I have shot several air shows back in the film days and now more than a dozen in digital. I’m certainly not an expert, but here are a few tips I have found through trial and error.
Don’t sit in bleachers or areas with tight packed seating. Take a folding chair, arrive early and stake out a location as close as possible. Or skip the chair and roam around. If there is a special photographer’s option, it’s definitely worth the extra money.
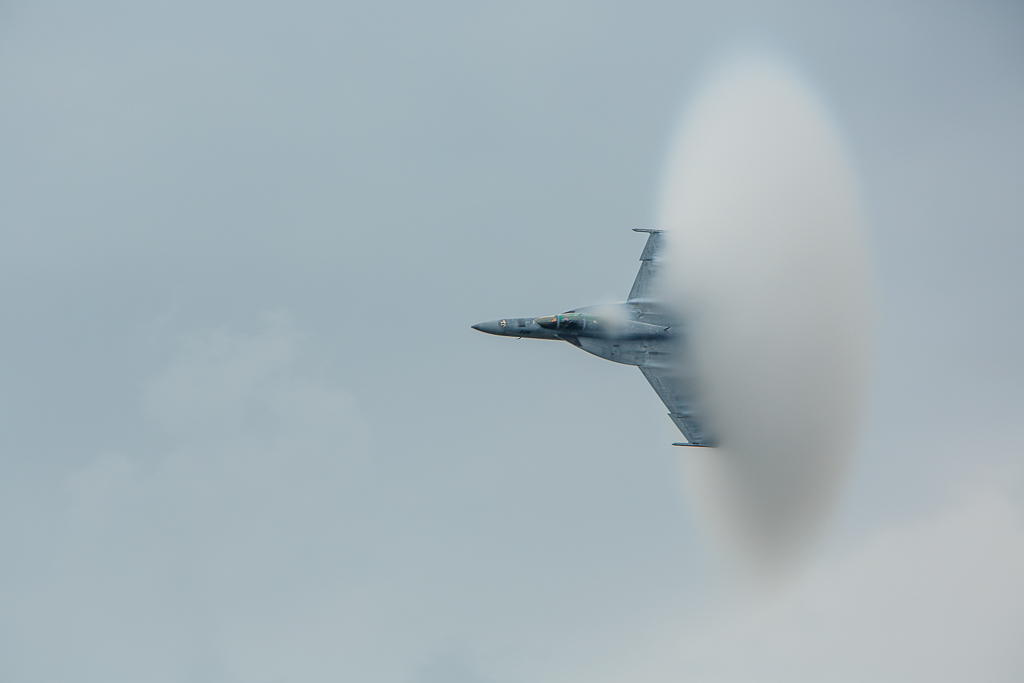
If the air show is scheduled for 2 days, plan on attending both days. At night review your work from the first day, so you can correct your mistakes or get the shots you missed on day one. Also one day may have better weather than the other, or prettier skies. Even bad weather can work to your advantage. High humidity or even light mist can create visible cone shaped “vapors” as a jet approaches 700 MPH. They last a split second, so shoot at a high frame rate when conditions are right for this effect.
Panning is a critical skill for air show photography and you need to practice beforehand by shooting moving cars, bikes, birds or animals. Remember to pan smoothly with the aircraft, and don’t stop your pan as you shoot. Shooting at your camera’s highest frame rate will make it more likely that least one shot out of a sequence will be acceptably sharp. There will be lots of blurred shots, so remember it only takes one good shot.
For most photography, you’ll want the very longest lens that you own, particularly for solo acts. A 100-400mm lens is a good zoom range. For formations of three or more planes, a 70-200 on a crop sensor or with a 1.4 teleconverter may work. Image stabilization or vibration reduction can be a real help. Forget the tripods and even monopods for planes in flight. You’ll be panning so quickly that hand held is the way to go. For static displays you may want wider angle lenses. If you have access before the crowds you may be able to use a tripod, but for safety don’t attempt to use it in a crowd.
Make sure your camera’s autofocus is set for moving subjects. On Canon cameras this is AI Servo and on Nikons it is AF-C. Make sure you are not on single shot focus mode, and double check that autofocus is not turned off on the lens. Every professional I know uses back button focus, where the focusing function is reassigned from the shutter button to a rear button. Check your manual for how to do this.
Make sure your camera and sensor are clean, your battery is fully charged, and your card is empty and formatted. Large capacity cards like 32GB can be very useful. Make sure you have extra cards and batteries. Many air show prohibit backpacks and camera bags, so make sure you can carry what you need on your person.
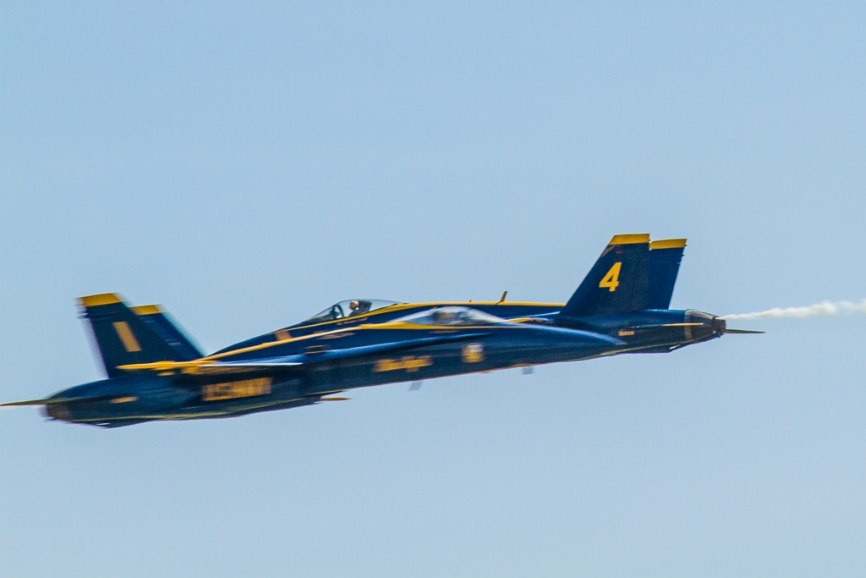
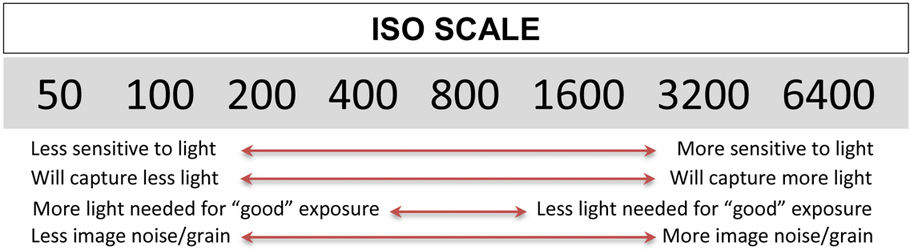
For jets, you will want a fast shutter speed, 1/1000 sec or faster. Even at this shutter speed, you need to practice panning smoothly to minimize blur. At 600 MPH a jet is moving almost 1000 feet for second. At 1/1000 shutter speed it will move 1 foot and be blurred without smooth panning. I usually use shutter priority, 1/1000, and set an ISO that will allow f/8 or f/11. On a clear day this is usually ISO 200 or 400. On a cloudy day I may even need ISO 800. For crossing shots where two jets are each flying 600MPH toward each other, closing speed is 2000 feet per second. You must be panning on one plane and begin firing on burst mode as they approach each other. If you wait until you see both planes in the viewfinder, you have probably already missed the shot. If you try to anticipate where the aircraft will cross and hold steady on that point both will be blurred. I will say that even with a fast frame rate, there is lots of luck involved.
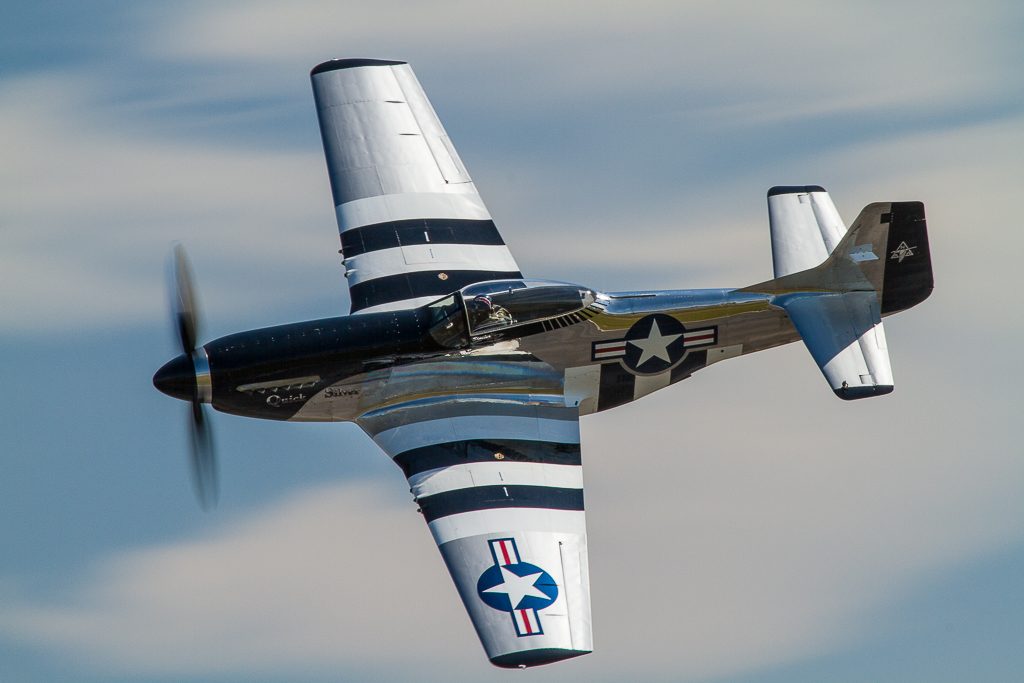
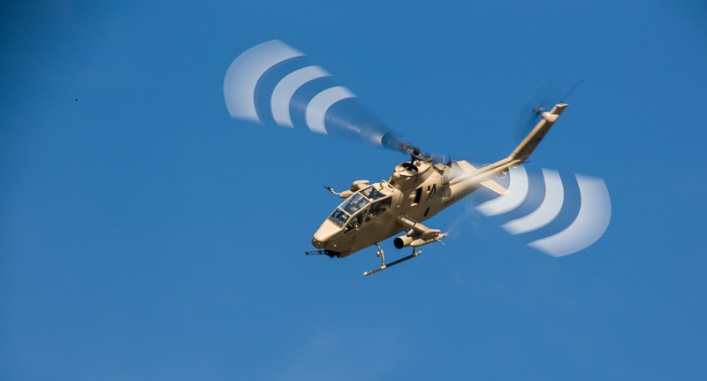
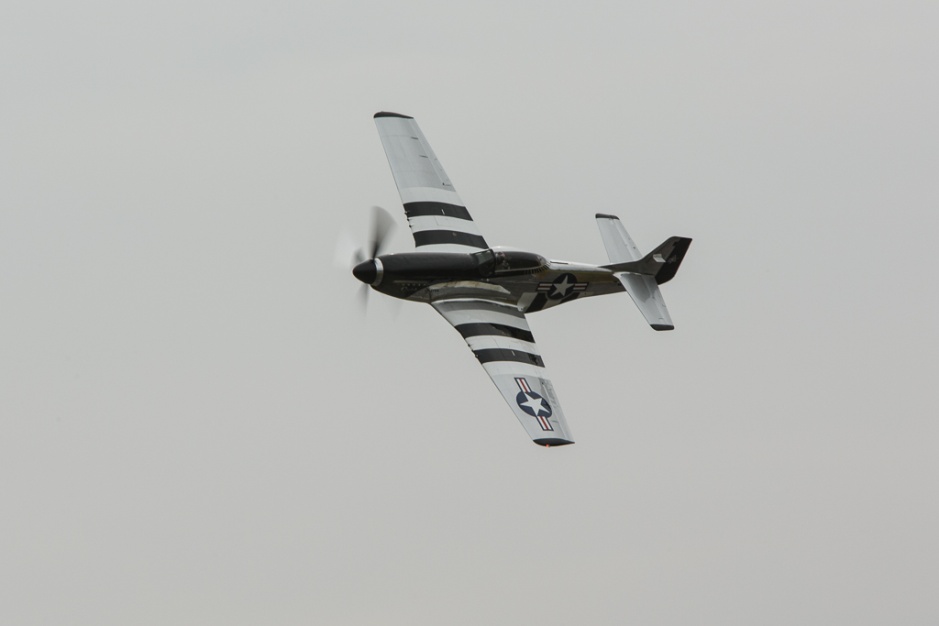
For prop planes, you do not want a fast shutter speed, as it freezes all propeller movement and looks very unnatural. Something between 1/30 and 1/80 will create a full prop circle or close to it. At these speeds panning is essential, and even with practice you will still have lots of blurred shots. 1/100 to 1/200 will still show enough prop blur to be believable. I usually use shutter priority, 1/30 to 1/100, and set an ISO that will allow f/8 or f/11. On a clear day this is usually ISO 100 or 200. On a cloudy day I may even need ISO 400. For helicopters, a shutter speed of 1/30 second or slower is required to blur the rotor blades. Even with good technique, expect lots of rejects.
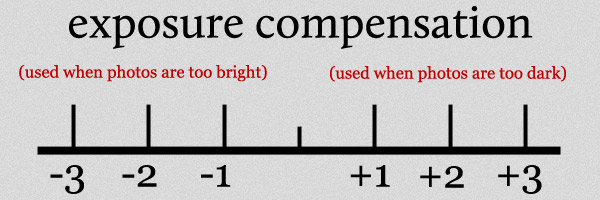
Exposure can be difficult, particularly if you are shooting into the sun, in bright gray overcast, or if the aircraft are in front of bright white clouds. Shoot some test shots and review before the flights that you are most interested in. I find I’m often at +2/3 or even + 1 full stop.
Non Photography Tips
HYDRATE! At most shows you are in direct sun for the duration and it is easy to dehydrate. At the last air show I attended, there were several medical emergencies due to dehydration, and the temperature was only in the mid 80’s. Drink plenty of fluids before entering the venue. Most shows prohibit coolers and outside food and drink, so bring money for food and drinks from the vendors.
Use sun protection. Large hats, long sleeve shirts, sunscreen and sunglasses are all useful. Don’t forget sunscreen on the back of your hands. You don’t want sunscreen on your fingers or palms as this may damage your camera’s finish. Dressing in layers and wearing moisture wicking fabrics can keep you cool in hot weather or warm in cool weather. You will probably be on your feet most of the day. Wear comfortable, sturdy shoes.
The Opportunities
There are several air shows held in Georgia and Tennessee. The Great Tennessee Air Show is held annually in June in Smyrna and the recent show featured the Blue Angels. Wings Over North Georgia in Rome, GA is held each fall and Usually features the Blue Angels or thunderbirds and numerous other acts.. This is one of the few air shows I know of that has special passes available for photographers. Photographers have a tent and seating close to the flight line, drinks, and private restrooms. Also reserved parking, and early morning access to photograph the static displays before the crowds arrive. There are a limited number of passes available and they are worth the extra cost.
The Blue Angels practice on Tuesdays and Wednesdays in Spring and Summer at the Pensacola Naval Air Station Museum. When you get there, see one of the guides for access to a separate area for photographers. It has never been crowded when I’ve been there. See the official web site for dates and times.
2021 Foreward When I was doing my original “Basic Photography” series I put off writing about composition for a long time because I knew it was going to be a difficult article to write. There are whole books written on composition, so it’s difficult to do justice to this important subject in one article. And as you’ll see, composition is very subjective. If you’ve read (and done the exercises) the articles on exposure, aperture, and shutter speed, this article should round out a basic intro to photography.
In this article I’m going to talk about photographic composition. It is undoubtedly one of the basic foundations of photography, but one of the hardest to define, understand and master. Most of the photography basics can be evaluated objectively; within limits, a photograph is well exposed, it’s either sharp or it isn’t, the color balance is right or it isn’t. But composition is subjective; there is no absolute right or wrong composition. No two photographers will see and compose a scene exactly the same way. It is why on a field trip five photographers can stand shoulder to shoulder and get five very different images.
When we talk about photographers “having a good eye”, we’re referring to their ability to compose a photograph in a way that effectively guides the viewer to see what they want you see. Some lucky photographers seem to just naturally have a good eye, it’s intuitive and instinctive for them. They make fast progress learning, because the technical aspects are relatively easy to learn. Others master technical concepts quickly, or trust their camera to properly expose and focus, but their progress is slower because they haven’t learned to see photographically yet.
“There are two people in every photograph: the photographer and the viewer”― Ansel Adams
And even different viewers will see a photograph differently. Photographers see an image differently from non-photographers. A portrait photographer and the model see an image in very different ways. People from other parts of the world will look at photos differently. We read left to right, so we tend to scan images left to right. In countries that read right to left, viewers will scan images right to left and thus see an image much differently than we do.
Definitions
“Composition is the strongest way of seeing.” —Edward Weston
Composition describes the placement of objects and elements within a photograph. Those elements include line, color, texture, pattern, form, shape, and light. We can use principles such as relationship and perspective, balance, contrast. simplicity, rhythm and flow, and unity and cohesiveness to help arrange the elements.
I look at composition as using all of our photographic tools to guide our viewers through the photograph. Ideally, we want to lead the viewer through the image to our subject and hold his interest. We want to keep our viewer’s eyes within our image and not lead his eyes out of the image.
Composition begins before we shoot.
Whether we actively think about it or not, composition begins before we even look through the viewfinder. Our choice of lens focal length, aperture, and shutter speed and whether we shoot vertically or horizontally all effect the composition. Most important is deciding what our subject is, and what other elements to include or leave out and how to arrange them. In some types of photography like portraits and still life, we have the ability to move and arrange our subjects. In other areas we can’t arrange the elements, but we can move our camera to change the viewpoint, and the relationship of objects within the image.
“A good photograph is knowing where to stand.” —Ansel Adams
The “RULES”
“The code is more what you call guidelines than actual rules” –Captain Barbosa, Pirates of the Caribbean
You will hear and read about the rules of composition, and many of them are contradictory. If the rules were hard and fast, there would only be one right way to photograph a subject, and we all know that’s not the case. Some will say rules are meant to be broken, but realize that it’s usually more effective to understand the rules before you break them. Think about these “rules” as guidelines as you look through your camera and think about what your subject is and how you can direct your viewer’s eye through the image to the subject and keep it within the image.
Avoid centering your subject.
“Dead Center is Deadly” – Rick Sammon
Dead center or bull’s-eye composition is often the first choice for the beginning photographer. It’s so easy to place the subject in the center focus point (after all we do want it in focus don’t we) and leave it there. The problem is that it generally presents a static image with no interest or sense of flow or movement. However, some subjects really seem to demand a centered viewpoint, but break this rule carefully.
Rule of Thirds
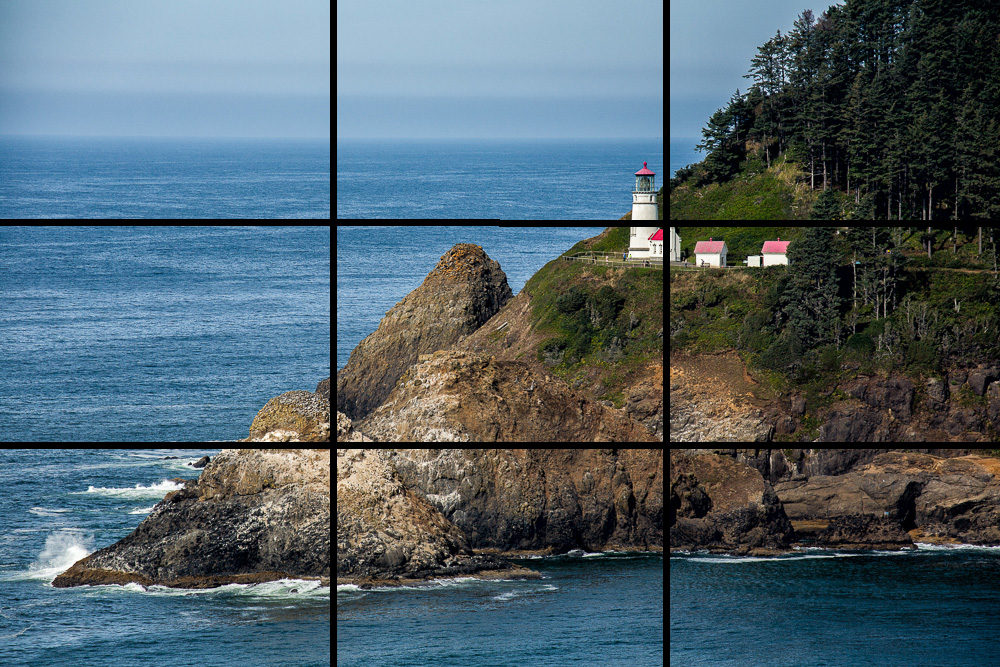
In the rule of thirds, grid lines divide the image frame into thirds horizontally and vertically. The four intersections of these lines are “power points” that tend to draw the eye. Thinking of the rule of thirds helps avoid the dead center look.
Here you can see and feel the difference in centered and rule of thirds composition. Which is more interesting and dynamic?
Leading Lines
Lines have a powerful ability to lead our eye through a photograph. In particular “S” and “C” curves create a graceful flow. Be aware that the wrong lines may also draw your viewer right out of your image.
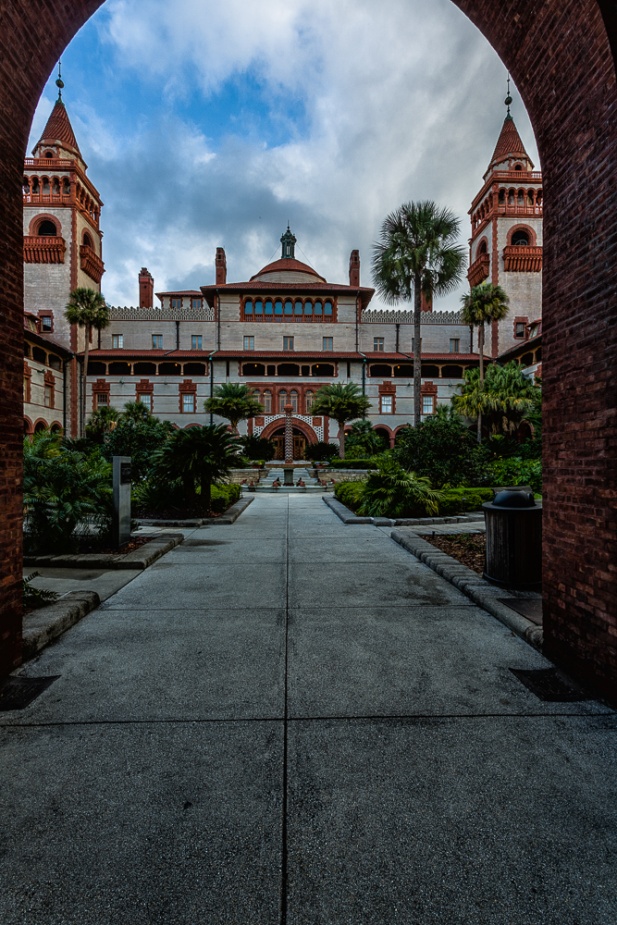
Framing
Finding a natural frame through which to shoot your main subject can focus the viewer’s attention and keep it from wandering out of the image.
Contrast and Color Contrast
The eye is drawn to the area of greatest contrast. So in a dark photograph the eye will be drawn to the lightest element, and in a bright photograph the eye will be drawn to the darkest element. Also in a photograph with very little color, the eye will be drawn to the most intense color.
Fill the Frame
“If your pictures aren’t good enough, you aren’t close enough.” Robert Capa
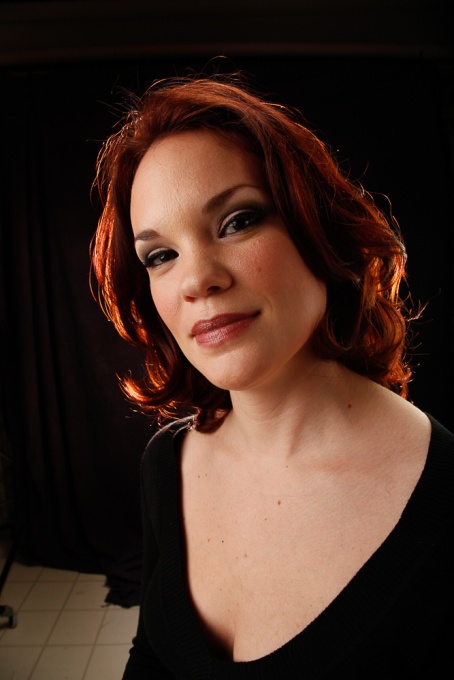
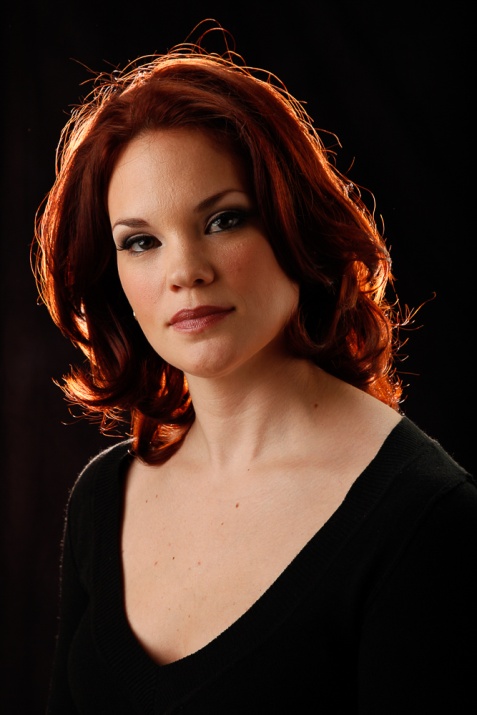
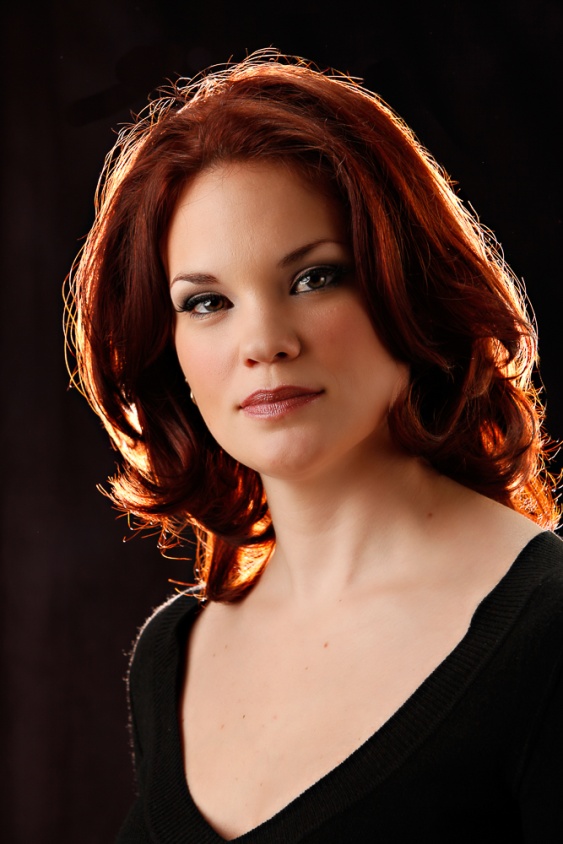
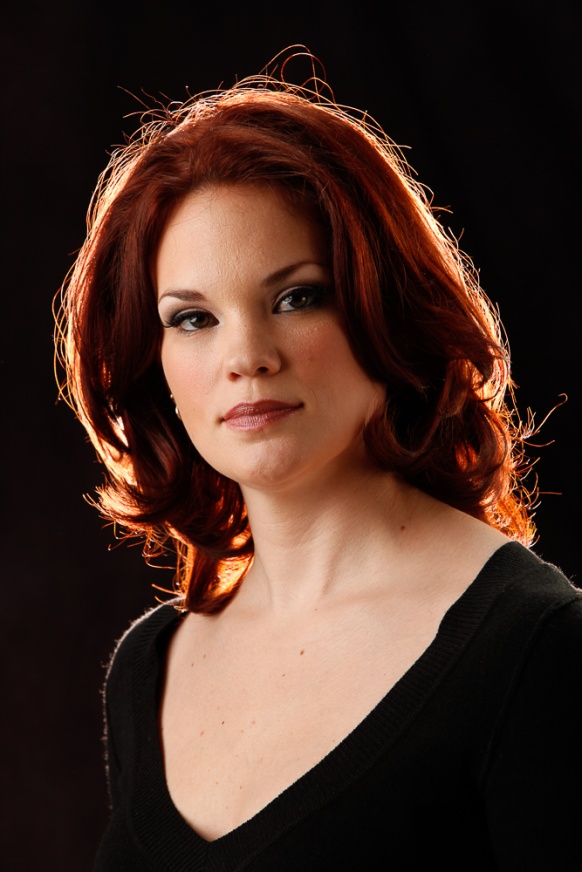
One way to emphasize your subject is to eliminate anything that doesn’t add to the main subject. There is no wasted space around the subject. Look at the first portrait and look at how much wasted black space surrounds the subject. It’s also dead center. The second portrait completely fills the frame.
Negative Space
This would seem to completely contradict the rule about filling the frame, but sometimes it is effective to have a lot of space surrounding the subject. It should be relatively simple and not detract from the subject.
Patterns
Repeating patterns tend to draw and hold the eye. A repeating pattern with one small break can be very effective at creating interest.
Symmetry
This would seem to directly contradict the rules about not centering the subject and the rule of thirds. Yet some subjects almost demand symmetry. Architecture and head on views of cars come to mind. and If you use it make sure your subject is as symmetrical as possible. A picture that is almost, but not quite symmetrical looks like an accident.
Rule of Odds
If there is more than one subject, odd numbers tend to be more interesting than even.
Simplicity
Have you ever looked at a picture that was just so busy it was hard to tell what the subject was supposed to be? Often a much simpler picture has more impact. Here are two photos from Sloss Furnaces taken on the same trip. Does the simple picture tend to hold your eye more than the very busy picture?
Balance
Balance means balancing an object in one part of the frame with an object of similar weight in the opposite part of the picture. Visual weight may be based on size, color or brightness.
Give Subjects Space to Move
If there is a subject that should be moving the eye tends to anticipate where it will be going and move in that direction. If the moving object (or person or animal) is too close to the edge of the frame, the eye goes right out of the frame. Generally, a moving subject should have more room in front of it than behind.
Subjects Should Be Looking into the Frame
It’s natural to follow the gaze of people and animals. If they are near the edge and looking out of the frame, the eye tends to go right out of the picture. If the eyes are toward the center of the frame, the viewer will tend to stay within the picture. In the first picture below, whichever horse and rider you look at, your eye is directed to stay within the photo. In the second photo, through the magic of Photoshop both horses and riders have been turned around. Look at either horse and rider and your eye immediately leaves the image.
Border Patrol
Though this isn’t often listed as a rule of composition, it’s important none the less. Check the edges of your image for items protruding into the frame without a source and with no reason for being there. This is a common mistake in landscapes. In the picture below, the bare branch comes out of nowhere and pulls the eye. The larger leafy branches obviously belong to a large tree and have more reason to be there, and they actually act as a framing device.
Keep the horizon level
A horizon line that is not level is very unsettling The image below is only two degrees off level, but it feels very wrong compared to the level image. Either level your camera carefully when you shoot, or straighten it in post production.
Don’t Center the Horizon
A perfectly centered horizon tends to create a static composition. Generally if the interest is in the sky, put the horizon along the lower third. If the interest is in the foreground, put it along the top third. The exception is an image with reflections where a centered horizon is much more acceptable.
Use Foreground Objects to Create a Feeling of Depth
Having a strong foreground object, particularly with a wide angle lens can create a greater feeling of depth and dimension. Not having a foreground makes a flatter image.
Crop Happens
A lot of photographers seem to have the belief that they should not be cropping their images. Or that even if they crop, they must conform to their camera’s format or to the “standard” formats like 8×10 or 11×14. Not all images fit perfectly into 2×3, 4×3, or 4×5 formats. Cropping can remove non essential parts of the image to concentrate attention on the subject. Often we can’t photograph a subject without including things we don’t want in the picture, and good cropping can make a huge improvement. Think of cropping as a second chance to get you composition right. Let your artistic judgement decide the cropping and aspect ratio. Remember that if something in your image isn’t helping to focus attention on your subject, it’s probably distracting and needs to go.
I often find a wide aspect ratio looks more dramatic and is a good way to focus attention on a wide subject while eliminating distracting foregrounds and backgrounds.
When you have an image that could work as a horizontal, or vertical image, try a square crop. It’s worked for Hasselblad for decades.
Practice Exercises
Even if you aren’t one of those naturally gifted photographers with a “great eye” you can definitely improve with some training and practice. Here are a couple of exercises to get you started.
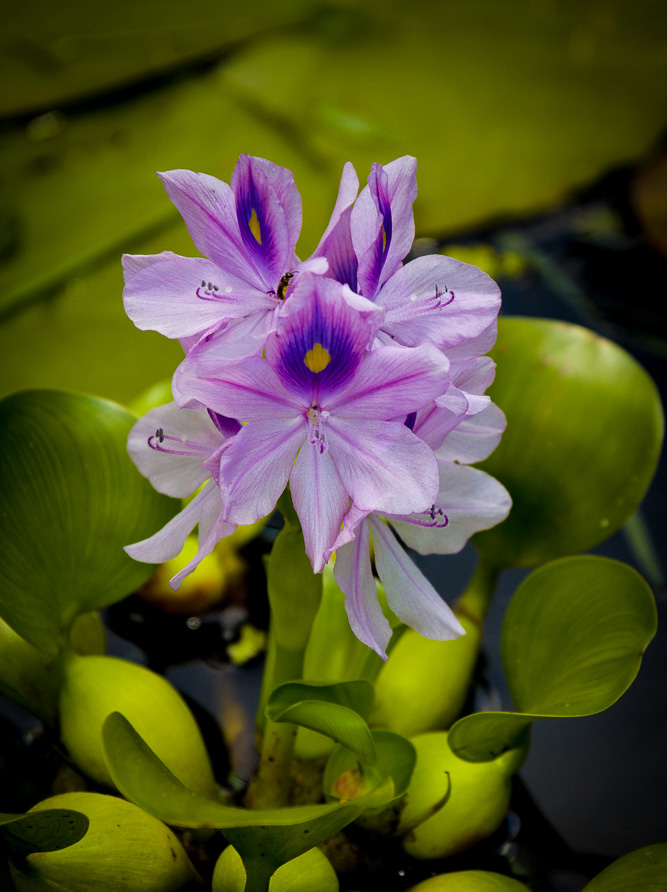
1) Get an object like an artificial flower and put it in front of a plain wall or background. Photograph it horizontally with the bloom in each corner, at each of the rule of third “power points” and dead center. Repeat vertically.
2) Add a second flower. Place one of the flowers on one of the power points, and then move the other flower to each of the other power points and dead center. Do this exercise in horizontal and vertical formats.
3) Pick a subject and photograph it so that it doesn’t fill the frame. Then zoom in and/or move closer and take another shot. Repeat until the whole image doesn’t fit within the frame. Try different cropping formats to move your subject around in the image.
4) Shoot a landscape or cityscape fairly loose and then in your editing program try cropping in different formats and moving the scene around.
5) Find 10 of your pictures that you like, open them and concentrate on how your eyes move through the picture. It would be helpful to make prints and actually mark your visual path on the print or draw it in Photoshop. Also look at the image and see which of the above rules help guide your eyes.
6) Go to a good photographic site like 500PX and find images that appeal to you. Analyze them as above, looking for which rules might apply and how your eyes move through the image.
7) Go out and shoot 10,000 photos. “Your first 10,000 photographs are your worst.” ― Henri Cartier-Bresson
In last month’s article I talked about lenses, focal lengths, and perspective. This month I thought I’d take it a step further and talk about lens selection for portraits or any people pictures for that matter. Some would say that shooting portraits is beyond basic, and they might be right. But at some point, even beginning photographers will take photos of people and lens choice may make the difference between a good or bad shot; it could mean the difference between a flattering portrait and an unflattering portrait. Poor lens choice could even add weight to your subject, and then you know you’re going to be in trouble.
Head and shoulder portraits
This is what many people think about when they think of portraits. This is probably the area where lens selection is most important because the wrong lens can distort the facial features. Last month we discussed how placing a wide angle lens close to a subject exaggerates perspective and the difference in size in near and far subjects. These same effects happen with a face; we have the tip of the nose close to us, the eyes a bit farther back and the ears still further back. Add to that the fact that many people don’t enjoy being photographed, but anyone would hate having a camera stuck right up in their face. A comfortable shooting distance for most people is 4 to 6 feet. Shoot closer than this and not only will you have distortion caused by unnatural perspective, but you will have invaded your subjects personal space and made them uneasy if not mad.
Again I’m going to refer to focal lengths as if they were a full frame camera. If you use a crop body camera convert the focal length I’m using by dividing by your camera’s crop factor. For example if I’m using a 100mm lens on a full frame camera, for a camera with a 1.6 crop factor the equivalent lens would be 100/1.6 or about 62mm.
The focal length best suited for head and shoulder portraits is usually in the 90-135mm range. One of my favorite lenses for tight headshots is the 100mm macro lens. Shorter lenses tend to exaggerate the length of the nose and chin, while lenses that are too long tend to compress the face, causing it to lose its three dimensionality and look heavier.
Below is a series showing the effect of varying focal lengths on a tight portrait.
Figure 1 A 24mm shows very unflattering distortion of the face
Figure 2 At 50mm distortion is less, but the nose is still large.
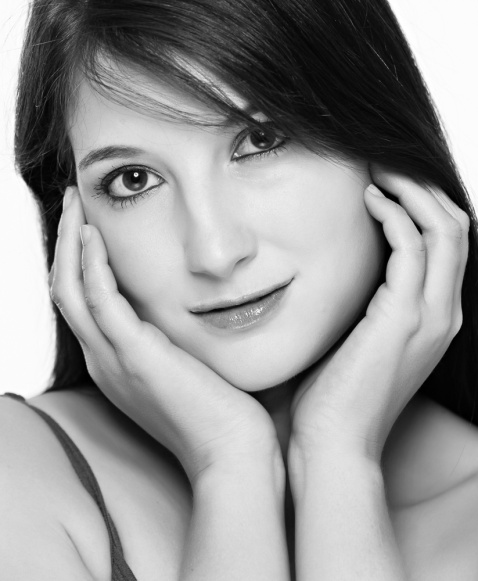
Figure 3 By 85mm we are close to a good perspective and the camera is a comfortable distance from her face.
Figure 4 100mm is in the range that many photographers believe is ideal for tight portraits. There is no unflattering distortion.
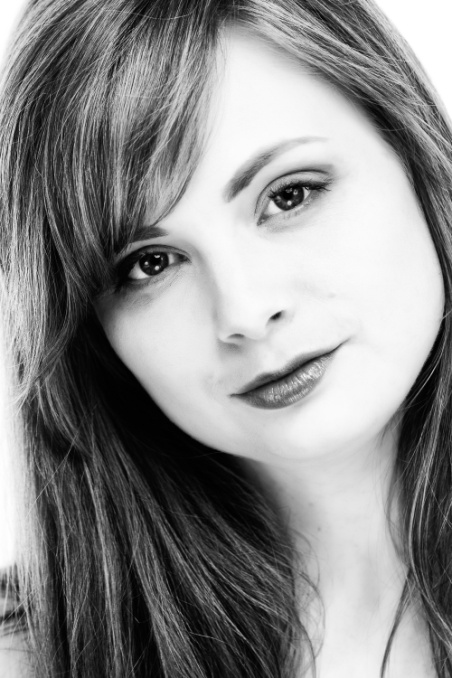
Figure 5 135mm is also in the range that many photographers believe is ideal for tight portraits. Again there is no unflattering distortion.
Figure 6 For some faces 200mm may compress the features too much. Compare this with the 100mm or 135mm shots and the face seems a bit heavier.
Figure 7 For some faces a 200mm can work well.
Figure 8 For some faces a 200mm can work well. This model has a long neck and narrow nose.
1/2 to 3/4 body shots
For shots where the frame is filled by 1/2 to 3/4 of the body height 50 to 80mm works well.
Figure 9 This is roughly a 3/4 length shot at 70mm.
Full length body shots
For shots where the frame is filled or nearly filled by the body height 35 to 80mm works well.
Figure 10 35mm works for this full length shot.
More than full length
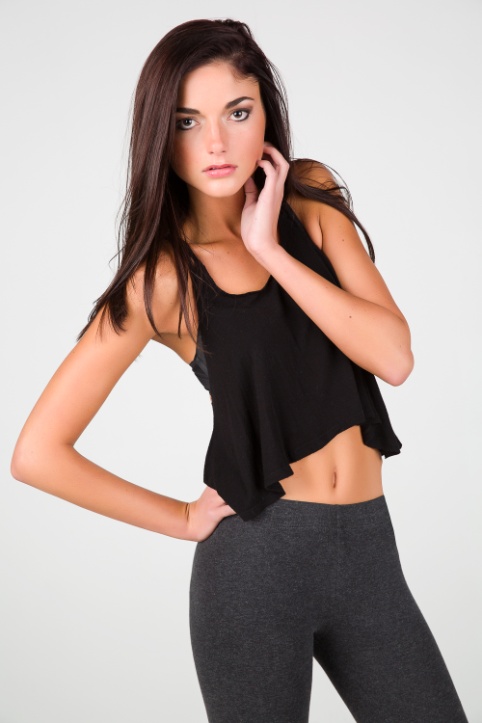
When the whole body doesn’t come close to filling the frame even wide angle lenses can work well.
Figure 11 Since the two men are not close and are small in the frame a wide angle will not cause distortion.
Breaking the normal rules
There are times you want a different visual effect, or are limited to shooting in a tight space or don’t have the right lens available. It is possible to use wider than recommended lenses and still make an effective picture.
Figure 12 My model wanted the apple to be prominent in the picture and a 17mm lens did that. Notice that her body proportions are exaggerated, but this was OK for the shot she had in mind.
Figure 13 It was necessary to use a 19mm lens to get the right perspective of the teeth and hygienist.
Figure 14 This model wanted her skateboard to be the main focus of the shot. 19mm makes her feet look disproportionate to her head and shoulders, but the shot says “skateboarder”
Figure 15 With the model squatting down, this is probably a 1/2 body shot, and even though it is a bit wide, 35mm worked.
Figure 16 A narrow staircase forced me to use a 24mm lens, but by keeping the camera parallel to the subject and at waist level I was able to minimize distortion.
Soft focus Lenses
It isn’t always necessary or desirable to have everything razor sharp in an image. Soft focus lenses create flare that decreases sharpness and contrast in a way that is hard to duplicate in post processing. The only fully auto focusing and auto exposure lens I know of is the Canon 135mm soft focus lens. It can be set to shoot at normal sharpness or used at varying degrees of softness.
I also have two old, cheap and totally manual lenses that have to be adapted to my camera by the old T-mount adapter system. One is the all plastic Sima 100mm soft focus lens. This lens slides in and out to focus, and has two plastic inserts to change the aperture. I also have an old Spiratone Portragon lens. It is an all metal 100 lens that also uses the T-mount system. I don’t use these lenses very often, but they have a unique effect and also can give an antique look to a picture. Neither of these lenses are still in production, but they sometimes show up on EBay or at used camera stores. They can be adapted to virtually any camera with the right T-mount.
Figure 17 Shot with the 100mm Portragon lens. It is no longer made, but used ones turn up occasionally. I used B&W, sepia toning and a vignette to make it look like an antique picture.
A Cheat sheet for focal lengths for portraits
Here is a table with recommended focal lengths. In general it is better to use a lens that is too long rather than too wide as long as you have room to frame your subject properly.
Size
Full Frame
1.5 crop Nikon
1.6 Crop Canon
2.0 crop micro 4/3
Head and shoulder
90-135mm
60-90mm
55-85mm
45-67mm
1/2 to 3/4 body
65-85mm
43-60mm
40-53mm
32-42mm
Full length
35-50mm
24-35mm
22mm-32mm
17-25mm
More than full length
24-35mm
16-24mm
15mm-22mm
10-18mm
Practice assignment
1) If you can find a willing portrait subject, photograph them in tight portrait, waist length and full length views with wide, normal and telephoto lengths and notice how the lens affects the look of each type of picture. Do not show these to your subject, since we know many of these will not be flattering. Even with an explanation, someone is very likely to get their self esteem hurt, whether they say so or not. It is not worth risking hurting someone’s self image. Just explain that these are a test, and NOBODY but you will ever see them.
2) Shoot with a wide or very wide angle lens to show the subject in his or her environment or to use distorted perspective creative. Again don’t show these pictures.
In this article I’ll be talking about lenses and how they affect the look of your photos. Most DSLR’s are sold with a zoom lens, and the first accessory many photographers buy is an additional lens, so it is important to understand what different lenses can do.
Basic definitions
Focal length is the distance in millimeters (mm) from a lens to the point where light rays passing through it converge. With modern lens designs with multiple elements, this definition gets somewhat blurred (bad pun totally unintended.) A better working definition for photographers is based on what the various focal lengths do optically. The longer the focal length is, the narrower the angle of view, and the more objects appear to be magnified. The shorter the focal length, the wider the angle of view and the lower the magnification.
Effective focal length depends on the crop factor of the camera which is a function of sensor size. The effective focal length of a lens is its focal length times the crop factor. So a 100mm lens on a full frame camera (crop factor is 1) would have an effective focal length of 150mm on a Nikon crop body (crop factor 1.5), 160mm on a Canon crop body (crop factor 1.6), and 200mm on a micro 4/3 camera (crop factor 2). For the rest of this article, I will discuss focal length as it relates to a full frame camera. You can do the math to see how a lens of a given focal length would look on your particular camera.
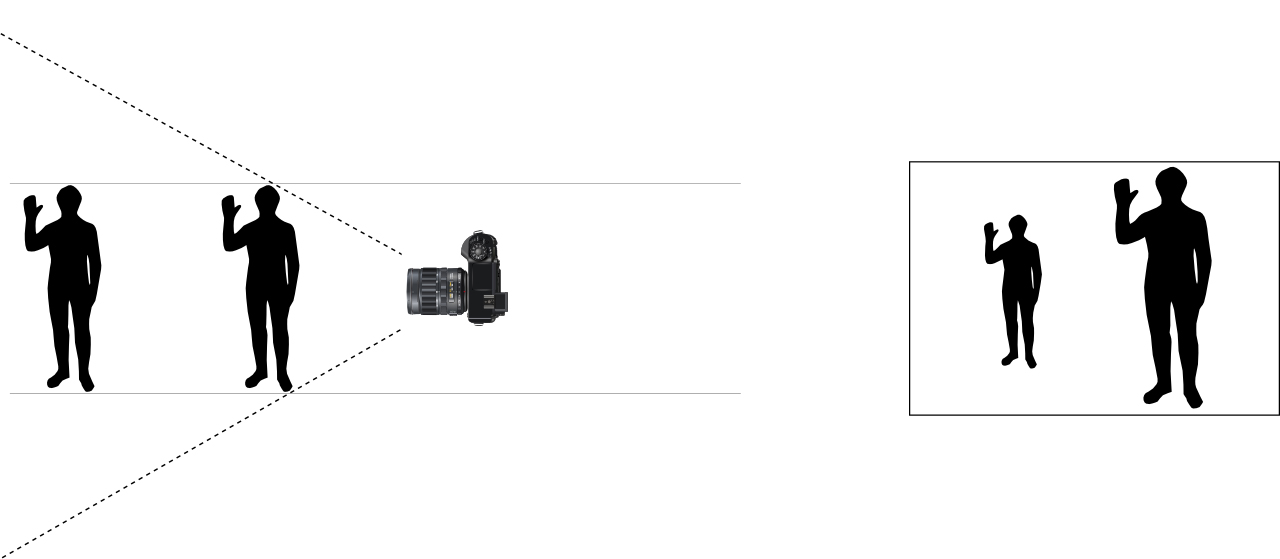
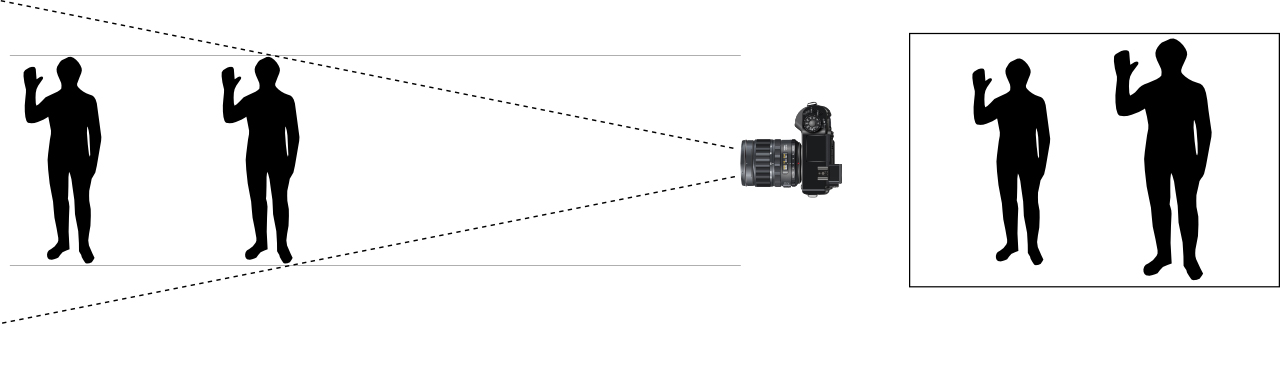
Perspective is the feeling of distance between near and far subjects. You can also think of it as the relation between the apparent size of near and far objects. Perspective is purely a function of the camera’s distance from a subject. If you take a picture from the same position at different focal lengths, the size of the main subject will change, but if you enlarge or reduce the images so that the main subject is the same size, you will see that the relationship of objects in the picture does not change. On the other hand, as you change focal length and move closer to or farther from your subject to keep the subject size the same, perspective varies greatly. Shorter focal length lenses (wide angle) exaggerate the distance between objects and the increase relative size differences. Longer focal length lenses (telephoto) compress the distance between objects and decrease relative size differences. When you hear someone talk about the “wide angle perspective” remember that it is not due to the lens so much as it is that the wide angle of view allows the camera to be close to the subject and that makes the subject appear large in relation to more distant objects. When you hear “telephoto perspective” it is not the lens’ focal length so much as it is that the lens allows the camera to be farther away from the main subject, and background objects will appear large in relation to the main subject. To summarize, you change perspective with your feet, you change the look of a photo with lens selection.
Figure 1 Short focal length lenses have a wide angle of view. When the camera is close enough to the front subject to make him appear large, the background subject appears much smaller.
Figure 2 Longer focal length lenses have a narrow angle of view. With a longer lens, the camera has to be moved back to keep the front figure the same size. However, now the background subject does not appear to be as small or distant as with the wide angle shot
Prime lenses are lenses with a single focal length. They are usually faster ( larger aperture) zoom lenses. They may also be slightly sharper than a zoom lens, but with good quality lenses, this difference isn’t as great as it once was.
Zoom lenses are adjustable to cover a range of focal lengths. So for example a 24-105mm lens can cover every focal length between 24mm and 105mm. They can be much more convenient and lighter than carrying several prime lenses and having to constantly change lenses.
Lens markings give basic information about the lens. There is the focal length, either a single number for a prime (i.e. 50mm) or the range of a zoom (i.e. 70-200mm). The aperture is given as a single number for lenses with a constant aperture (i.e. f/2.8) or as a range for zoom lenses that do not have a constant aperture (i.e. f/3.5-5.6). In this case the aperture becomes smaller as the lens is zoomed from the shorter focal length to the longest. The diameter (i.e. 77mm) of the lens is included to indicate what size filters and accessories screw onto the lens.
Types of Lenses
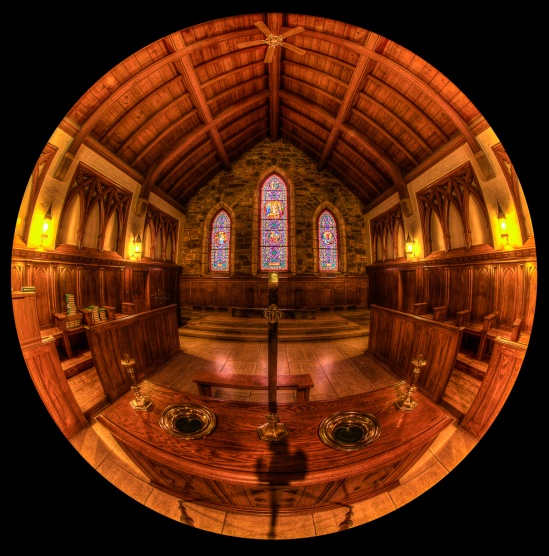
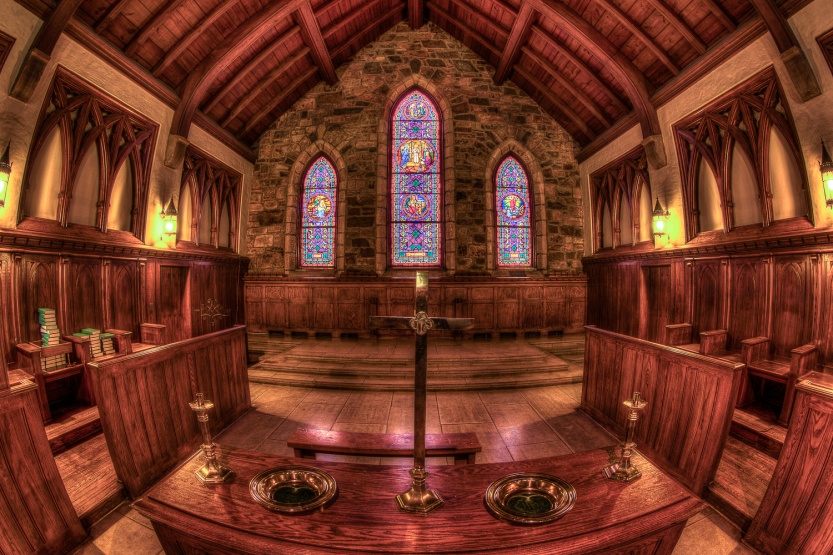
Fisheye Lenses have an angle of view of 180o. They range from 8mm to 15mm, and create considerable curvature and distortion. At 8mm, they do not cover the entire sensor and create a circular image. At 15mm they cover the entire sensor area and fill the frame, but still cover a 180o angle of view and still create distortion. With a 180o angle of view it is possible to get the tripod feet or your feet in the picture. Make sure you wear matching shoes and socks.
Figure 3 A 8-15mm fisheye lens at 8mm does not cover the whole sensor and creates a circular image.
Figure 4 A 8-15mm fisheye lens at 15mm covers the whole sensor and creates a full frame image. Notice the extreme curvature of lines typical of fisheye lenses in both shots.
Ultrawide Angle Lenses have focal lengths of less than 24mm. Lenses of very short focal length (less than 15mm) may cover a very wide angle of view without being a fisheye lens. Objects toward the edges of the frame may appear distorted, although not as heavily curved as a true fisheye lens. These lenses can have a powerful effect on emphasizing distance and size of near and far objects. This can be used to create a strong accent on a close object, while more distant objects recede quickly in size and into the distance.
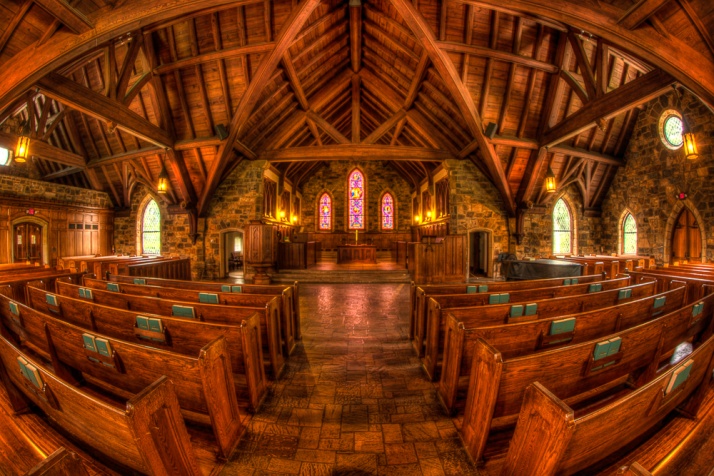
Figure 5 15mm with a fisheye. Notice the curvature.
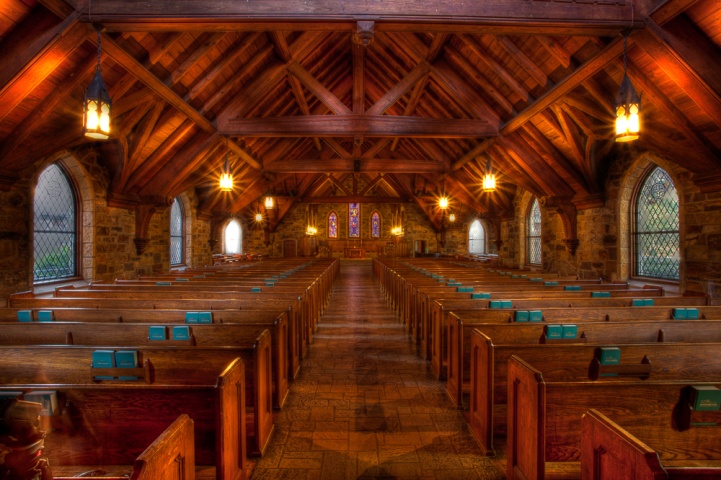
Figure 6 17mm with a non-fisheye lens. Just 2mm longer, but notice the absence of extreme curvature.
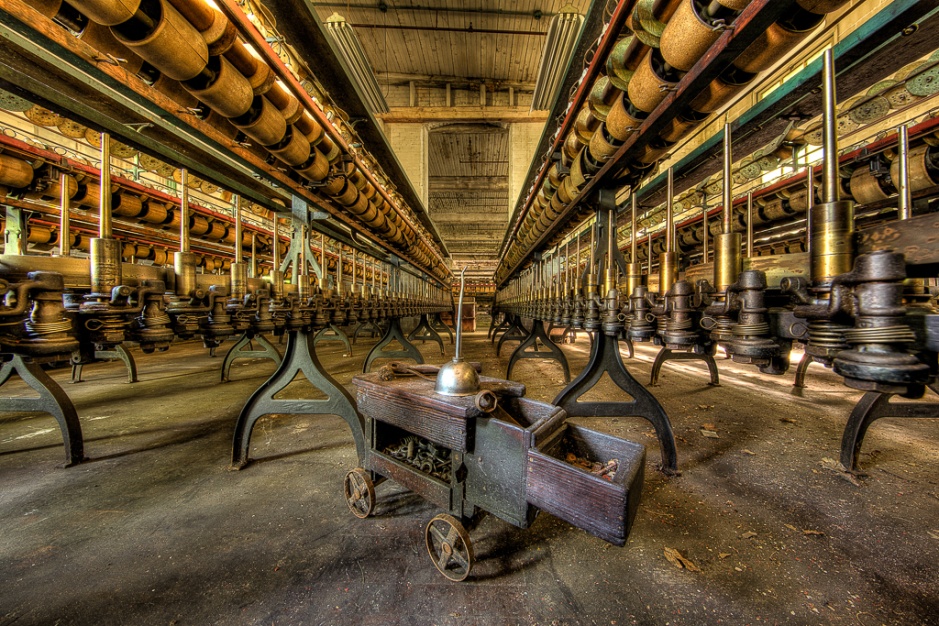
Figure 7 Taken at 11mm. Notice that even though this is a shorter focal length than the 15mm fisheye, there is no extreme curvature. Notice the great sense of distance as background objects appear smaller. From the tool box to the wall was only about 20ft.
Figure 8 Shot at 17mm. Notice how the distance between headstones seems large, and how size diminishes in the distant headstones.
Wide Angle Lenses have focal lengths between 24mm and 40mm. They also increase the distance and size of near and far objects, but not as strongly as the ultrawides. They and the ultrawides are often used in landscape and architectural photography.
Figure 9 Shot at 24mm. By shooting from close to the gas pump, it seems large in comparison to the old store.
Figure 10 Shot at 30mm. Shooting from close to the lion emphasizes the lion more than the bridge or sunrise.
Normal lenses have a focal length of between 40mm and 60mm. These lenses have roughly the same angle of view as our eyes and so they don’t strongly exaggerate distance or size relationships. Because they don’t create an unique viewpoint, they may produce less dramatic photos, unless the photographer uses composition and color to create the drama.
Figure 11 Shot at 50mm, this appears pretty much as the eye sees it.
Figure 12 50mm works well when we don’t need to create a dramatic perspective. In this shot, I didn’t want the truck too large or small in relation to the window.
Telephoto Lenses have a focal length between 70mm and 300mm. They compress distance and minimize size differences in near and distant objects. Their magnification brings distant objects closer and are often used when you can’t move closer to your subject. They are widely used in sports and wildlife photography.
Figure 13 At 300mm distance is compressed and all of the headstones appear close to the same size.
Figure 14 A budding sunflower in front of a full blossom at 100mm.
Figure 15 A budding sunflower in front of a full blossom at 500mm. Notice how close they appear and how much larger the back flower is at 500mm.
Super Telephoto Lenses have focal lengths greater than 300mm. Common focal lengths are 400mm, 600mm and 800mm. As the focal length goes up, so does the size, weight and cost. Super telephotos by the major manufacturers can easily cost over $10,000. They greatly magnify everything, including camera movement, so good technique, sturdy support, and fast shutter speeds are needed. These are used for birds in flight, major sporting events and situations where it is dangerous or impossible to move closer to your subject. They also tend to have a shallow depth of field that can useful for isolating subjects.
Figure 16 At 500mm the compression of a super telephoto makes the planes seem even closer to each other than they are.
Figure 17 500mm brings this osprey much closer than either of you would like to be in real life.
Macro Lenses are designed to create a life-sized or greater image of the subject on the sensor. they usually have a focal length of 50mm to 100mm. These are used for flower photography, insects, medical and scientific. They can also be used for general photography.
Figure 18 A 100mm macro captures sharp detail in the bug and even the hairs on the plant leaf.
Figure 19 A 100mm macro lens provides a close up view of a fly on a daylily.
Teleconverters are designed to attach between the back of the lens and the camera body. Typical converters are 1.4X and 2x. They increase magnification by their factor, so a 100mm lens becomes a 140mm lens with a 1.4X converter, and becomes a 200mm lens with a 2X converter. There may some loss of image quality, but more important is the loss of light. A 1.4X converter causes a 1 stop drop in light, and a 2X converter causes a 2 stop drop. They also decrease the effective aperture, and may make auto focusing impossible.
Figure 20 The effect of adding a 1.4X converter.
Your Practice Assignments
1) Set two identical objects on a table about 2 feet apart, one in front of the other, and just offset enough to see both. Place your camera about 2 ft away, focus on the front object, and shoot images at 28mm, 50mm, and 70mm. (Remember I’m using full frame equivalents, so on a Canon crop body that would be roughly 18mm, 30mm, 44mm.) Keep the distance constant, so a tripod may be useful. Look at the shots and notice that while the size of the objects changes, their relationship to each other doesn’t change. It may be easier to see if you use Lightroom or Photoshop to crop the images so the front object fills the frame in each image. Focal length doesn’t change perspective if the camera to subject distance is constant.
2) Leave the two objects set up as above. Set your lens to 28mm (or equivalent) and move your camera until the front subject fills the frame. Repeat at 50mm and again at 70mm. Notice how the relationship of the objects change. Camera to subject distance does affect perspective.
3) Do an internet search for “wide angle landscape” images. Notice how many of the most powerful images use a close object to create a sense of depth in the photo.
4) Do an internet search for “telephoto photography” images. Notice how the longer lenses compress distance and isolate individual subjects.
4) Do an internet search for images of any subject of your choice. Try to figure out if the photographer used a wide, normal or telephoto lens, and how it affects the look and mood of the picture.
In this article I’ll be talking about how cameras meter a scene to determine the proper exposure. The camera is making a lot of assumptions and calculations to determine what it thinks is a good exposure. It’s good to have some idea about what it’s thinking and when it may not be right.
First a quick bit of history and theory. There are basically two types of light meters, incident and reflective. Incident light meters measure the amount of light hitting the subject and are not influenced by the color and brightness of the subject. This can be very accurate, but to accurately measure the light on the subject, you have to be at the subjects position. That’s not always possible, and it doesn’t lend itself to fast spontaneous shooting. Unless your name is Neil Armstrong, how would you ever meter the moon? The other type of metering is what is found in our cameras, and that is reflective metering, which measures how much of the light hitting our subject is reflected back to our camera. The problem is that not all subjects reflect light equally. Light colored subjects and shiny surfaces reflect more light, and dark or dull surfaces reflect less light.
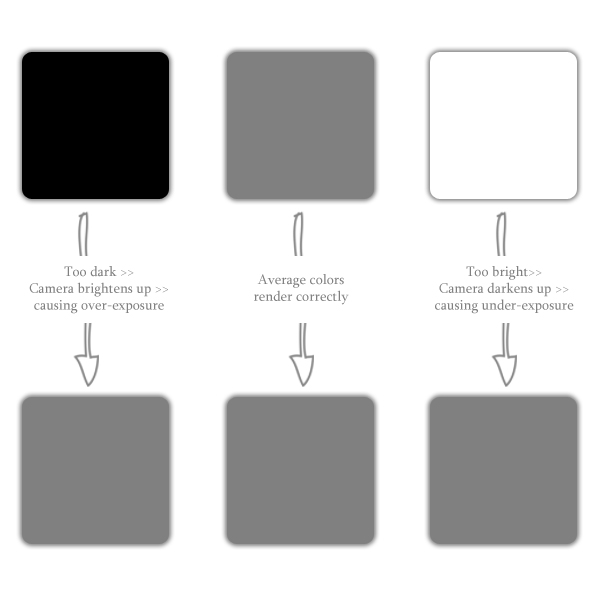
Reflective meters try to give a correct exposure by assuming that in an average scene roughly 18% of the light is reflected back to the camera. If you were to take this average scene, meter it and blend all of the image into one uniform tone and convert it to black and white, you would get “18% gray”, which is a light gray. So our camera meters are looking to average what they meter into this 18% gray which works well for “average” scenes, but how many of us want to shoot “average” pictures?
If a camera meter sees a solid white wall, it is going to meter it so it become an 18% gray wall. Likewise, it will make a solid black wall look 18% gray. Most of us don’t go around shooting solid white or black walls, but we do photograph light or dark subjects in front of bright or dark backgrounds. That’s where our understanding of meters, and our judgment and ability to adjust the exposure come into play.
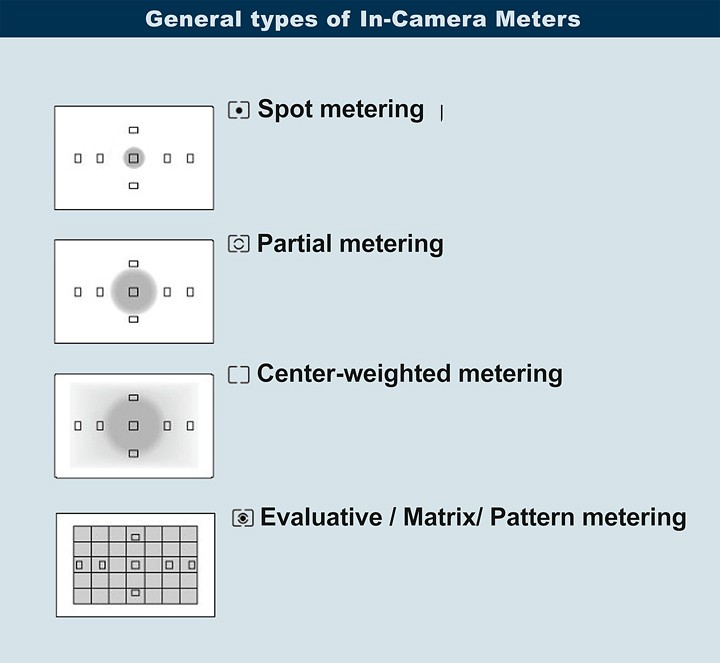
The early in-camera meters took a relatively broad area and averaged it out. A small subject against a light or dark background would often be exposed incorrectly. As meters have become more sophisticated, we have the ability to adjust how much of the scene the meter uses to average it’s exposure. Typical patterns are center weighted, which looks at the whole image, but gives more weight to a medium sized area in the center of the picture, partial area which ignores the outer areas of the image and just looks a medium area in the center, and spot which only uses the center 5%. The newest and most “intelligent” mode is evaluative (Canon) or matrix (Nikon) metering. This looks at several areas in the frame and compares what it sees to a data base of types of images that has been programmed in.
So, when do we use which mode or pattern? The short answer is it depends. It depends on what type of scene, what subject and how much difference there is between the subject and background in terms of exposure, and also relative size.
Evaluative (or matrix or pattern) is a good all around mode. When you don’t know what else to do start here. To be honest, that’s what I use 99% of the time. Fifteen years ago I would never have trusted a camera to have enough judgment to determine a good exposure because I was smarter than the average meter. Now I hate to admit that the camera is at least as smart as me if not smarter.
Center-weighted metering works well when your main subject is relatively large and in the center of the frame. It could work in backlit conditions or when your subject is in front of a light or dark background. The key here is that your subject should fill a large part of the center of the image. It may be fooled if your subject is much brighter or darker than “18% gray”.
Spot or Partial metering works when your subject is relatively small within the image. At times like this, you may not want the subject centered, but the meter only looks at a narrow area in the center. How do you correct for this? Center your subject so it is in the metered area, meter by pressing the shutter release halfway and the recompose without lifting your finger and then release the shutter. Again even this pattern may be fooled if your subject is much brighter or darker than “18% gray”.
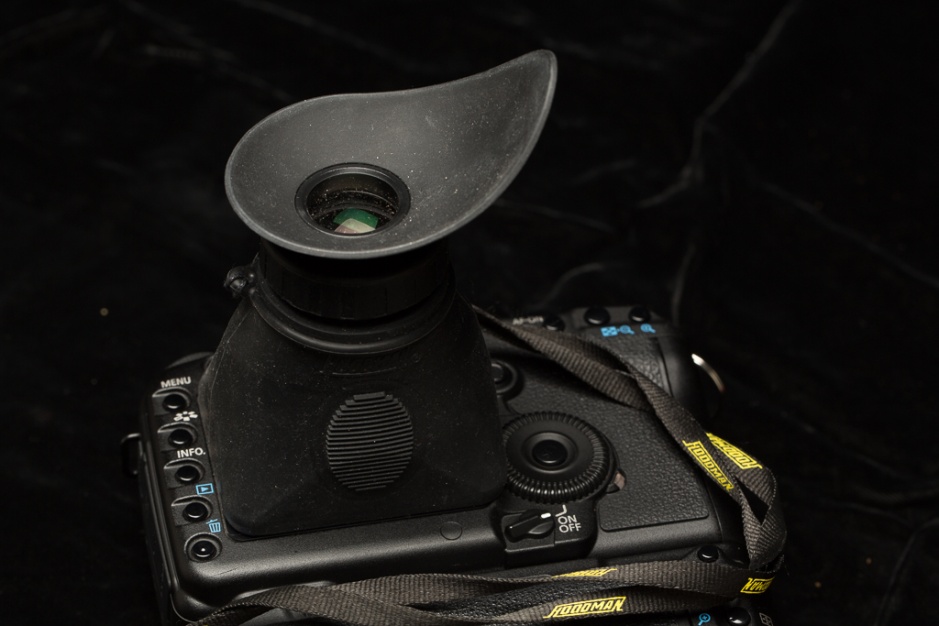
At times even the best metering patterns may get fooled by tricky lighting situations. As you are shooting look at your LCD. If your image is too dark, add +1 or +2 compensation, and if it’s too bright add-1 or -2 compensation, reshoot and check. A couple of points are helpful here. It can be hard to evaluate the LCD in bright light, so a viewing loupe if very useful. Also somewhere in your camera’s menu is a setting for LCD brightness, and the default is usually “auto”, where the LCD dims in dark light and brightens in bright light. That’s not what you need to evaluate exposure. Go into the menu and set a fixed brightness. Usually the middle setting works well, but experiment.
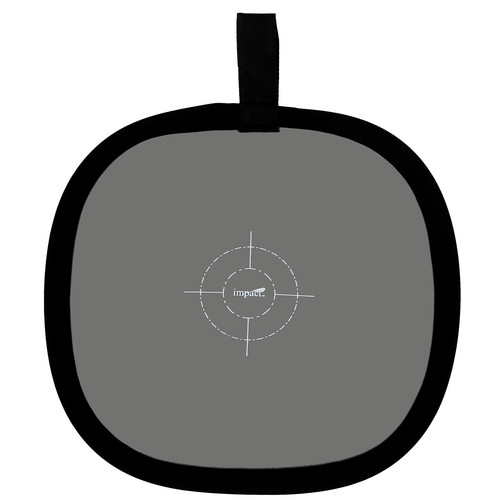
There is a trick you can use to get the most accurate exposure in difficult lighting. Buy a “neutral gray” card or fabric made for photographers. Put it in the same light as your subject, move or zoom in until the card fills the frame and meter. Note the settings and switch to manual mode and enter the aperture and shutter speed the camera selected. Below is a pop-out gray target by Impact and available for order at most camera stores. It is handier and more durable than the cardboard gray cards.
Your Practice Assignments
1) Get your camera manual and make sure you know how to change the metering patterns. Also make sure you know how to adjust exposure compensation. Also whenever you use exposure compensation, remember to turn it off when you no longer need it. Like so many other photographers, I’ve been burned by this mistake more than I care to admit.
2) Put your camera into program mode and shoot an average scene in each of the metering patterns. Look at the differences in how the camera exposed the same scene in each pattern.
3) Have someone stand in front of a light colored wall. Back up or zoom out so the subject is relatively small in the frame and shoot a shot in each of the metering patterns. Move or zoom in until he is large in the frame and repeat. Again evaluate how the camera exposed the different shots.
4) Repeat the sequences above against a dark wall.
5) For even more fun, do the sequences 3 and 4 above with the subject wearing all white clothes, and then repeat with him wearing all black clothes.
6) Put your subject on a bright background, but meter on a neutral gray card, and use those settings. Repeat on a dark background. Hopefully you will see your subject properly exposed in each situation.
7) Either in early morning or late afternoon when the sun is directional, face your subject into the sun, and shoot with all of the meter patterns. Turn your subject so he is backlit and repeat. Notice how the exposure varies.
In this article I’ll be talking about sharpness and how to achieve it. First, you have to be looking for sharpness (or lack of) to know if what you’re doing is working. As you shoot and look at the LCD on your camera, zoom in and/or use a loupe like the Hoodman loupe to see your image magnified. It is impossible to evaluate sharpness on that tiny LCD at normal magnification. If it’s a picture of a person or animal, make sure the eyes are sharp. When you edit your pictures, zoom in on the computer monitor to evaluate sharpness. Of course if the image isn’t sharp on your computer, it may be too late to do much about it. It’s better to be checking while you’re shooting and still have a chance to correct your problems.
Figure 1 A loupe that magnifies the LCD image to evaluate sharpness. It also blocks ambient light and improves the contrast.
Unintentional Camera movement is a major cause of soft images. There are several techniques you can use to minimize camera movement. In the last article we talked about subject movement which can also affect sharpness.
Handheld Shooting
Make sure your grip provides a solid platform for your camera, and that your body is as stable as possible. The right hand holds the camera, and pulls it into the face. The left hand supports the lens from underneath and the elbows are tight into the body. Take a deep breath, let part of it out, and gently press the shutter release. When possible brace yourself or the camera on a solid support.
As a general rule, most photographers cannot dependably hand hold a camera at a shutter speed slower than 1/focal length. For example, with a 200mm lens, that means 1/200 sec or faster. Also with a cropped sensor don’t forget the effect of the crop factor. So for example a 100mm lens on a Canon crop body behaves like a 160mm lens (1.6 crop factor), so again you would want a shutter speed faster than 1/160 sec. If necessary, increase the ISO to get a faster shutter speed. Sharp and noisy beats soft without noise. This is a general rule, and some photographers are sturdier, some may be shakier, so test with the exercises below.
Figure 2 A shutter speed of 1/30th sec with a 200mm lens was too slow and caused motion blur. At first glance it seems almost sharp, but zoomed in, everything appears soft.
Figure 3 Hand held shutter speed test at 200mm. At 1/500 sec each dot still looks like a sharp dot. This is a safe hand held speed.
Figure 4 Hand held shutter speed test at 200mm. At 1/30 sec, the dots are blurred into streaks. Definitely not a safe hand held speed.
Shooting a burst at your camera’s fastest frame rate may help get a sharp shot. Usually one of the shots will be somewhat sharper than the others.
Some lenses have stabilization that helps counteract movement when you shoot handheld. Canon calls it IS (Image Stabilization), Nikon calls it VR (Vibration Reduction) and Sigma calls it OS (optical stabilization). Depending on the lens, this may allow you to hand hold two to four shutter speeds slower than the rule above, but you should test as in the exercises below.
Supported Shooting
If you have never used one, you won’t believe how a good tripod can improve the sharpness of your images. A good tripod should be light enough that you will carry it, yet sturdy enough to support your heaviest camera and lens. A good tripod is not cheap, but it can be a lifetime investment. Better to spend the money for a good tripod the first time, rather than waste time and money on cheap tripods that are too heavy or too unstable.
There are a couple of tips to improve sharpness on a tripod. Pressing the shutter button can induce shake and vibration, so either use a cable release, or if you don’t have one, use the camera’s self timer. Extend the largest, heaviest legs first, then the smaller legs. Use the lowest practical height, and only extend the center column when the legs are fully extended and you still need more height. Many tripods have a hook on the bottom of the center column for hanging a weight such as your camera bag for added stability. If you do hang a weight, don’t let it swing. Make sure all of your legs are locked securely, and the tripod head is locked down tightly. Watch where you stand, and don’t kick the tripod during an exposure.
Also, some lenses with image stabilization can induce vibration when used on a tripod. The motor within the lens actually creates movement as it searches for movement. Then it moves more to correct its own movement. Some lenses don’t do this while others do. Read the manual for your lens and see if the manufacturer recommends turning IS off, or just turn it off to be sure it’s not a problem. If your lens doesn’t have image stabilization you don’t have to worry about this.
Figure 5 This was shot on a tripod, but image stabilization was on and caused the diagonal blurring you see in the close-up.
When you aren’t able to use a tripod, (situations like sports, or in crowded areas) a monopod offers a level of support that is better than hand held, but not as sturdy as a tripod. A monopod also takes the weight off of your arms, and prevents muscle fatigue that causes loss of steadiness.
Improper focus point selection can cause your image to be soft in the wrong places and sharp where you don’t need it to be. There are several focusing techniques that can help.
First, choose a focusing mode in which you select the focusing point, and can place it over the part of the subject that you want to be sharp. When you use the focusing mode where all points are active, the camera will usually select the closest object it sees, whether that is your intended subject or not. One common technique is to aim your camera so that a focus point is over your main subject and lock the focus and recompose. Different cameras use various methods to lock focus, so read your camera’s manual. Also many photographers (almost all sports or wildlife shooters) use what’s called back button focus. Most cameras focus when you press the shutter halfway, but back button focus removes the focus function from the shutter button, and allows you to reassign it to another button on the back of your camera. You then focus by pressing that button with your thumb. Release, and the focus is locked, or hold it down to track movement. It does take some practice to remember to focus before shooting since it’s not linked to the shutter button. Read your camera manual to learn how to reassign the focus button.
Figure 6 In this focusing mode all points are active and generally the camera will select the point over the closest object it sees.
Figure 7 This is an extreme example where the camera chose to focus on the flower, the closest object and not the girl and horse which were the intended subject.
Figure 8 In this focus mode the photographer can choose which point to make active and place it on the subject.
If you shooting a stationary subject, one technique for achieving critical focus is to use live view (using the cameras LCD to view and compose), then zoom in to 5X or even 10X, and fine tune your focusing manually. This only works on a tripod.
Also be sure to match your focus mode to the shooting situation. For a stationary subject you can use a focus mode that doesn’t change once you focus (Canon calls it one shot, Nikon calls it AF-S). For moving subjects you want a mode that keeps the subject in focus as it moves (Canon calls it AI Servo, and Nikon calls it AF-C).
Once you focus be sure you don’t move. With a close subject and shallow depth of field, even breathing can cause your focus to shift. Think tripod!
Make sure your camera has actually focused. Some viewfinders will light up the focus point, or light an indicator, or beep (most cameras allow you to turn the beep on or off). By whatever means be sure the camera has actually focused. This is often a problem at close range where the subject may be closer than the minimum focusing distance of the lens.
Lens Factors
Every lens has an aperture range where it is sharpest, usually it is two or three stops smaller than the widest aperture. For many types of photography this is not that big a concern, especially if stopping down forces you to use a shutter speed that is too slow to hold steady. Also, generally the more expensive the lens, the sharper you can expect it to be. Again for many photographers, even the less expensive lens will perform adequately. Use a lens hood to shield your lens from light that might cause flare and decrease contrast and sharpness. Also while many photographers use a UV or clear filter to protect their lens, many feel it decreases sharpness, particularly when shooting into the light.
Sharpening during Processing
If you shoot JPEGs, then your camera makes some image adjustments, including adding sharpness. If you shoot RAW files, there is no sharpening until you add it in Lightroom or Photoshop. Lightroom has a sharpening section in the develop mode as well as some presets. You can use unsharp mask or smart sharpen in Photoshop. Also Photoshop CC has a filter to correct camera shake. It’s rarely perfect but it may make a slightly blurred image at least usable if not sharp.
Things that increase apparent sharpness
Shooting at or near wide open creates a shallow depth of field that blurs the background and makes the subject in focus seem even sharper. Notice that the wide open aperture may not be the very sharpest for the lens, but our eyes see it as sharper.
Figure 9 A shallow depth of field makes the subject appear sharper. Additionally, the wide open aperture allows a faster shutter speed. Also note that eyes are perfectly sharp.
High contrast lighting makes subjects appear sharper, and low contrast lighting makes things seem less sharp. You may not be able to change the lighting contrast of natural light, but you can change the contrast of your image in processing.
Figure 10 Low contrast lighting on a cloudy day makes this shot look softer, even though it is sharp and in focus.
Figure 11 Contrasty light on a sunny day makes this plane look even sharper.
Your Practice Assignments:
1: Either download and print a focus target or use a sheet of text taped to a flat surface. Keeping a constant aperture (to minimize the effect of aperture on sharpness), shoot a series of hand held exposures at increasingly slower shutter speeds. You may have to change ISO to keep the aperture constant. Turn off IS, VR or OS. Shoot 5 exposures at each shutter speed. If you are using a zoom lens do the test at the shortest focal length, middle focal length and longest focal length. If you have several lenses, repeat for each lens. When you load the images on your computer zoom in to 100% and evaluate sharpness. For each focal length, the slowest shutter speed where 4 out of five images are sharp is the slowest shutter speed you can reliably hand hold. That also means that 20% of your shots will be soft, so in actual shooting situations, shoot more than one!
2) Repeat the test above, but turn on image stabilization and evaluate to see how much it realistically improves your ability to hand hold.
3) Do the tests above with the camera on a tripod (I hope you’re impressed by the difference) and with IS on for one series and off for the other. If IS causes blur in your images, remember to turn it off when you use a tripod.
4) Read your camera manual to learn how to setup back button focus. Practice using it for a couple of days until it becomes second nature.
5) Read your camera manual and learn how to change focusing patterns and how to select the active focus point.
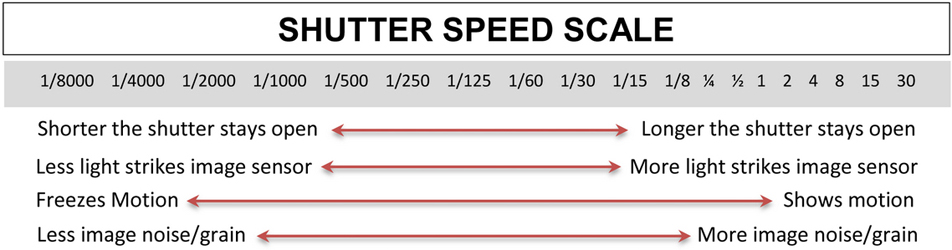
In previous articles we’ve discussed what shutter speed is and how it effects exposure. Now let’s look at how shutter speed can be used creatively to portray motion. We can have motion of the subject, the background, the camera or any combination of the above. And for this article we’ll only discuss intentional camera movement. In another article we’ll discuss unintentional camera movement and how it effects sharpness.
First let’s look at the factors that control how our camera sees movement. First and most obvious is the speed of the subject’s movement. Second is the direction of movement; movement toward or directly away from camera is not as obvious as movement from side to side. Third is the distance from the camera to the subject; a car traveling 100 MPH looks much faster at a distance of 20 feet than at half a mile. Fourth is lens selection; a telephoto lens not only seems to magnify our subject; it also magnifies any movement. Wide angle lenses have the opposite effect; by minimizing subject size, they also minimize the sense of movement. And last and perhaps most important is shutter speed, because we can use shutter speed to choose how we portray motion, and it’s the variable that we as photographers have the most control over.
So how does shutter speed affect how we see motion and movement? We basically have three ways to shoot motion – try to freeze the movement, allow the motion to cause blur or use a technique called panning to move with the action, so there is a blurred background and possibly blur in part of the subject, but there is at least some relatively sharp part of the subject where the movement of the camera followed the movement of the subject almost exactly.
We can freeze motion with a fast shutter speed. This may require high ISO’s and wide apertures to freeze very fast action. Remember it will take a faster shutter speed to freeze movement going across the frame than movement going toward or away from the camera. And to restate the obvious, the faster the movement, the faster the shutter speed needs to be. A shutter speed of 1/125 of a sec may freeze a bicycle moving slowly across the frame, where it may take 1/4000 of a sec to freeze the motion of a jet streaking across the frame. We freeze motion when it is more important to show detail in our subject than to convey a sense of motion. Sports such as football, basketball and even rodeo usually depend on sharpness. I would add a special caution about planes and helicopters. While a fast shutter speed may capture sharp detail, it freezes the movement of the propeller or rotor and makes it look like a model and not like a plane in flight. For most prop planes 1/80 or 1/100 creates good prop blur. Helicopter rotors turn more slowly and may require 1/30 sec. Good luck handholding a telephoto on a moving, vibrating helicopter at 1/30 sec. Literally 1 in a 100 good shots is par for the course, but that one good shot makes up for the 99 rejects. Jets don’t have any externally moving parts that convey movement, so a fast shutter speed works well.
Slower shutter speeds allow the subject to blur and lose detail, but may convey a stronger sense of movement, or even blur to the point of creating an abstract picture. It sometimes works to use very slow shutter speeds that blur the subject dramatically. A shutter speed that is only slow enough to create a slight blur may look more accidental than intentional. One special case is moving water in streams or waterfalls. Most photographers prefer the water to be blurred silky smooth. Depending on the amount and speed of the water this may require from 1/2 sec up to several seconds.
Panning is following the movement of a subject with shutter speed that is slow enough to show movement in the back, and blur in parts of the subject that are not moving in exactly in the direction of the camera. Panning works well for sports like track and field, cycle racing, horse racing and auto racing where motion is more important than detail. To pan, set a relatively slow shutter speed, and stand with your hips square toward where you want to capture the action. Then twist at the waist in the direction the subject will come from. Start tracking your subject before the point where you want to capture the action, and follow past that point. You’ll want to set you camera to its fastest frame rate and shoot a lot of shots hoping to get that perfect shot where everything lines up just right. Don’t be disappointed if only 1 in 20 or 30 works. But when they work they are impressive. Like everything else, it takes practice and repetition to get good results.
Next month I’ll be discussing how to make your images look sharp.
(Figure ) At 1/500 sec details are sharp, but nothing shows a sense of motion.
(Figure ) 1/20 sec without panning turns the rowers into an almost abstract blur that conveys movement, but not detail.
(Figure ) 1/20 sec and panning, tracking the third rower, shows a sense of speed while still maintaining some detail.
(Figure ) While the rowers aren’t moving very fast, 1/15 sec shutter speed and panning makes it look as though the shell is really moving. Notice the blur and movement of the background.
(Figure ) 1/250 sec freezes the movement of the rotor and gives no impression that the helicopter is actually flying.
(Figure ) 1/30 sec gives good rotor blur and looks more appropriate for a helicopter in flight.
(Figure ) For a jet 1/1000 sec captures good detail. Speed is implied in a jet without having to blur a prop.
(Figure ) Panning along with this horse at 1/100 sec blurs the background and his hooves while keeping the face sharp.
(Figure ) 1/30 sec is too fast to blur the movement in this waterfall.
(Figure ) 4 secs gives a pleasing blur to this waterfall.
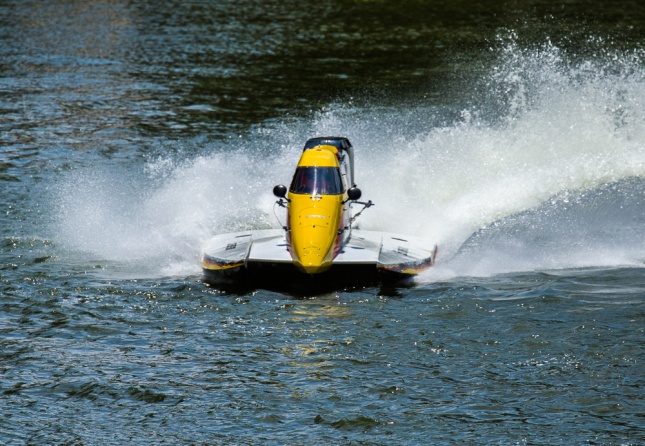
(Figure ) 1/250 sec captures very little of the speed of this car. Notice the wheels and background cones are only very slightly blurred. Nothing really conveys that this was a very tight turn at 50 MPH. (I know, because I’m driving!). If you look very closely, the front right wheel is lifted off the pavement, but nothing else really conveys the speed of the car. As a general rule when a fast moving car (or motorcycle or bicycle) is broadside to you, you should use a shutter speed slow enough to allow the wheels to blur, and this usually also requires panning.
Figure Freezing the action of this bull rider required 1/1000 sec. Due to the very poor lighting, that required a wide open aperture of 2.8 and an ISO of 25,600. A slower shutter speed would have resulted in blurring which could have created an artistic abstract.
So, here are your homework assignments for learning about shutter speed and motion.
1) Start simply by having someone walk or run by you about 30 feet away. Put your camera on a tripod, in shutter priority mode and photograph the walker as he’s coming toward you, moving directly across from you and going away. Use 1/15 sec then 1/30, 1/60, 1/125, 1/250 and 1/500. Repeat with your subject only 10 feet away.
2) Now to make it more challenging. Stand beside a busy road (but safely away from traffic). Put your camera on a tripod, in shutter priority mode and photograph (Notice I DID NOT say shoot) cars coming toward you, moving directly across from you and going away. Use 1/15 sec then 1/30, 1/60, 1/125, 1/250 and 1/500. Do this sequence with a wide angle lens, a normal lens and a slight telephoto. Try not to look like a terrorist or sniper.
3) If you haven’t already been arrested, repeat exercises 1 and 2 above, but this time hand hold the camera and try to pan along with the movement of the walker and cars.
4) Find a waterfall or water flowing over rocks in a stream. You need some ripples and turbulence to show motion. Put your camera on a tripod, in shutter priority and photograph the water at 10 sec, 5 sec, 1 sec, 1/2, 1/4, 1/8, 1/15, 1/30, 1/60, and 1/125. Notice the blurring of the water and see what shutter speeds look good to you. Remember this effect depends on the speed and turbulence of the water, so the effect won’t be consistent with every moving water subject.
5) Go to an air show like the ones in Smyrna TN or Wings Over North Georgia in Rome GA. These are great places to practice panning and learn the effects of different shutter speeds. Or go to a racetrack or motocross track.
6) Practice photographing any sport that interests you and that allows you good access. Try various shutter speeds, and try panning. See what works, what doesn’t, and what suits your particular vision.
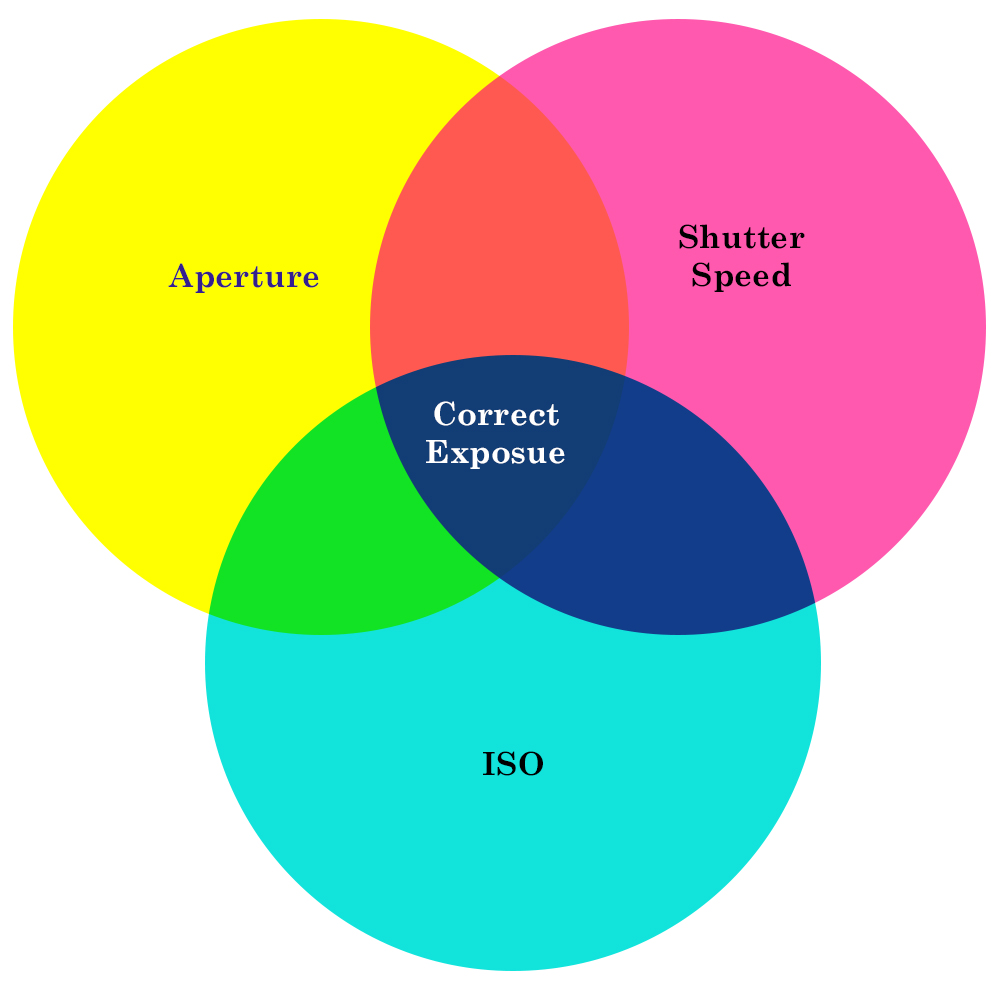
In my last article, I talked about the exposure triangle and mentioned that in addition to its effect on exposure, the aperture (or f/stop) is one of the determinants of depth of field. Controlling depth of field allows you to determine what is in focus and helps direct the viewer’s eye to what you feel is important. Learning how and why to control depth of field will help you make more powerful images that say what you intend.
So what is depth of field anyway? Depth of field is the distance between the nearest and farthest objects in a scene that appear to be in sharp focus. Technically only one plane is exactly in focus, but the optical principles of lenses allow for a greater area to be in acceptable focus. Within this area of acceptable focus, 1/3 is in front of the point of focus, and 2/3 is behind the point of focus. So when we talk about “Shallow depth of field,” we mean only a limited area is in focus. “Deep depth of field” means a greater area is in focus, in some cases from close to the camera all the way out to infinity. And why should we even care about depth of field? One important reason is that the eye is drawn to objects that are in sharp focus and tends to skip over things that are soft and not in focus. So right away, you can see what a powerful tool this can be in composing a picture. If you want your viewer to pay attention to something, make sure it is in focus. If other elements in the picture are not important, putting them out of focus helps keep the attention on the main subject.
The things that affect depth of field are aperture, focal length of the lens, distance between the camera and subject, and to a degree, even sensor size. Let’s look at each one below.
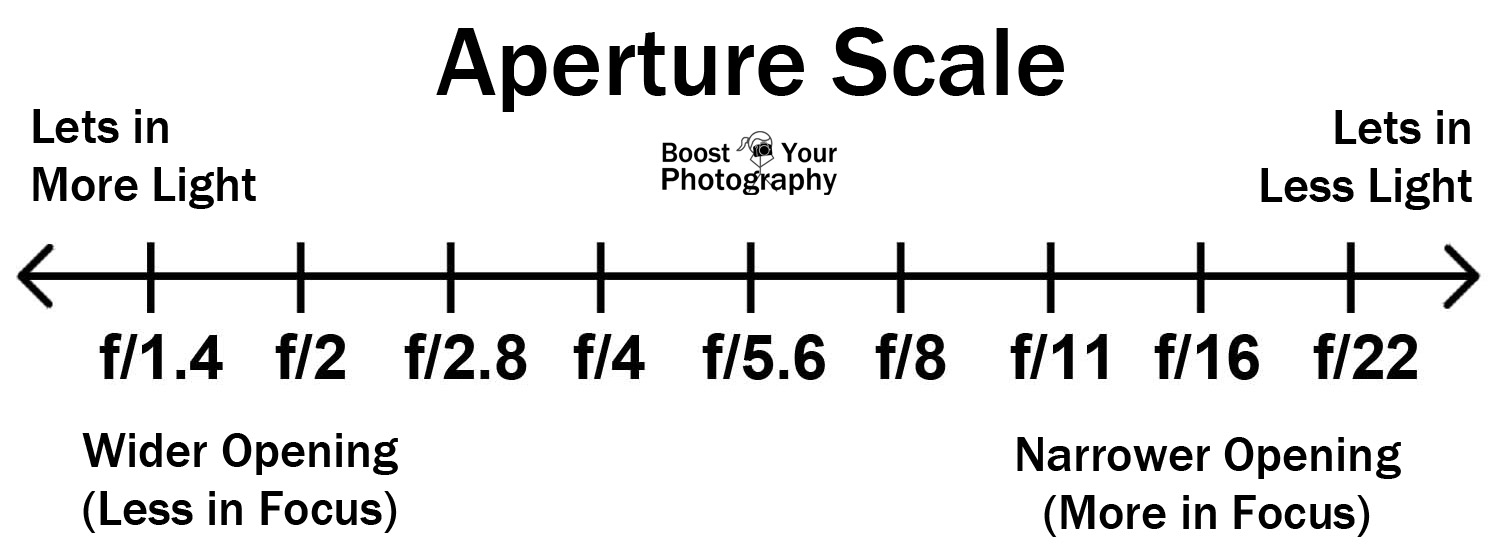
Aperture is the first control most people think about for controlling depth of field. Wide apertures (low f/stop number, such as f/2 or f/2.8) produce a shallow depth of field and are often used in portraiture to blur the background and keep the focus (bad pun intended) on the subject. Smaller apertures (high f/stop number, such as f/16 or f/22) produce a deep depth of field and are often used in landscape photography to allow everything from near to far to be in focus and thus be important within the picture. See the chart below.
Focusing distance also affects depth of field. At very close focusing distances, depth of field is very shallow. This can be used to isolate a subject, but in macro photography, where focusing distance may be only a few inches, it can be challenging to get all of our subject in focus. You will often see extreme close-ups shot at f/32 or f/45 in an attempt to get the whole subject in focus. See the chart below.
Lens focal length also affects depth of field. The longer the focal length, the shallower the depth of field. The wider the lens, the greater the depth of field. That’s why longer lenses (and large apertures) are often used for portraiture to blur the background and make the subject stand out. This out-of-focus blur has the fancy name “bokeh” and is important to portrait shooters. Some lenses have soft creamy out of focus highlights, while others have harsher highlights and more chromatic aberration (color fringing errors). Generally, the more expensive the lens, the nicer the bokeh. On the other hand, landscape photographers often use wide-angle lenses (and small apertures) for depth of field that goes from close to infinity. See the chart below. Notice that at the same focusing distance and aperture, as focal length increases, depth of field decreases.
Sensor size also affects depth of field. Without going into a bunch of complicated math, the smaller the sensor, the greater the depth of field at a given aperture and magnification. A point and shoot with a tiny sensor will have a great depth of field at even f/5.6. DSLRs with APS-C sensors will have more depth of field than a full-frame DSLR at the same aperture. Now that you know this, there’s not much you can do to change it, other than change cameras. Portrait and fashion shooters prefer full-frame DSLRs or the still larger medium format cameras to create that out-of-focus bokeh. But the smaller sensors have an advantage where getting a good depth of field in low light or at high shutter speeds is important.
This image was shot at f/2.8. Notice the very shallow depth of field due to both the large aperture and the close focusing distance.
This image was shot at f/22. Notice the much greater depth of field even though the focusing distance is the same.
This image was shot at f/2.8. Notice the very shallow depth of field due to both the large aperture and the close focusing distance. Only the very front plane of the face is in focus.
The shot below shows more depth of field at the same focusing distance, but f/11. Still, the whole figure is not in focus.
Here a wide aperture (f/2.8) and a telephoto lens create a shallow depth of field to isolate the subject.
Here a large aperture (f/2.8) and very close focusing distance create a shallow depth of field that isolates one daffodil from the ones just inches behind it.
Shooting at f/4 with a moderate telephoto allows the background headstones to blur but remain recognizable.
f/16 allows everything in this image to be in focus.
Hyperfocal Distance: For a given focal length and aperture, there is a focus distance that provides the widest possible depth of field. This is called the “Hyperfocal Distance.” It is basically the closest focus point to the lens where the far limit is infinity, giving us total depth of field from this point to infinity. Moving beyond the hyperfocal distance increases the near limit, but the far limit is always infinity, so the overall depth of field reduces. Remember that within this area of sharp focus, roughly 1/3 is in front of the point of focus and 2/3 behind. Landscape photographers often use hyperfocal distance to get the deepest possible depth of field, so both near and distant objects such as the horizon are sharp. See the example below. At a focus distance of 3m, the far limit is 16.8m. As we move towards 4m, the near limit and the far limit get further away until we reach a point at 3.65m, where the far limit becomes infinity. This is our hyperfocal distance.
There are five possibilities for finding the hyperfocal distance:
1) Use the depth of field preview button (some models call it the stop-down button) if your camera has one. This closes down the aperture to the set value and provides you with a visual check. When you use the depth of field preview, your viewfinder will become increasingly darker with smaller apertures, making it hard to focus. Focus before using the preview.
2) Use the depth of field scale if your camera has one. In the bad old days of film cameras, single focal length lenses, and manual focus, lenses had aperture and distance scales that could be used to determine hyperfocal distance. I can’t think of any current DSLR lenses that have these scales.
3) Use a depth of field calculator chart which shows the hyperfocal distance for any focal length and aperture combination. See the chart below. There are charts for full-frame cameras and cameras with smaller sensors and multiplication factors such as 1.6 for Canons or 1.5 for Nikons.
4) Use a DOF app for your phone or tablet. There are lots of good ones, and many are even free.
5) Focus on something roughly 1/3 of the distance into the picture and use a small aperture such as f/16 or f/22. This is my most commonly used method, and I also use the depth of field preview button as a quick double-check.
In these two pictures, I focused roughly 1/3 of the distance into the picture and used a small aperture to keep everything in focus.
Your Practice Assignments
1) Read your camera manual and be sure you can set aperture priority mode and how to operate the depth of field preview.
All of the following exercises will work best on a tripod. This is so that both your distance to the subject stays constant and because as your aperture is set smaller, shutter speeds will become longer, often to the point where you will not be able to handhold steadily enough. These sound really boring, but they will really increase your understanding of creative controls.
2) Line up six cans or bottles about 6 inches apart, in a line going away from you. I have an endless supply of diet Pepsi bottles, but you may prefer beer cans or wine bottles; realize that emptying those cans or bottles may affect your ability to do this exercise. Set your camera in aperture priority mode. Start at your lens’s widest aperture (f/2.8 or f/4.0), and if you are using a zoom lens, use the shortest focal length. Place your camera 1 foot away from the closest can, focus on the nearest can, press the depth of field preview to see the effect, and shoot a picture. Repeat focusing on the second can, then the third, etc.
3) Repeat the above exercise in the middle of your zoom range and then again at the longest focal length.
4) Repeat exercises 2 and 3 but back up to 3 ft away.
5) Photograph a person with a medium telephoto at the largest aperture of your lens, then with each picture, stop down one stop until you are at the smallest aperture. While you are doing this, focus on the eyes, and if the person is not facing you squarely, focus on the nearest eye.
6) Find a scene with a close object, a middle ground, and a distant horizon. Use a short focal length and focus about 1/3 into the picture. Shoot a shot at the largest aperture of your lens, then with each picture, stop down one stop until you are at the smallest aperture. Notice when both near and distant objects come into focus.
Next month, we’ll look at shutter speed and how it can be used to show or freeze motion creatively.
Also, after my article last month, I found this handy chart showing the effects of aperture, shutter speed, and ISO. You can download it at the link below. Print it out and laminate it and keep it in your camera bag as a quick reminder.
I’ve been asked to write a series of articles on some of the basics of photography. So first I’ll take a look at exposure, camera modes and camera controls over the next few articles. Then we’ll move on to issues of sharpness, composition, lenses, and any other topics that I get requests for.
How and why do we practice? First, I want to talk about a basic approach to improving your photography (or just about anything for that matter). There seems to be an amazing overlap between music and photography, so I’ll use some music analogies to illustrate some ideas.
When I was in the school Jazz Band our director told us “If you’re not happy with your playing, look at how you’re practicing.” If you’re a musician, you practice scales, chords, and progressions. If you’re a drummer, you practice rudiments, beats, time signatures and creating a groove. The purpose of practicing these basic skills is so that you can use them in performance without having to think about them. It’s not always fun or exciting or glamorous, but it’s necessary. Then you put these basics into practicing actual pieces of music. It is worth noting that practice involves repetition to learn specific skills. It doesn’t mean just learning a couple of things that you enjoy and repeating that forever. There is a big difference between playing around and practicing, just as there’s a big difference in practicing photography and just shooting. It means working on specific skills that you may not enjoy, but you know are necessary in the long run. Once you have those skills down, then performances follow, and then your performances hopefully get better and better. Eric Clapton or Mark Knopfler make playing guitar seem effortless. What you don’t see are the countless hours they spent in a basement practicing the basics like scales, chord progressions and fingerings. When Doc Severinsen, who is one of the world’s best trumpet players was asked about practicing he replied ” I practice at least two hours a day, because somewhere out there there’s a kid practicing four hours a day so he can be better than me.” This is in addition to his actual playing. So it is with photography. We practice to master the basics so we don’t have to think about them when we are trying to create a picture that fits our vision. And none of us ever gets so good that we don’t have to practice, at least not if we hope to keep getting better.
While we’re at it, let’s also talk about the difference between studying and practice. You can (and should) study by reading books, watching videos, and going to seminars on photography. But by themselves, these won’t make you a better photographer any more than reading a book on guitar technique or watching an old Cream video makes you Eric Clapton. But if you take the concepts that you study, and actually pick up your instrument (whether it’s a guitar or a camera) and physically practice using those concepts, then you will see your skills start to development. So, with these first few articles I’m going to give you some practice assignments to work on, so that you can use the basic skills to create better pictures.
And lastly, let’s mention equipment. My band director didn’t say go out and get a better instrument. Give Eric Clapton a cheap, basic guitar and he still plays like Clapton. Give Eric’s guitar to a beginner and he won’t suddenly sound like Clapton. It’s easy to get excited about newer, better and more expensive camera gear (boy do I know about this), but it’s not the camera that takes the picture. Sure, better gear makes it more convenient, maybe extends the possibilities, or helps you create a unique look, but without your skills, a camera is just an expensive box. If you’re using a camera made in the last 5 or 6 years, I can almost guarantee that you’re holding it back more than it’s holding you back. Or as my friend put it, “99% of the cameras are better than 99% of the photographers”.
So, the next time you tell yourself “I want to be a better photographer”, think about what you need to practice and how you will practice, and plan to set aside time for practice.
The Exposure Triad There are three basic things that control your photograph’s exposure – aperture, shutter speed and ISO. We’ll look each one, and then look at them in much greater depth in following articles.
Aperture Aperture is how wide the opening that lets through to the sensor (or film) in your lens is. The smaller the numerical value, the larger the opening is and the more light is allowed to pass through the lens. The larger the numerical value, the smaller the opening is and less light is allowed to pass through the lens. One term we use to describe the quantity of light is “stops”. A change of 1 stop means we either double or half how much light passes through the lens. So for example at f/2.0 the lens allows twice as much light to pass through as it does at f/2.8. At f/4 only half as much light passes through as at f/2.8. The scale below shows whole stop intervals. Most digital single lens reflex cameras (DSLR’s) and even many point and shoot cameras allow for an infinite adjustment between whole stops.
Lenses are often described in terms of their maximum aperture. A lens with a maximum aperture of f/2.8 lets in twice as much light when it is wide open as a lens that has a maximum aperture of f/4. The wider aperture can be useful in low light situations, but the trade off is cost. The wider the aperture, the higher the cost. You will see some zoom lenses that have two aperture values such as f/4-5.6 and are called variable aperture lenses. What this means is that the maximum aperture is wider at the short end of the zoom range than at the longer end. The reason is that it is easier and less expensive for the lens manufacturer to create a variable aperture lens. You can buy fixed aperture zoom lenses, but be prepared to spend (much) more. Once you move past the maximum aperture, there is little real variation in exposure between variable and fixed aperture zooms.
Besides controlling how much light passes through the lens, aperture or f stop has very important effects on the look of your photo, due how it affects depth of field, which is the area of a picture in acceptably sharp focus. That will be the subject of the next article in the series.
Shutter Speed Shutter speed is how long the shutter is open, allowing light to strike the sensor (or film). The longer the shutter is open, the more light reaches the sensor. Doubling the time or cutting the time in half, changes light by one stop. Besides controlling exposure, shutter speed has major effects on how camera movement affects sharpness due to camera movement, and how subject movement appears in your picture. I’ll cover shutter speed in the third article.
ISO ISO is a measurement of how sensitive the sensor (or film) is to light. The higher the ISO number, the more sensitive the sensor and the less light it takes to create a good exposure. High ISO’s allow faster shutter speeds or smaller apertures. The trade off is in image quality. Higher ISO’s have more noise (or grain, if you use film), and generally less contrast and color saturation. But sometimes high ISO’s are the only option for getting usable pictures in low light conditions. In general, you will want to select the lowest ISO that gives you the combination of aperture and shutter speed you need.
Modern sensors are much more sensitive than film ever was. A huge advantage of digital over film is that we can change our ISO as light conditions change. With film, we would have to change to a different type of film, and sacrifice part of a roll if we hadn’t used it all. As a result, many serious or pro photographers carried multiple bodies with different film in each.
A quick word on camera meters
Camera meters measure the light reflected from our subject into the camera. Initially camera meters just averaged all of the light entering the camera and adjusted the exposure so that the overall exposure would create a middle gray, which was what the “average scene” needed. But if your subject is predominately white or light colored, it will be reduced to a middle gray and be under exposed. If your subject is predominately black or dark, the camera will increase exposure to make it a middle gray and it will be overexposed. Likewise a bright background, bright backlighting, or a dark background may fool your meter. Modern cameras have gotten much smarter and have metering modes that try to correct for some of these situations, but they aren’t foolproof.
Take a quick look at the camera’s LCD and see if the exposure is too light or dark and make adjustments. If your exposure is too dark, you can dial in a “+” compensation or if it is too light you can dial in a “-” compensation.
How the three controls combine for exposure Proper exposure depends on the right amount of light hitting the sensor and the sensitivity of the sensor. So we can make the sensor more sensitive by setting a higher ISO, and it takes less light to make an image. If we decrease the ISO it takes more light.
Slower shutter speeds allow more light to reach the sensor, but may cause blurring due to camera or subject movement. Higher shutter speeds allow less light to hit the sensor. We can adjust for that with wider apertures, higher ISO’s or a combination of the two.
Larger apertures (lower f numbers) allow more light to hit the sensor and we can use faster shutter speeds and/or lower ISO’s. Smaller apertures allow less light to reach the sensor, but provide great depth of field. We can adjust by using slower shutter speeds or higher ISO, or a combination of the two.
If you have been following all of this, you will realize that we can get a correct exposure with any number of combinations of shutter speed, aperture, or ISO as in the chart below. So, which is the right combination, if they can all give a “correct exposure”? That’s where your vision as a photographer comes into play. Is there subject movement and how do you want to show it? How much depth of field do you want? How steady can you hold the camera and at what shutter speeds do you see softness caused by camera movement? It’s why two photographers can stand shoulder to shoulder, shoot the same subject, get good exposure, but very different looking pictures.
Camera Modes All DSLR’s and even most point and shoot cameras have a number of exposure modes that you can select. The major difference in the modes is in which of the exposure controls you set, and which the camera sets.
Program-Generally you set the ISO, and the camera sets the shutter speed and aperture. It usually tries to maintain a fast enough shutter speed for handheld shooting, but that may not always be possible. Some cameras have a totally auto program mode where the camera controls ISO, shutter speed and aperture. Program modes are best when you need your camera to ready quickly to take a shot, but you don’t care about having any creative control. Think of it as snapshot mode.
Aperture priority– You set the aperture and ISO and the camera sets an appropriate shutter speed. This is the mode to use when you want control over depth of field. Be aware of shutter speed as it may drop too low to handhold reliably.
Shutter Priority- You set the shutter speed and ISO and the camera selects an appropriate aperture. This is the mode to use when you want control over how motion is depicted. Fast shutter speeds to freeze action, slow shutter speeds for panning or blurring motion.
Manual-You set ISO, aperture, and shutter speed. There is an exposure indicator in the viewfinder to show when you have set a correct exposure. This is the setting you would use with studio flash, or in light conditions that aren’t changing rapidly and you want total control.
Practice Exercises – Reading this article was your “study”. Now to really learn how to put this into use it’s time for practice. 1) Get out your camera manual practice selecting aperture priority, shutter priority, program and manual modes. Practice adjusting aperture and shutter speeds. Learn how to change ISO and how to dial in exposure compensation. 2) Put your camera in aperture priority. Look through your viewfinder, set a wide aperture and notice the shutter speed the camera selects and shoot a picture. Set increasingly smaller apertures and notice how the shutter speed changes and shoot a picture at each aperture. Repeat the process at increasingly higher ISO’s. 3) Put your camera in shutter priority. Look through your viewfinder, set a fast shutter speed and notice the aperture the camera selects and shoot a picture. Set increasingly slower shutter speeds and notice how the aperture changes and shoot a picture at each shutter speed. Repeat the process at increasingly higher ISO’s. 4) Choose either aperture or shutter priority mode, go outside and photograph a scene. Now set your exposure compensation at -2 and reshoot the same scene, Repeat at -1, +1 and +2 compensation. 5) Always remember to turn exposure compensation back to”0″ when you no longer need it. I’ve been burned by this more than I care to admit. 6) Return your ISO back to a usably low setting after using very high ISO.
Bonus Hint Some photographers recommend keeping your camera manual in your camera bag. That’s not a bad idea, since there are always things I don’t do often enough to remember without referring to the manual. If you are like me, it’s also a good way to lose your manual. Almost every manufacturer allows you to download your camera manual in PDF format. You can then save that on your phone, and it’s always available.