In this article I’ll be talking about how cameras meter a scene to determine the proper exposure. The camera is making a lot of assumptions and calculations to determine what it thinks is a good exposure. It’s good to have some idea about what it’s thinking and when it may not be right.
First a quick bit of history and theory. There are basically two types of light meters, incident and reflective. Incident light meters measure the amount of light hitting the subject and are not influenced by the color and brightness of the subject. This can be very accurate, but to accurately measure the light on the subject, you have to be at the subjects position. That’s not always possible, and it doesn’t lend itself to fast spontaneous shooting. Unless your name is Neil Armstrong, how would you ever meter the moon? The other type of metering is what is found in our cameras, and that is reflective metering, which measures how much of the light hitting our subject is reflected back to our camera. The problem is that not all subjects reflect light equally. Light colored subjects and shiny surfaces reflect more light, and dark or dull surfaces reflect less light.
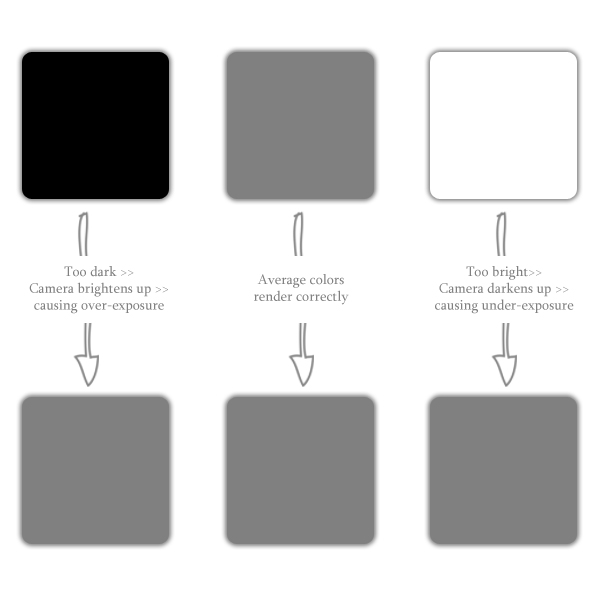
Reflective meters try to give a correct exposure by assuming that in an average scene roughly 18% of the light is reflected back to the camera. If you were to take this average scene, meter it and blend all of the image into one uniform tone and convert it to black and white, you would get “18% gray”, which is a light gray. So our camera meters are looking to average what they meter into this 18% gray which works well for “average” scenes, but how many of us want to shoot “average” pictures?
If a camera meter sees a solid white wall, it is going to meter it so it become an 18% gray wall. Likewise, it will make a solid black wall look 18% gray. Most of us don’t go around shooting solid white or black walls, but we do photograph light or dark subjects in front of bright or dark backgrounds. That’s where our understanding of meters, and our judgment and ability to adjust the exposure come into play.
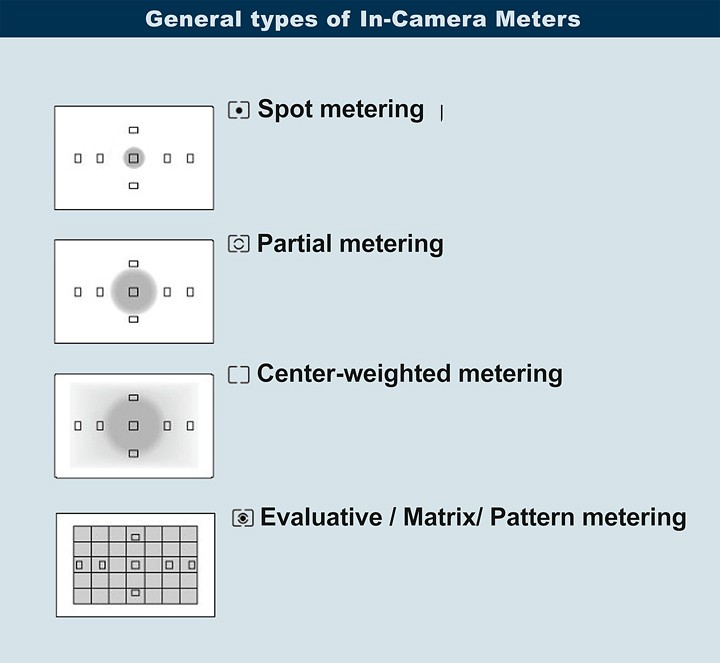
The early in-camera meters took a relatively broad area and averaged it out. A small subject against a light or dark background would often be exposed incorrectly. As meters have become more sophisticated, we have the ability to adjust how much of the scene the meter uses to average it’s exposure. Typical patterns are center weighted, which looks at the whole image, but gives more weight to a medium sized area in the center of the picture, partial area which ignores the outer areas of the image and just looks a medium area in the center, and spot which only uses the center 5%. The newest and most “intelligent” mode is evaluative (Canon) or matrix (Nikon) metering. This looks at several areas in the frame and compares what it sees to a data base of types of images that has been programmed in.
So, when do we use which mode or pattern? The short answer is it depends. It depends on what type of scene, what subject and how much difference there is between the subject and background in terms of exposure, and also relative size.
Evaluative (or matrix or pattern) is a good all around mode. When you don’t know what else to do start here. To be honest, that’s what I use 99% of the time. Fifteen years ago I would never have trusted a camera to have enough judgment to determine a good exposure because I was smarter than the average meter. Now I hate to admit that the camera is at least as smart as me if not smarter.
Center-weighted metering works well when your main subject is relatively large and in the center of the frame. It could work in backlit conditions or when your subject is in front of a light or dark background. The key here is that your subject should fill a large part of the center of the image. It may be fooled if your subject is much brighter or darker than “18% gray”.
Spot or Partial metering works when your subject is relatively small within the image. At times like this, you may not want the subject centered, but the meter only looks at a narrow area in the center. How do you correct for this? Center your subject so it is in the metered area, meter by pressing the shutter release halfway and the recompose without lifting your finger and then release the shutter. Again even this pattern may be fooled if your subject is much brighter or darker than “18% gray”.
At times even the best metering patterns may get fooled by tricky lighting situations. As you are shooting look at your LCD. If your image is too dark, add +1 or +2 compensation, and if it’s too bright add-1 or -2 compensation, reshoot and check. A couple of points are helpful here. It can be hard to evaluate the LCD in bright light, so a viewing loupe if very useful. Also somewhere in your camera’s menu is a setting for LCD brightness, and the default is usually “auto”, where the LCD dims in dark light and brightens in bright light. That’s not what you need to evaluate exposure. Go into the menu and set a fixed brightness. Usually the middle setting works well, but experiment.
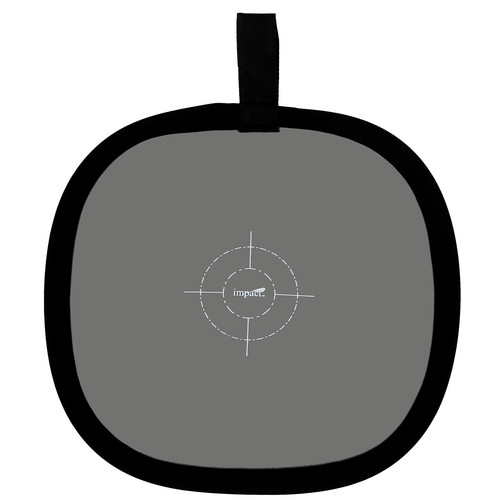
There is a trick you can use to get the most accurate exposure in difficult lighting. Buy a “neutral gray” card or fabric made for photographers. Put it in the same light as your subject, move or zoom in until the card fills the frame and meter. Note the settings and switch to manual mode and enter the aperture and shutter speed the camera selected. Below is a pop-out gray target by Impact and available for order at most camera stores. It is handier and more durable than the cardboard gray cards.
Your Practice Assignments
1) Get your camera manual and make sure you know how to change the metering patterns. Also make sure you know how to adjust exposure compensation. Also whenever you use exposure compensation, remember to turn it off when you no longer need it. Like so many other photographers, I’ve been burned by this mistake more than I care to admit.
2) Put your camera into program mode and shoot an average scene in each of the metering patterns. Look at the differences in how the camera exposed the same scene in each pattern.
3) Have someone stand in front of a light colored wall. Back up or zoom out so the subject is relatively small in the frame and shoot a shot in each of the metering patterns. Move or zoom in until he is large in the frame and repeat. Again evaluate how the camera exposed the different shots.
4) Repeat the sequences above against a dark wall.
5) For even more fun, do the sequences 3 and 4 above with the subject wearing all white clothes, and then repeat with him wearing all black clothes.
6) Put your subject on a bright background, but meter on a neutral gray card, and use those settings. Repeat on a dark background. Hopefully you will see your subject properly exposed in each situation.
7) Either in early morning or late afternoon when the sun is directional, face your subject into the sun, and shoot with all of the meter patterns. Turn your subject so he is backlit and repeat. Notice how the exposure varies.