Slightly Beyond Photography Basics – Intro to Photoshop Brushes
by Mickey Rountree
As I usually do, I’m calling this article beyond basic because it involves Photoshop rather than Lightroom or other basic editing programs.
Photoshop brushes are located in the tools on the left hand side of the workspace. Clicking on the brush tool opens a submenu with the brush, pencil, color replacement tool and the mixer brush. For this article I’ll only be discussing the basic brush. You can also use the shortcut “B” to bring up the brush tool. You can use the brush tool to paint directly onto an image, onto a blank layer, or onto layer masks. You can also use the brush to make selections in quick mask mode, but I’m not going there for this article.
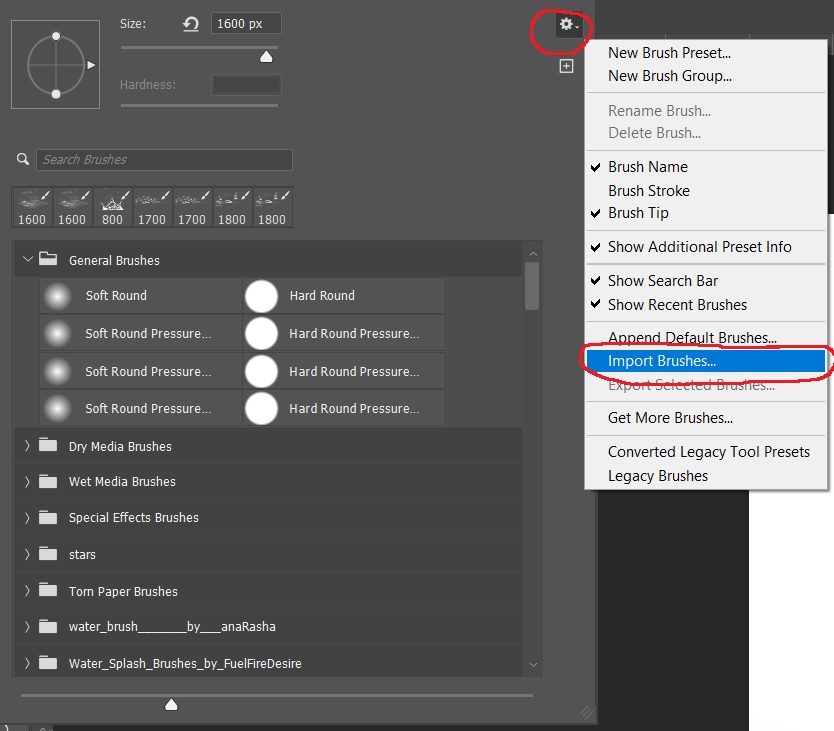
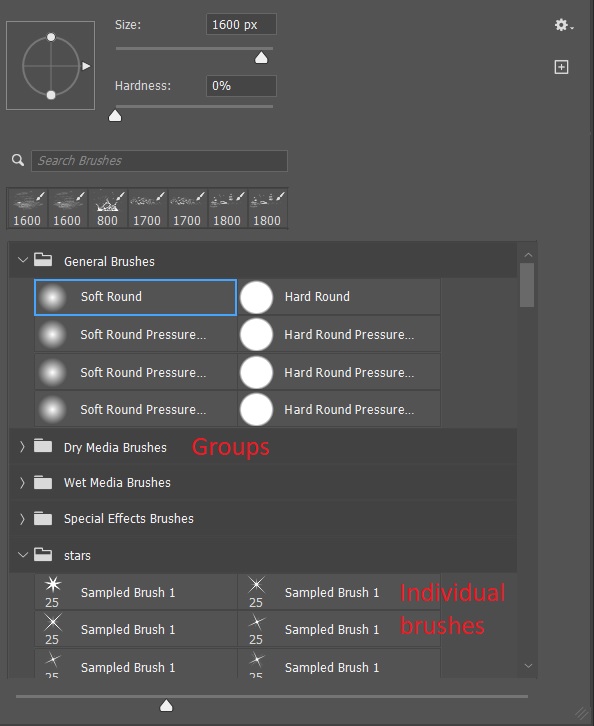
With the brush selected, clicking the dropdown arrow next to the brush opens a panel with control sliders for size and hardness, a list of the most recently used brushes, and a panel with all of your installed brushes arranged in groups. A quick shortcut to change the brush size is to use the right bracket key (}) to increase the brush size and the left bracket key ({) to decrease the brush size.
Hardness controls how sharp the edges of the brush are. It’s often better to use a softer brush if you need subtle blending, like when working on a mask.
Clicking on the arrow by a group opens the folder to show the individual brushes.
In the top tool bar you will see controls for flow and opacity with drop down arrows that bring up the sliders for controlling each.
Opacity sets a maximum opacity for each stroke, and you can’t go beyond that without releasing the mouse button and clicking again. Opacity is more like a computer-generated way of painting.
Flow allows you to build up ink over time, similar to using a marker on paper. The more times you go over an area with flow, the more ink is applied. Flow is similar to using spray paint, where you can make multiple passes to build up the paint.
In the example below, with the brush set at 50%, as long as I hold the mouse button the opacity will not go above 50%. If I release the mouse and start painting a new line the opacity will increase where there is overlap. In the flow example, at 20% opacity the line is light, but if I paint twice over an area opacity increases, and it increases more with each pass. It can give you a lot of control in some situations.
If you use a graphics tablet you can have opacity controlled by pen pressure.
Closely related to brushes are the foreground and background color swatches. The default is a black foreground and a white background. Pressing “D” resets the swatches to black and white. The brush always paints with the foreground color.
When painting on a layer mask you cannot use color. If you try to select a color, it will show as a shade of gray. You could also set a shade of gray as the foreground, but I prefer to use the default black and white, and if I want less than pure black or white, I decrease the opacity.
Pressing “X” swaps the foreground and background, or you can click on the curved arrow above the swatches.
To pick a color other than black or white, click on the foreground swatch and the color picker will open and you can use it to select your desired color. You can use the “X” key to swap foreground and background and change the new foreground to a different color. Just remember the brush always paints with the foreground color.
A handy trick for picking a color that is already in your image is with the brush tool selected, press the “alt” (option on a Mac) and click on a color in your image and it will set that color as the foreground.
Photoshop installs with a number of brushes, and even more importantly there are unlimited brushes available online, and many are free. Do a google search on free Photoshop brushes and you’ll get too many hits to count. If you search for free Photoshop brushes and a specific subject like Christmas, or stars or birds you will probably find what you want. Photoshop brushes have the extension “.abr” whether it is a single brush or a set of brushes. There are two ways to install brushes. First, if Photoshop is not running, browse out to your brush set, double click it and Photoshop will open and install the brush set.
The second method if Photoshop is already open is to click the drop down arrow next to the brush size on the toolbar to open the brushes menu. Click on the gear icon to bring up the settings menu and go down to import brushes, then browse to the folder where your brush set is stored.
You also create your own folders, and move brushes into them or delete brushes from a folder. Brush folders have only been around for a couple of years. Before that all brushes went into one huge list and it could be really tough to find that one special brush you wanted.
WARNING! You can find and load unlimited numbers of brushes, but there are consequences. If you have a lot of brush sets loaded, it can be tedious to find the brush you want among the many you have loaded. If there are brushes that you use infrequently, it may be better to load them when you need them, and then delete them until you need them again. Also having a lot of brushes loaded may make Photoshop load more slowly and they take up memory. That may not be a problem on a high end system with lots of RAM, but on a smaller system it may become a real problem and make Photoshop run more slowly.
It’s also very handy to have a folder on your computer where all of your brushes are stored so you can find them when you need them and they are all in one place the next time you have to set up a new computer.
In the next articles we’ll look at a few different brushes and what they can do for you.