1) Pay attention to all of the entry requirements.
The rules may specify a certain file format, such as jpeg. Some may accept TIFF, generally none will accept RAW. Many contests specify maximum image size in pixels, such as 1024×768 for PSC contests. PSC also has a maximum file size of 800kb. Most contests will automatically reject oversized or wrong format images. Also make sure you enter the maximum allowable size, or you will be diminishing the impact your picture has.
2) Make sure your picture fits the theme or subject if there is one.
Most judges won’t even score an image that doesn’t fit the theme. You may need to shoot specifically for a theme or you may have an existing image that fits well. Don’t enter an image that doesn’t clearly fit the theme. If you have to play word association games to make the image fit the theme, don’t enter it.
3) Make sure your picture is sharp; really sharp.
Soft, blurred or out of focus images get minimal scores. Even if it is a great subject, lack of sharpness kills your score. So zoom in and evaluate your image’s sharpness. Toss out anything less than perfectly sharp.
There are basically three things that ruin sharpness; camera movement, subject movement, and out of focus. Whenever possible use a good sturdy tripod. Also either use a cable release, or the camera’s self time to remove shake caused by pushing the shutter button. If you can’t use a tripod, use a higher shutter speed. The general rule has always been a shutter speed of 1/focal length. This is the slowest shutter speed you should hand hold, and faster shutter speeds are even safer. This may require a higher ISO, a wider aperture, or both. High ISO’s result in noise, but a sharp picture with some noise will always beat a blurred shot with no noise.
Subject movement can be handled with fast shutter speeds, using flash to freeze movement, or panning with the subject. Panning takes a lot of practice, has a high percentage of rejects, but it can look fantastic when it works.
The default for many cameras is for all focus points to be active, and the camera selects the closest subject to focus on. That may not always be the subject that you want to be in sharp focus. Select a single focus point and place it directly on the subject that you want to be in sharp focus.
A special note when photographing people (or animals) is to make sure the eyes are sharp and in focus. If depth of field is shallow, make sure the closer eye is in focus.
Here’s a shot taken at ISO 12,800 at an indoor concert. What looks like bright light to your eyes is really pretty dim to the camera. There were no tripods allowed, so to keep a fast enough shutter speed I used a wide aperture and very high ISO. Is it a bit noisy? Yes. But is it sharp? Yes. You can see the noise in the cropped image, particularly in the red shadow areas.
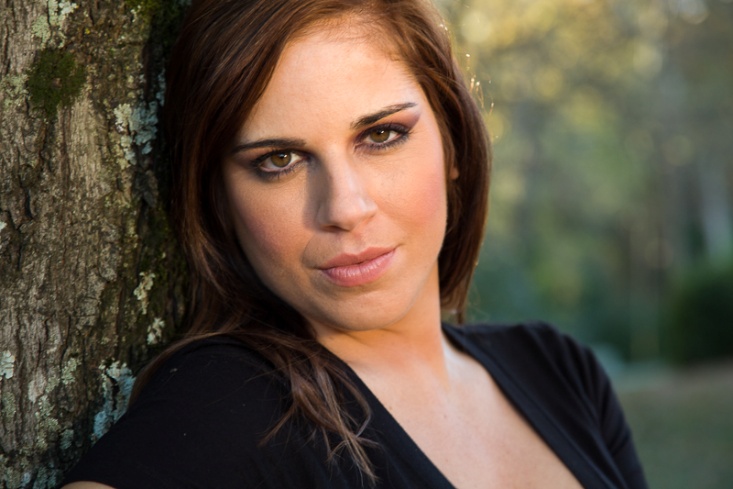
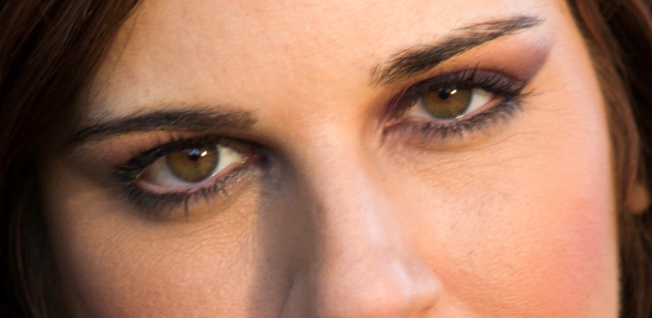
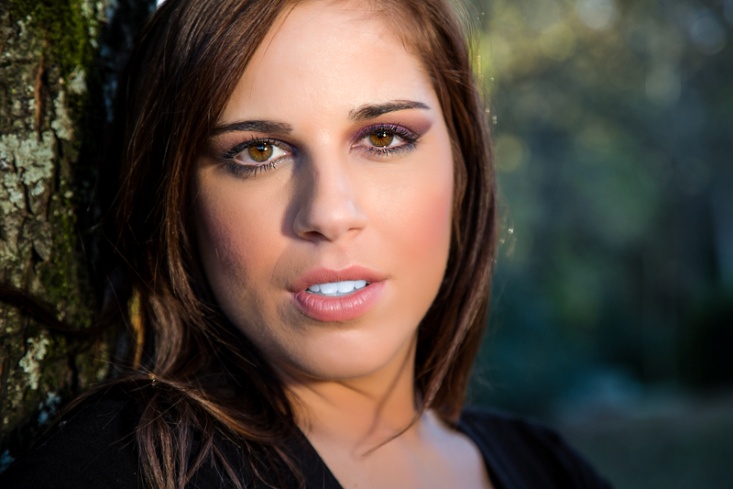
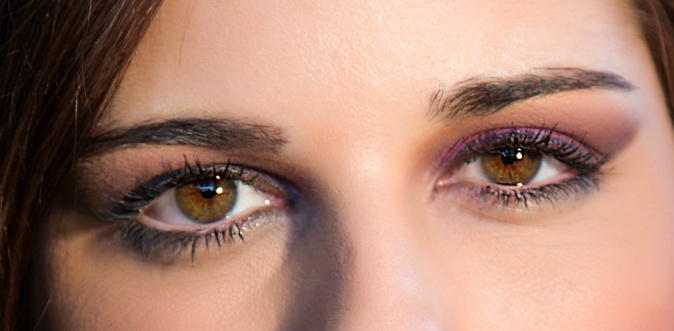
Here are two portraits. The first is “almost” good enough. The second is razor sharp. Look at the crops of the eyes. Don’t even think about entering the out of focus shot. No matter how good the subject or expression, lack of sharpness kills the score.
4) Choose an image with impact.
The image is large, bright, super sharp, unique, photographed from an unusual viewpoint, or anything that creates that WOW factor and leaves no doubt what the subject is.
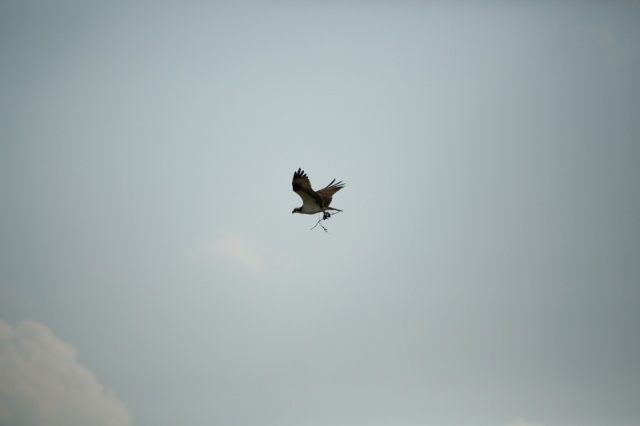
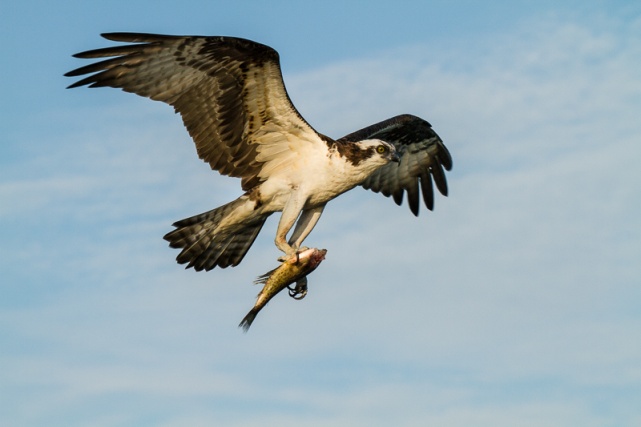
Here are two osprey shots. The first is so far away that he is tiny in the frame and barely recognizable. Add to that poor lighting and a dead center composition and it is a horrible picture. If it is the first and only osprey picture you ever took, you might be all excited about, but the judges won’t be. The second shot is close, has better composition, better lighting, more impact, and actually tells a story about the osprey.
5) Use composition to draw attention to your subject and be aware of elements that draw a judges eye away from your main subject.
All of the “rules” of composition exist to help direct your viewer’s (or judge’s) eye to what you want him to see. Yes, rules are meant to be broken, but pay attention to where your eye is drawn when you analyze a shot.
Leading lines can help lead a viewers eye to your subject. The first shot has effective leading lines. The second has leading lines that take you to a pair of poorly lit, uninteresting deer and then continue to lead you past them and right out of the picture, never to return. Be aware of the power of lines.
Camera angle and viewpoint can have a drastic impact on the image and what it conveys. Wide angle lenses exaggerate a sense of perspective, and telephoto lenses compress. The two shots below show the difference between a wide angle lens and a high viewpoint and a lower viewpoint with a longer lens. Can you feel the difference in impact between the two?
The rule of thirds divides your image into thirds horizontally and vertically. The intersections of these lines are “power points” and placing the most important elements on these points emphasizes them. Most importantly, it avoids the more boring dead center placement. Look at where the eyes are placed in the first two portraits. Compare them to the third where the eyes are dead center. Also look at all of the “dead space” that contributes nothing to the portrait.
Border mergers are elements on the borders of your photos that draw the eye to the edge of the frame and away from the main subject. Pay attention to the edges when you shoot, or use cropping and content aware fill or cloning to remove them later. Look at the difference simply removing the branches at the upper right makes.
Make sure your horizons are level. This is an easy fix in Lightroom and Photoshop. Better yet, make sure your camera is level when you shoot. Here I also changed exposure and contrast, but the most important change was fixing a badly tilted horizon.
Bright areas tend to draw the eye. This can work for you, or against you. Also many photographers darken the corners or use a dark vignette to help hold the viewers eyes on the main subject. In the pictures below, I cloned away the bright pavement, the tip of the white star, the yellow patch and the white blur. Do you see how much easier it is for your eyes to stay on the gun turret as the main subject?
Your eye is drawn to the area of sharpest focus, so make sure that is your subject. Putting distracting background elements out of focus keeps them from competing with your main subject. Wide apertures provide shallow depth of field to limit sharp focus. The first example is ridiculously shallow depth of field, but can you look anywhere but at that one eye? In the second picture, imagine if all of the background elements and highlights were sharp; the subject would not stand out so clearly.
Your lens choice and perspective has a powerful effect on how the viewer sees your subject. In the picture below, a wide angle lens and perspective make it obvious who the leader of the band is. It’s not so obvious that he is the shortest band member.
6) Correct the color balance.
Match your color balance to the light on your subject. Sometimes auto color balance works, but sometimes it is better to select an actual color setting such as tungsten, florescent, shade or daylight. If you shoot in RAW, you have more options for correcting color balance in post processing. Sometimes there are odd color balances that require trial and error correction. The first two pictures were shot in a large room with no lights. All of the lighting was reflected from green leaves and came through windows covered with green mold. I don’t think any auto color balance setting could have fixed this. But imagine how contest judges would react to the uncorrected shot. The concert shot shows the same shot as above, but shot with daylight balance under tungsten lighting. Notice the yellow cast compared to the correct white balance.
7) Add contrast if needed.
At one of our recent meetings our judges did a critique of the images for a quarterly contest. Their number one comment was “needs more contrast”. Generally that means that somewhere in the picture are some blacks that are close to true black, and some highlights that are bright without being blown out to pure white without detail. Here is an extreme example from a heavily overcast day with fog and mist that completely destroyed contrast. Restoring some contrast in editing made a big difference.
8) Try to tell a story.
Creating mood, drama, setting a scene, and good expressions all help a picture score well. One comment I hear a lot from judges is “There’s nothing happening here.” All of your composition tools, lighting, and choice of color or monochrome can help create a mood. Below is a pretty plain shot of a room. Look at the difference when I got to shoot a couple of the men who had been living there for a few days. Notice how the mood changes even more in black and white.
9) Get a second opinion from a photographer whose judgment you trust.
It is all too easy to fall in love with your own picture and not see its flaws. It may be a picture of someone you love, it may remind you of a great day, or you worked very hard to get the shot. But it still may not be a great shot. Another photographer can be much more objective. Also if you find yourself explaining a picture to someone, it is probably not going to do well in a contest. In a contest your pictures have to speak for themselves.
10) Realize that you won’t always win.
In fact it’s almost certain that you will lose more than you win. Try not to get your feelings hurt and take it personally. Use it as an opportunity to look at the winners and see how to improve your own work. Whenever you can get comments from the judges, it can be a great insight into the minds of judges, and tell you what works and doesn’t, particularly if you can see comments for all of the entries. Also remember that every judge brings his or her own biases, due to background, training, experience, personal photographic styles and preferences, and even their mood on that day. If you don’t win, it may just mean that those particular judges didn’t like that particular image on that particular day. The same image may score well in another contest, with no changes other than the judges. At the same time, try to hold your ego in check when you do win. Again, all it means is that you pleased those judges on that day. When you can do well consistently, you will know that you have improved as a photographer. Entering contests can be very rewarding if you approach it as a way to share your work, receive feedback and grow as a photographer.