When using flash, we normally have to shoot at the camera’s “synch speed” shutter speed or slower. For most cameras the synch speed will be 1/200 sec, but check your manual to be sure. A shutter speed faster than the synch speed does not allow the shutter curtains to be fully open, but instead the curtains open as a slit that moves across the sensor. The higher the shutter speed, the narrower the band becomes. So using flash at a shutter speed faster than synch speed will result in a band of underexposure, and the band gets larger as the shutter speed gets faster.
Normally at “synch speed” or slower, the shutter curtains open completely, the flash fires, everything is lit evenly, and then the shutter closes. High speed synch mode allows us to use flash at shutter speeds up to the fastest speed of the camera. It requires a flash that is compatible with the camera, and has high speed synch (HSS) mode. It works by continually firing low power flashes at a fast rate, so that the entire image is evenly illuminated. The higher the shutter speed, the more rapid the pulses, and the lower the power output of each flash. These pulses may be several thousand times per second and a speedlite can’t recycle fast enough at full power.
So why do we need HSS? The main use is in shooting with flash outdoors where bright sunlight requires a faster shutter speed. While it may be possible to stop down the aperture and achieve a proper exposure at synch speed, depth of field will be great. Many portrait and glamour photographers prefer to shoot at wide apertures for shallow depth of field, and also slightly underexpose the background which requires even faster shutter speeds.
What are the disadvantages of HSS? First the speedlites (or now even larger strobes) must be specific to the camera brand, and they generally cost more than speedlites without HSS. Second, HSS decreases the output of the flash, so it must be close to the subject, and it may even require multiple speedlites. The higher the shutter speed, the lower the flash output, so you will need to adjust flash output with every shutter speed change. Third, even though the light output is low, those multiple flashes consume a lot of power, and battery life is shortened. And last, but not least, all of those fast pulses can cause a speedlite to overheat. The better speedlites will shut down when they overheat; strobes without good heat protection may self-destruct, or worse yet, catch on fire.
Speaking of battery life, if you work with speedlites a lot, it pays to invest in good rechargeable batteries and a good quality charger. I have found Eneloop to be the best batteries, and I use a Powerex 8-cell charger.
Here I’ll show you some examples of using HSS to capture a portrait with shallow depth of field to isolate my model in bright sunlight. I had my model under shade so there wouldn’t be harsh shadows on the face. I used a Magmod softbox with two Yongnuo YN600EX-RT speedlites off camera and a YN-E3-RX controller on the camera.
It should go without saying that I am in manual mode so that I have complete control of aperture and shutter speed and also adjust my flash power manually. The first shot is at 1/200 sec, f/16 with no flash. This gives me the slightly dark background I want to help separate my subject. I find it best to turn off the flash and set the background exposure first. Without flash the subject is totally silhouetted.
The shot below is at 1/200 sec (my camera’s synch speed), and f/16. It’s nicely exposed and balanced, but at f/16, the background is too sharp for the effect I’m after. Also even at f/16, the two speedlites were only ay about ½ power.
For the next shot I switched to HSS, 1/4000 sec and f/2.8. Notice how soft and out of focus the background is. The two speedlites were at full power to provide enough light at f/2.8.
Below is a similar series. The first shot is at 1/200 sec and f/16 and the second shot is HSS, 1/3200 and f/2.8. Again it took two speedlites at full power to light the shot with HSS at f/2.8.
Neutral density filters are filters that decrease the amount of light entering the lens. They have two main uses either to allow shooting at a slower shutter speed, or shooting at a wider aperture. The much more common use is slow down the shutter speed to allow moving subjects to blur, or with extremely long shutter speeds allow moving subjects like tourists to completely disappear. Shooting at wider apertures is usually done by selecting faster shutter speeds, and unless you have rare situation where you need both a wide aperture, and a slow shutter speed, the faster shutter speed is no problem.
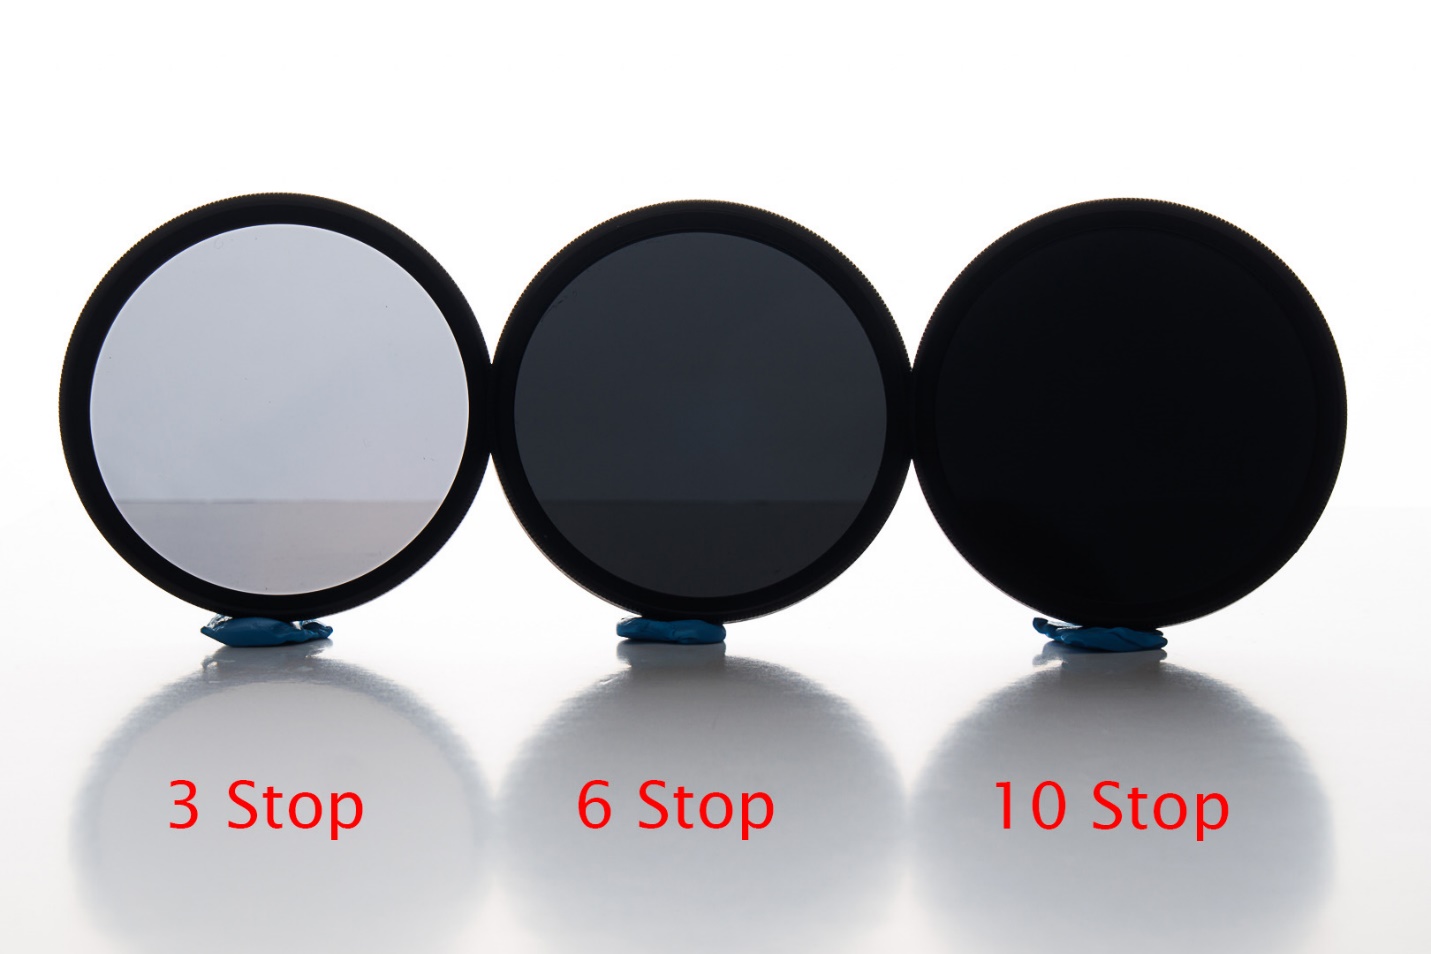
ND filters are available as square filters, or threaded round filters. If you use the threaded filters, you can get a set for your largest diameter lens and get step up rings for your smaller lenses, or if money is no object get a set for each lens size you plan to use.
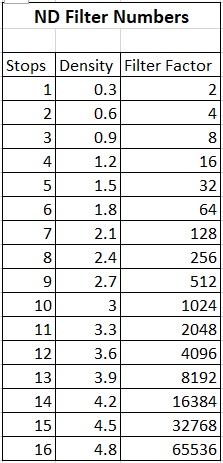
What do all of those numbers mean? There are several different ways of naming ND filters and how much they reduce light. The simplest way would be to state how much they reduce light, such as 1 stop, two stops, 6 stops etcetera. But that would be too easy. The most common naming either uses optical density, or the filter factor.
In the optical density format, 0.3 equals one stop, 0.6 equals 2 stops etc. Most days I can do the math in my head.
The filter factor system is based on the log of two and how many stops it reduces. So for example a one stop reduces light by ½ or 2^1. Two stops would be 2^2 or 4, three stops would be 2^3 or 8. I don’t mean for this to become a math class, and you can just refer to the chart below. The advantage of this system is you can multiply your shutter speed without a filter by the filter factor to get your new shutter speed with an ND filter.
You can also stack filters and the effect is additive, so a 6 stop plus 10 stop equals a 16 stop filter. Also if you get caught out without your ND filter a polarizing filter is about a 1.5 stop ND.
OK, those are the advantages; you know there must be some disadvantages too. Ideally ND filters decrease light without causing a color shift, but in practice there is a color shift until you get into the more expensive filter lines. You can color correct in camera raw by finding a neutral tone to color balance on, or shoot a gray card in your first shot and use it to color balance all of your images.
Focus can be a challenge because of the dim viewfinder. My DSLR focuses well with a three stop, but autofocus struggles with 6 stops and above. My M50 mirrorless works well with 3 or 6 stops. I haven’t used my 10 stop yet, but supposedly most mirrorless cameras can handle it. If focusing becomes an issue, focus before placing the filter, and switch to manual focus. Be careful not to change focus as you place the filter.
Most cameras will only do timed shutter speeds up to 30 seconds. Beyond that you’ll need to switch to bulb mode and use a timer. I have two free ND filter apps on my phone that will calculate shutter speeds with various ND filters and also have built in timers. I use an Android phone, but they (or similar) apps should be available for I Phones. Look for “ND Filter timer” or “ND Expert”.
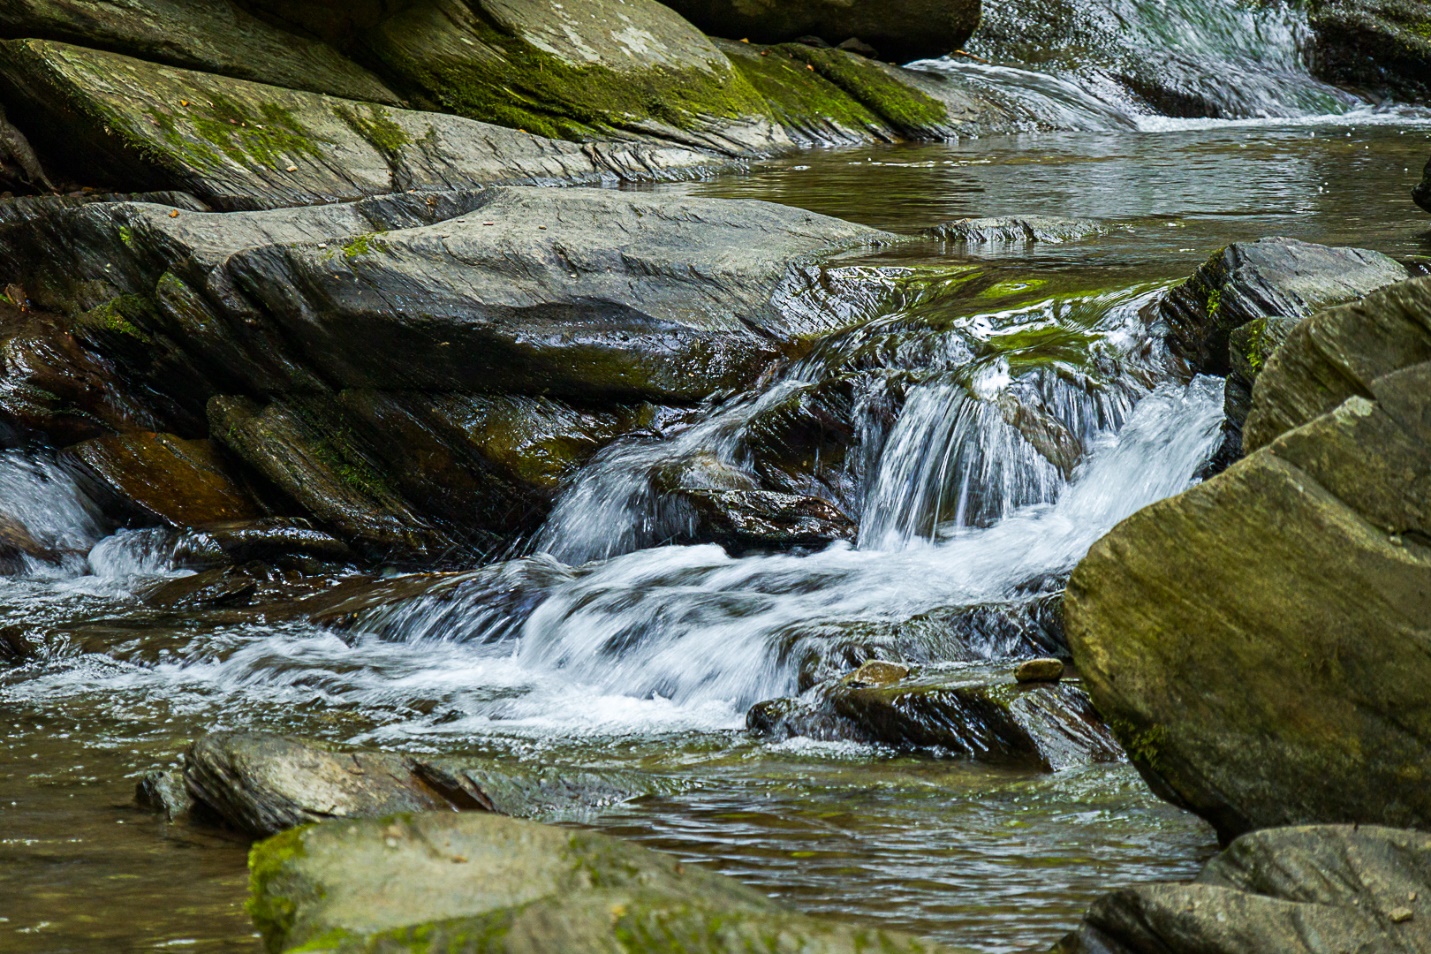
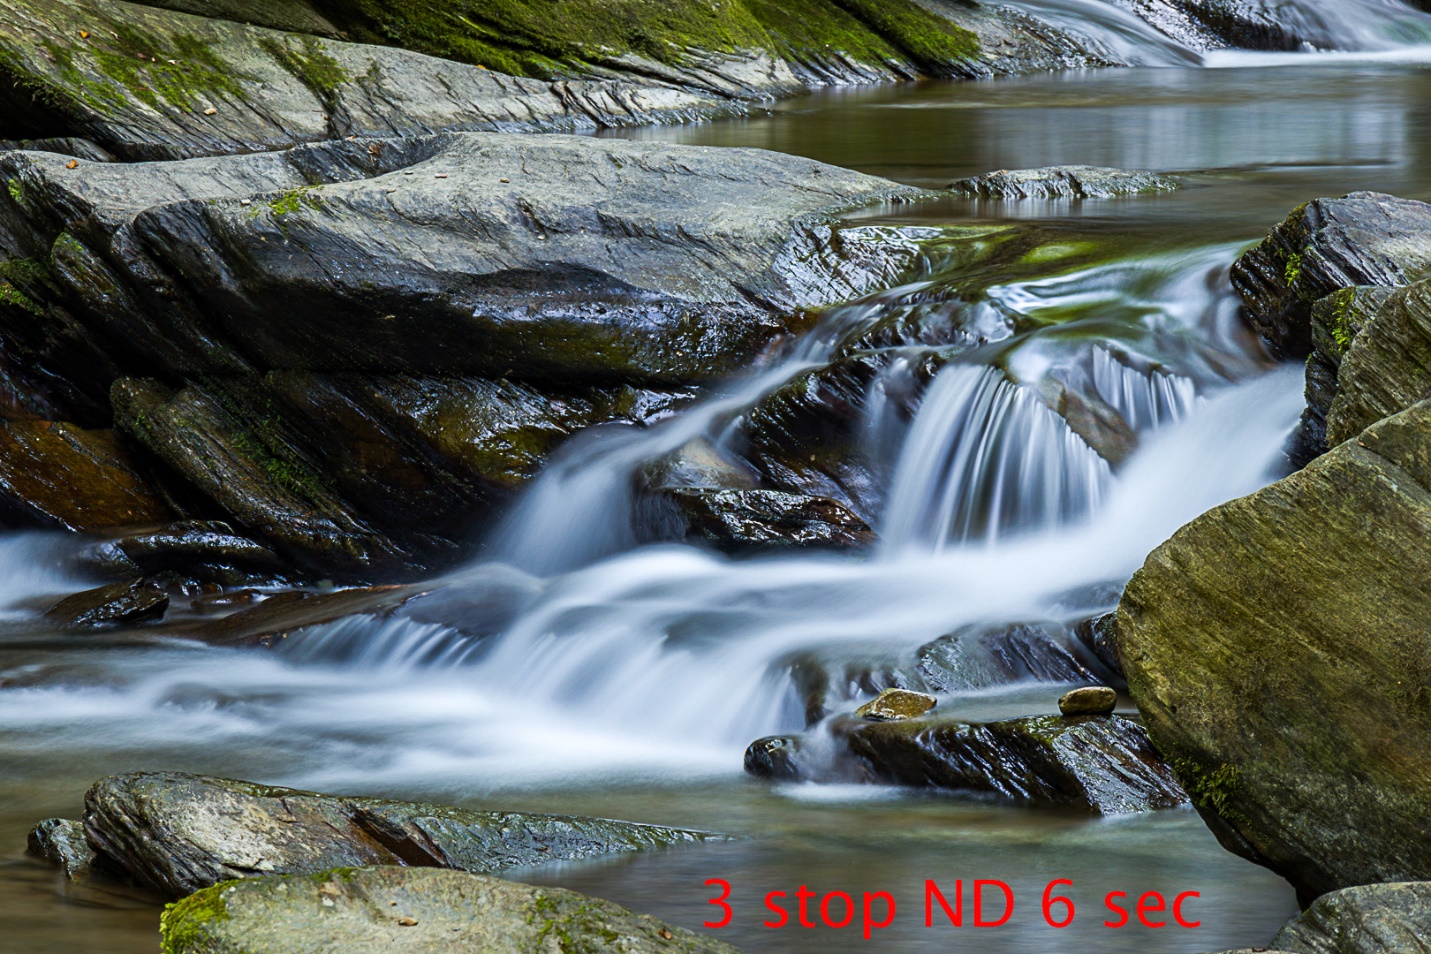
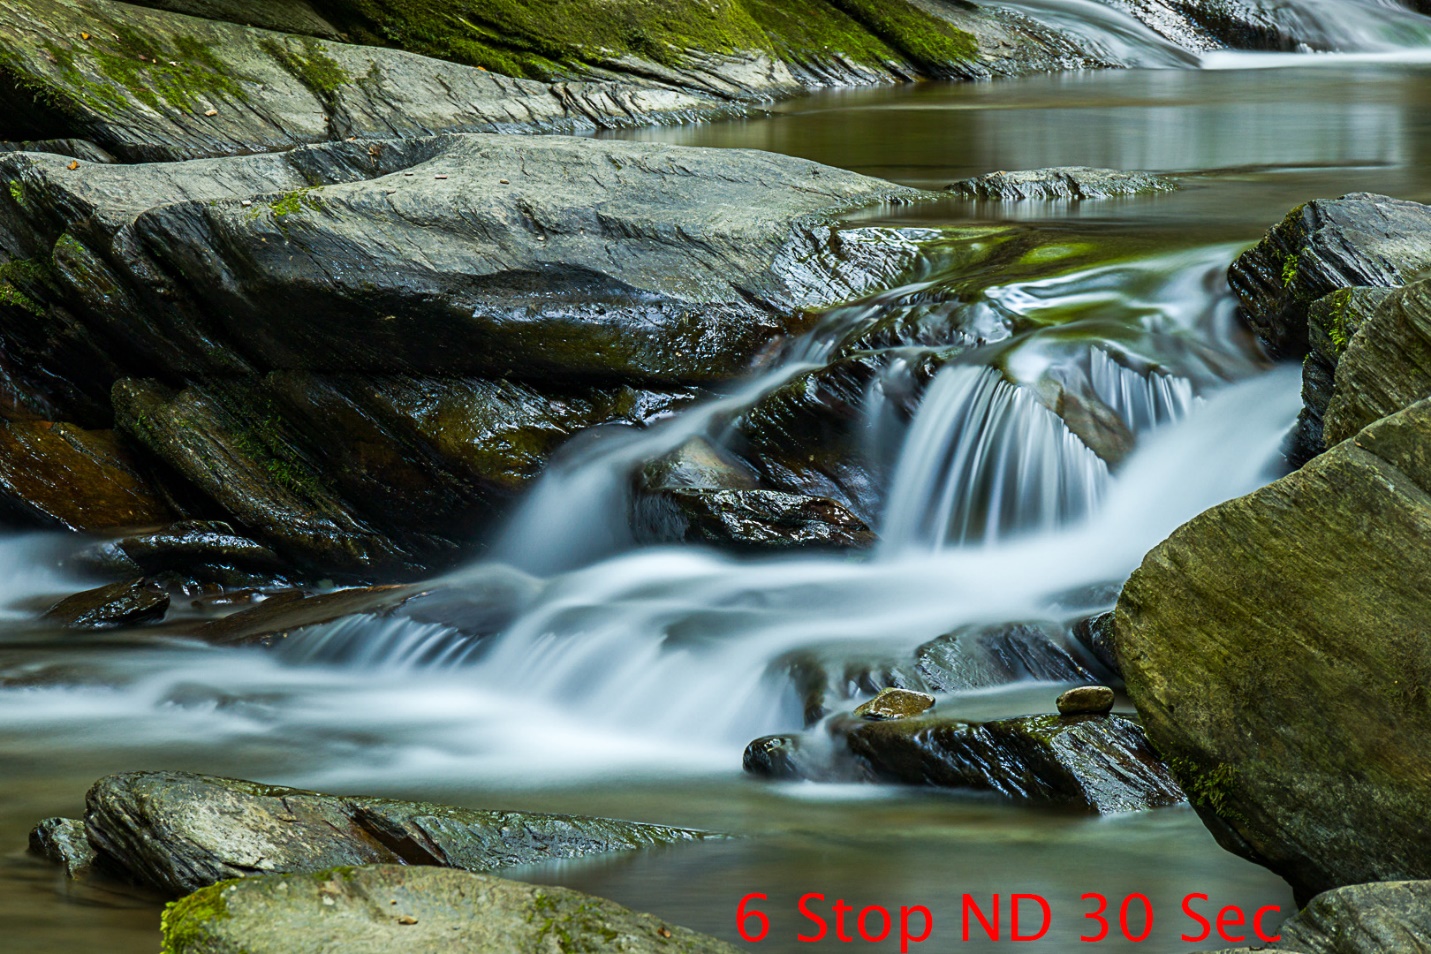
Here are some examples I shot the other day at Goforth creek. They aren’t best example since it was fairly overcast and the cascade is in shade, so my shutter speeds were already pretty slow. Most American photographers like the smooth silky water produced by a slow shutter speed. How slow that shutter speed needs to be depends on the amount and speed of the water. Experiment with different filters until you find the look you prefer.
I shot the first photo wide open at 1/40 and ISO 800 to show water that is too sharp.
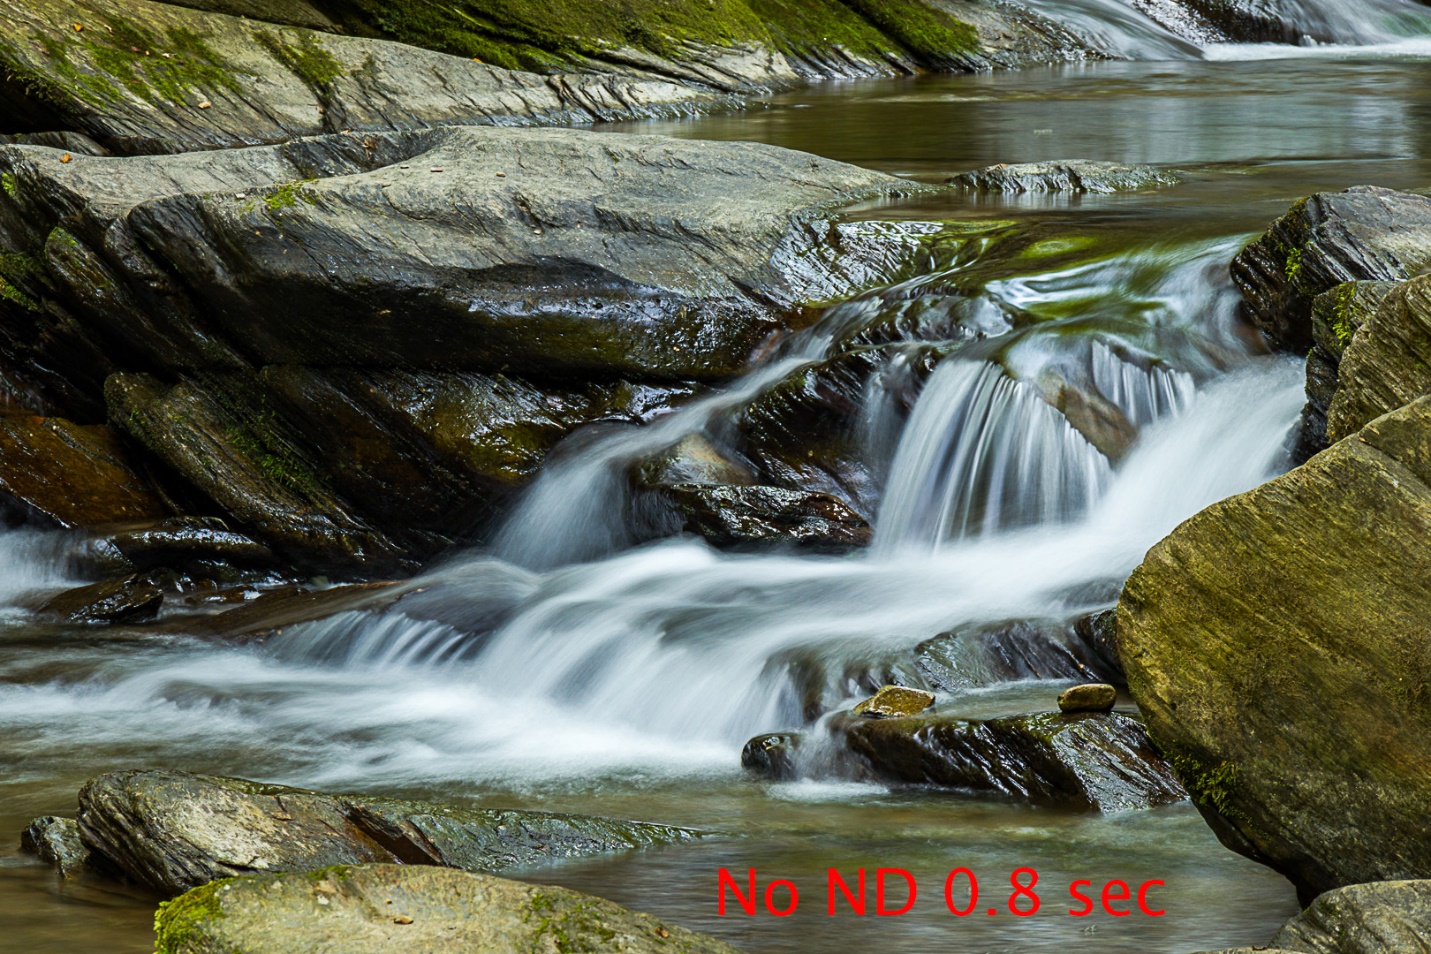
The next shots were 0.8 sec at f/16 and no ND filter, 6.0 Sec f/16 with a 3 stop ND, and 30 sec f/14 with a 6 stop ND. In these shots, there’s very little change between the 3 and 6 stop ND filters.
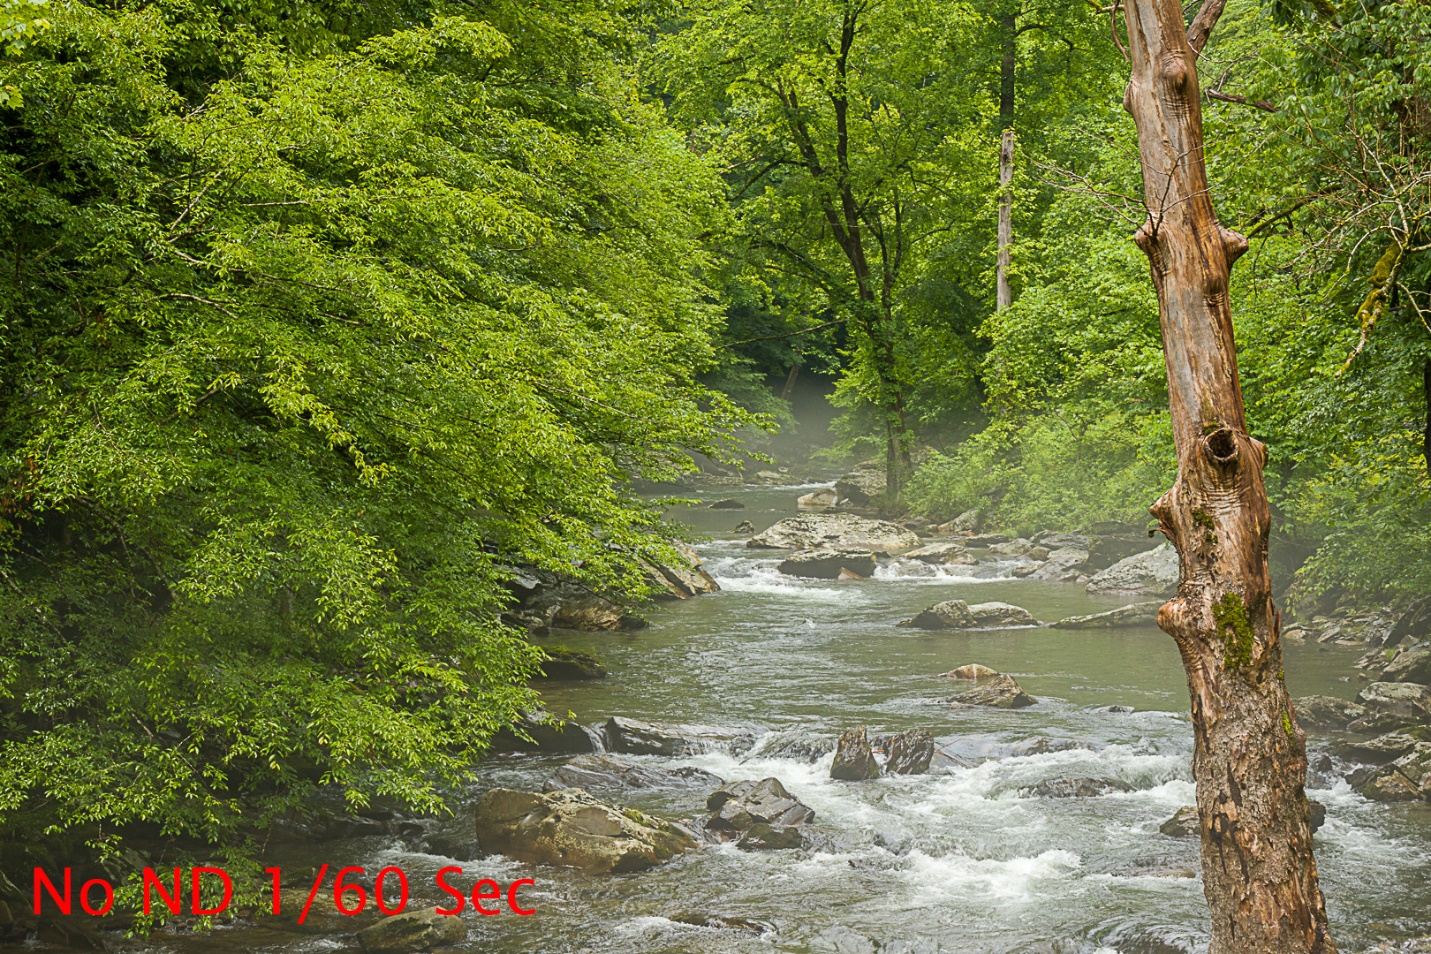
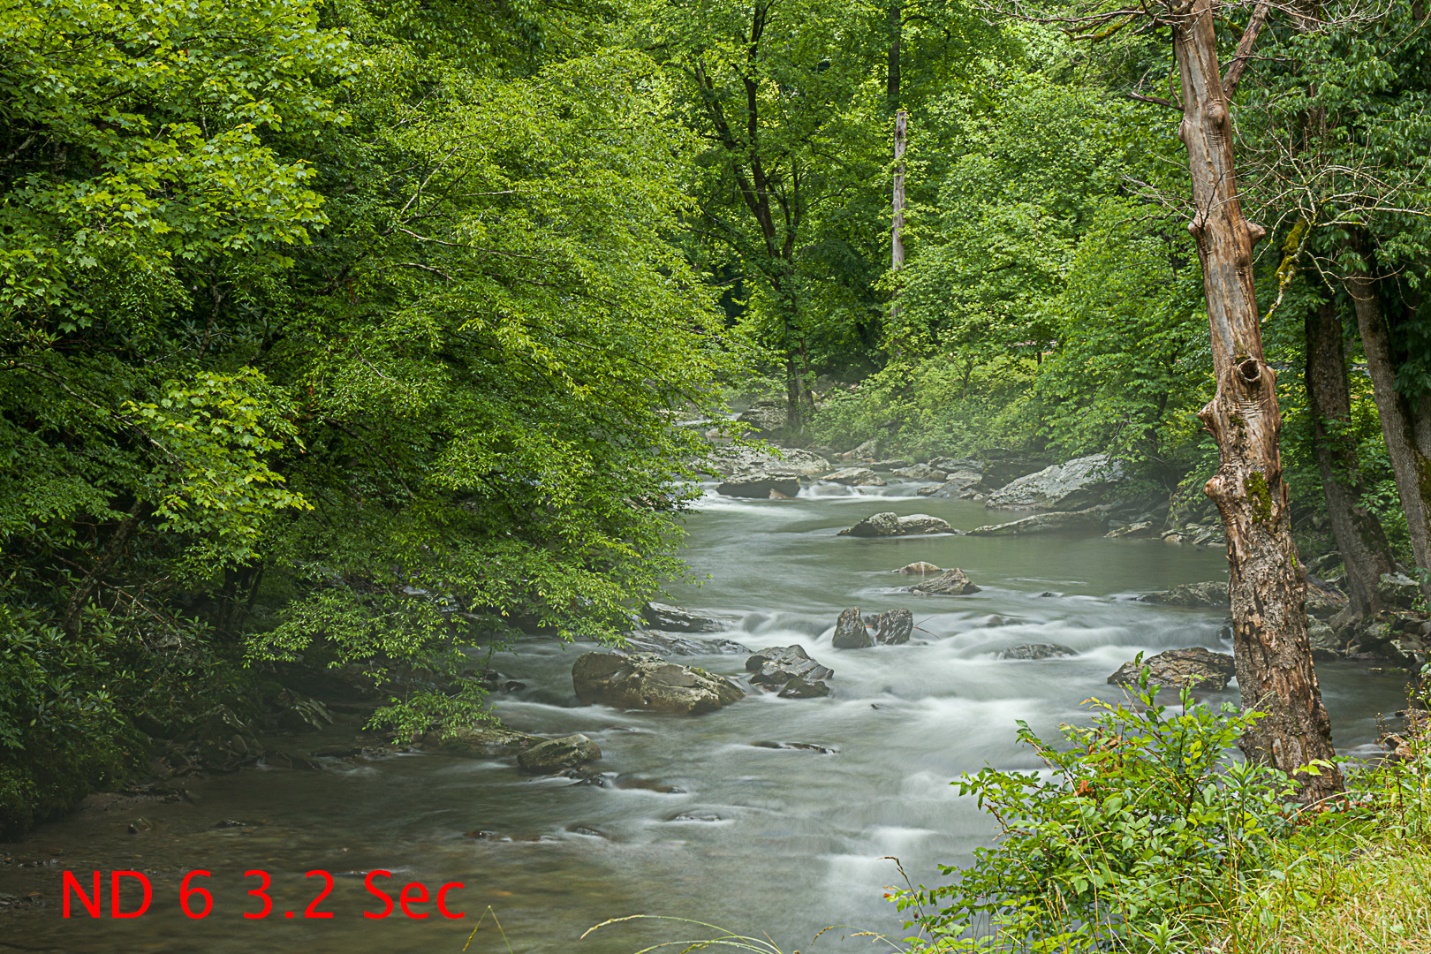
These last shots were in much brighter light, so the difference should be more obvious. The first shot was at 1/60 sec with no ND Filter, and 3.2 sec with a 6 Stop ND filter.
So, whenever your photography includes flowing water, or other subjects you want to blur, remember what ND filters can do, and don’t leave home without them.
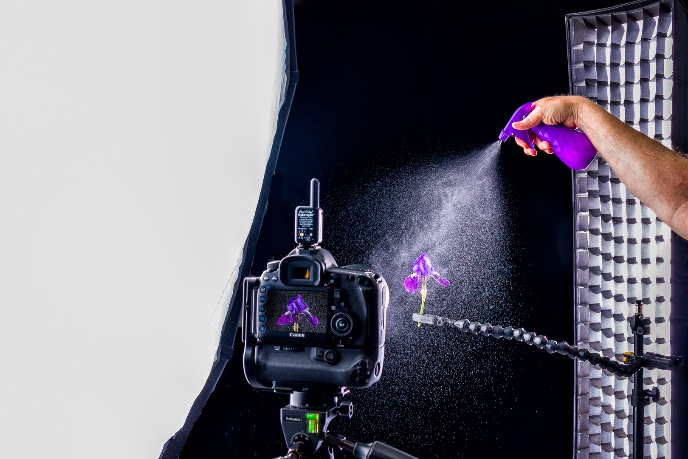
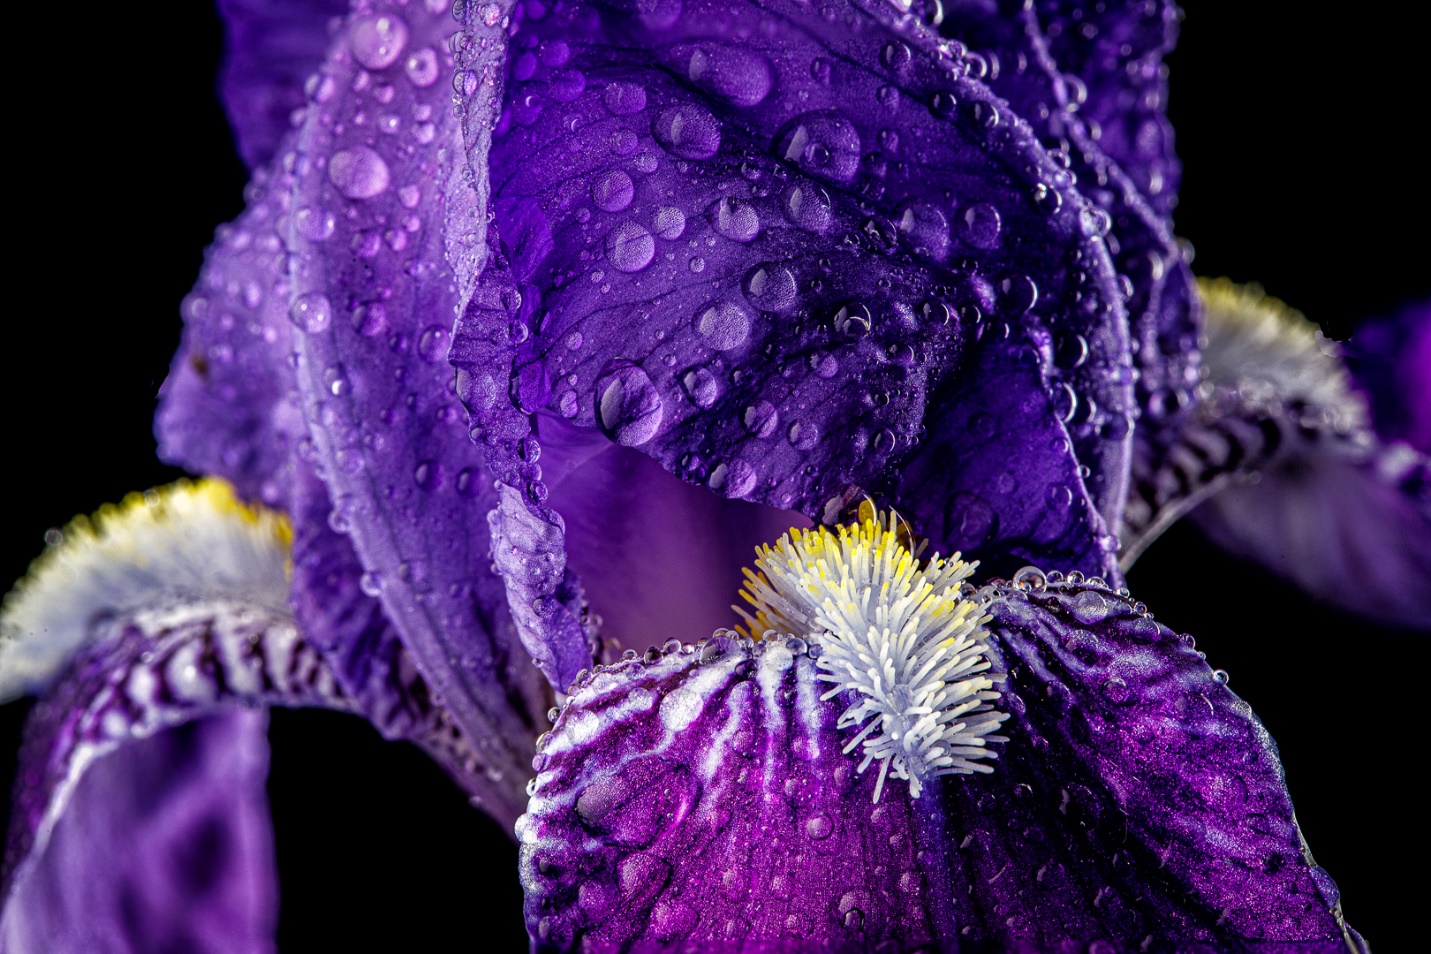
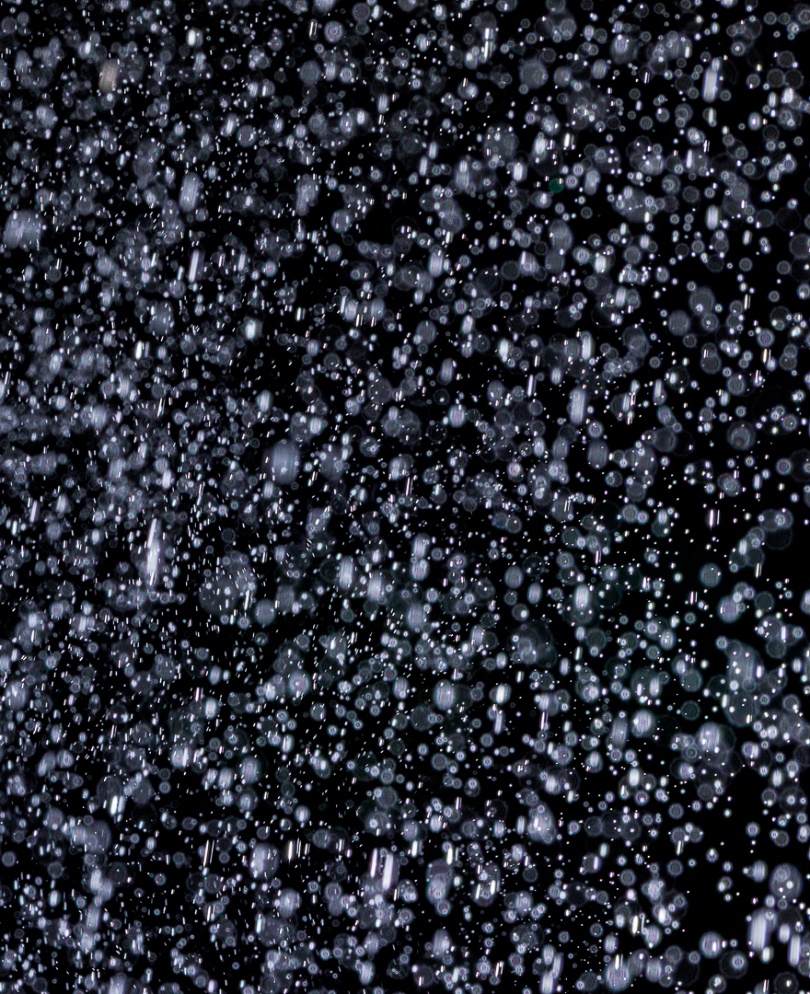
I found a nice purple iris in my yard, and decided to bring it into the studio to photograph it. I almost always spray some water on my flowers for extra interest and texture, but today I decided to shoot as I sprayed to get a rain effect. While I got some shots I liked, there was one unexpected problem that I’ll talk about in a minute.
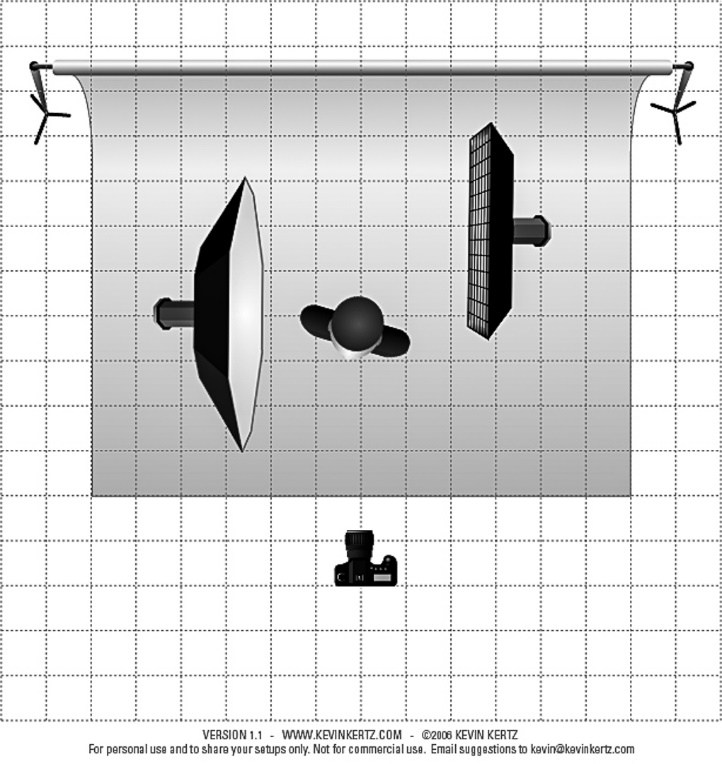
I shot with my Canon 5D Mark IV and 100mm f2.8 IS “L” Macro lens. My bloom was held with a Wimberly Plamp which makes positioning the flower easier and precise. I lit this with a large Octabox camera left, and a strip light with a grid behind the flower and camera right. This is very similar to one of my favorite portrait lighting setups. The indoor rain droplets came from a two small spray bottles; one gave a fine mist and the other a coarser spray. Exposure was ISO 200, 1/125 sec and aperture varied between f/16 and f/22 for deep depth of field.
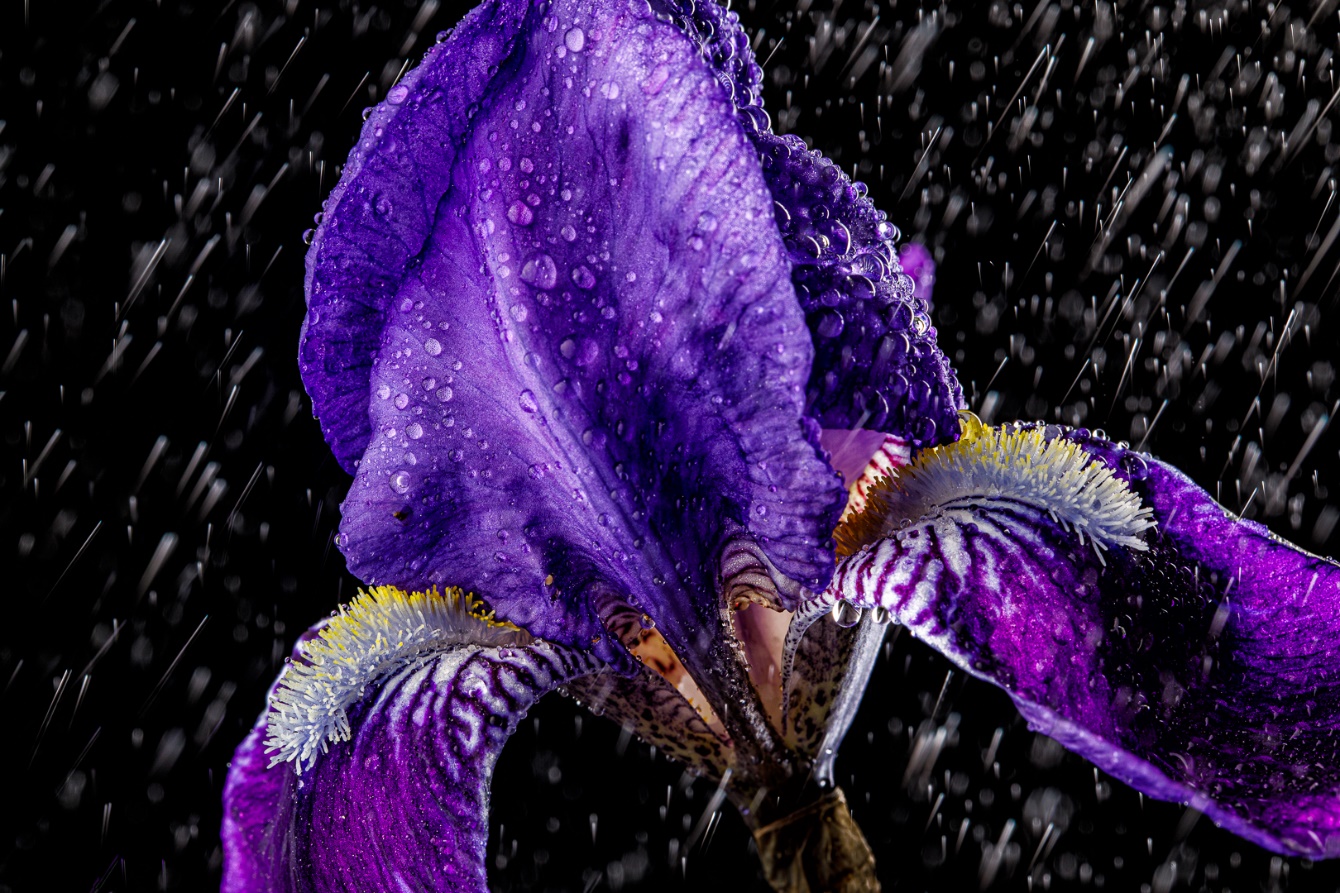
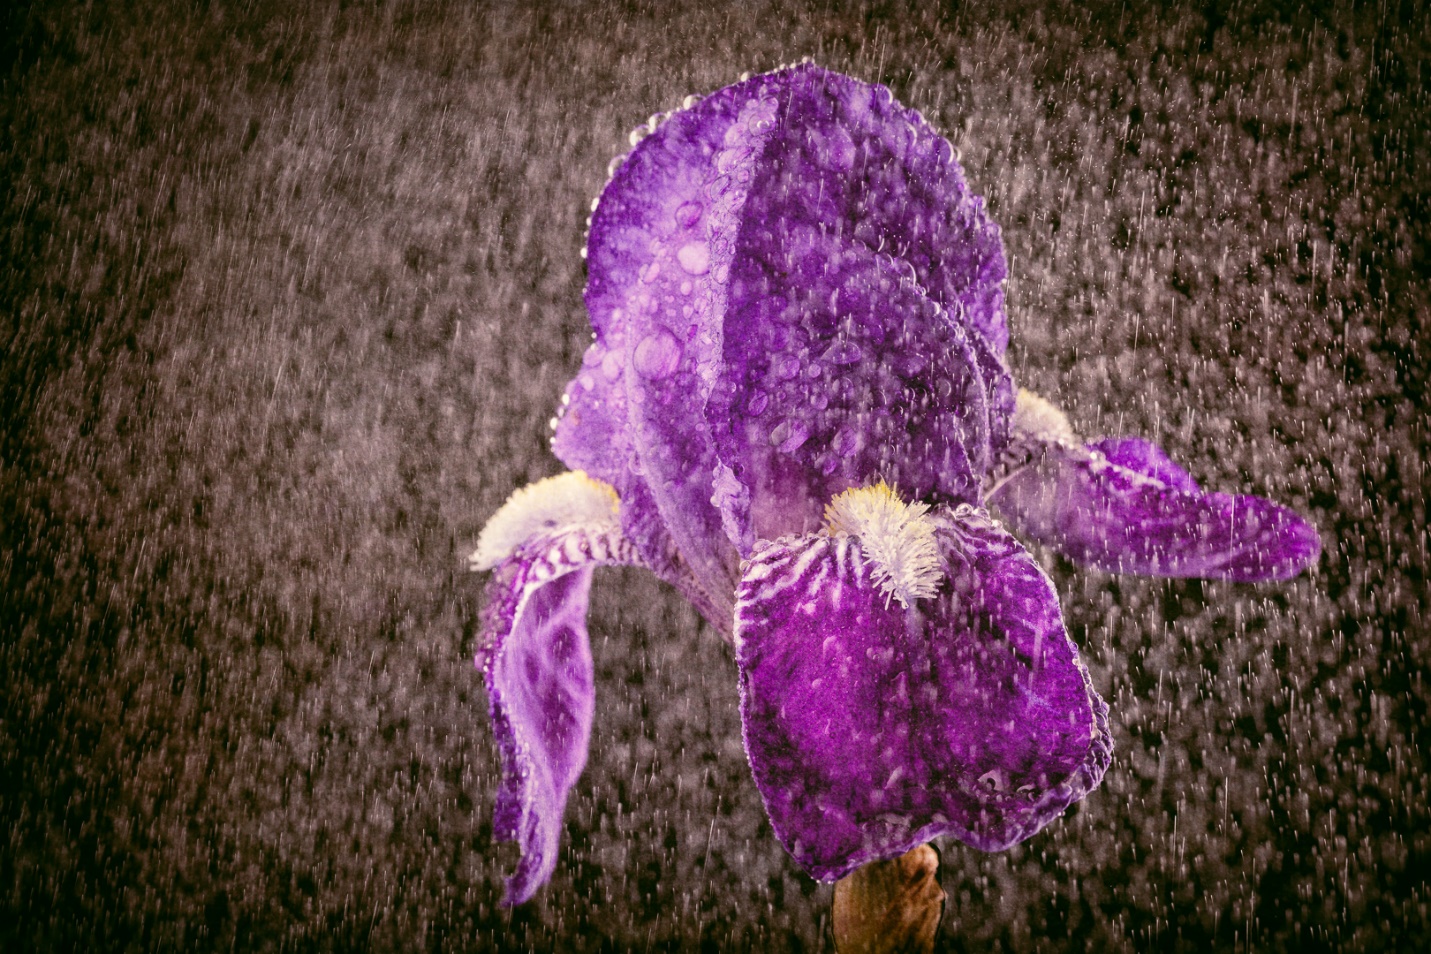
Here is one of the first images I took. I like it, but if you look at the raindrops closely, you’ll see the problem. In nature, and how we perceive them in our minds, water drops fall with the fat part down, and the trailing tail of motion blur going up. The raindrops in my shot look just the opposite and that almost makes them appear to be going up rather than falling downward.
There are several reasons this happened, and there are a couple of possible fixes that I may shoot later if I’m not feeling lazy. First, many people assume that the speed of a flash firing is so fast it will freeze motion. But different flashes have different flash durations. Generally, at full flash power like I was using, the flash duration is longer. Also on a studio strobe like I was using, there is an initial discharge where most of the light is produced, giving us the bright fat part of the drop, but then it falls off gradually from there leaving the motion streaks below our drops. The streaks weren’t from ambient light in the studio because the room lights were off. Also studio strobes use what is called front curtain synch. So the strobe fires as soon as the first curtain starts to move so any movement during the time the shutter is open appears to blur in front of the drop, rather than behind it.
So how do I fix it? First, I could buy a really large, powerful (and expensive) strobe with a very short flash duration. That’s not happening; have you noticed the price of gas and groceries lately? The second, cheaper fix is to shoot using speedlites rather than a studio strobe. Speedlites have a shorter flash duration, especially at lower power, and they don’t have the slow fall off of a studio strobe. Also most camera and speedlite combinations allow for rear curtain synch, so the flash doesn’t fire until the shutter is closing, so the streaks have already occurred behind the drop before the flash lights it.
So there must be a downside (or two or three) or I would have just started with speedlites. The first down side is the limited power of speedlites. I was shooting at ISO 200 and f/16 or f/22. To do that with speedlites, the light would have to be very close, I’d probably be at a much higher ISO and larger aperture (not what I needed for depth of field), and I probably couldn’t get enough power to use a softbox. Again at full power the speedlite would have a longer flash duration also. It would be difficult to get the light quality, good depth of field and the quality of a low ISO with speedlites, but I may do some experimenting later. And the biggest downside is that speedlites don’t have modeling lights, so placement is trial and error.
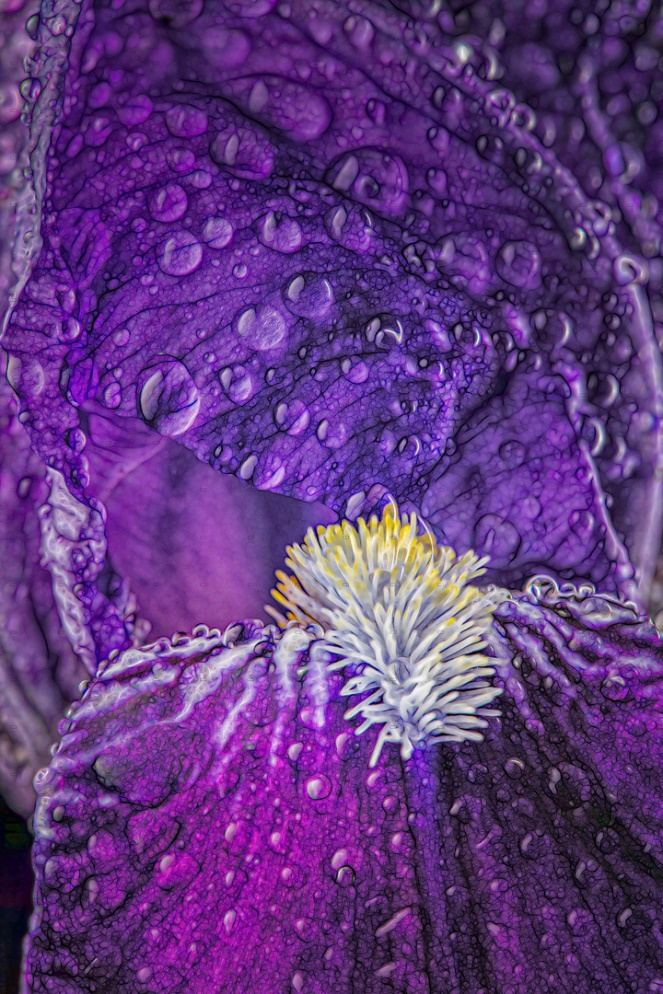
Generally, my style in the studio has been clean, sharp, graphic images like the one below.
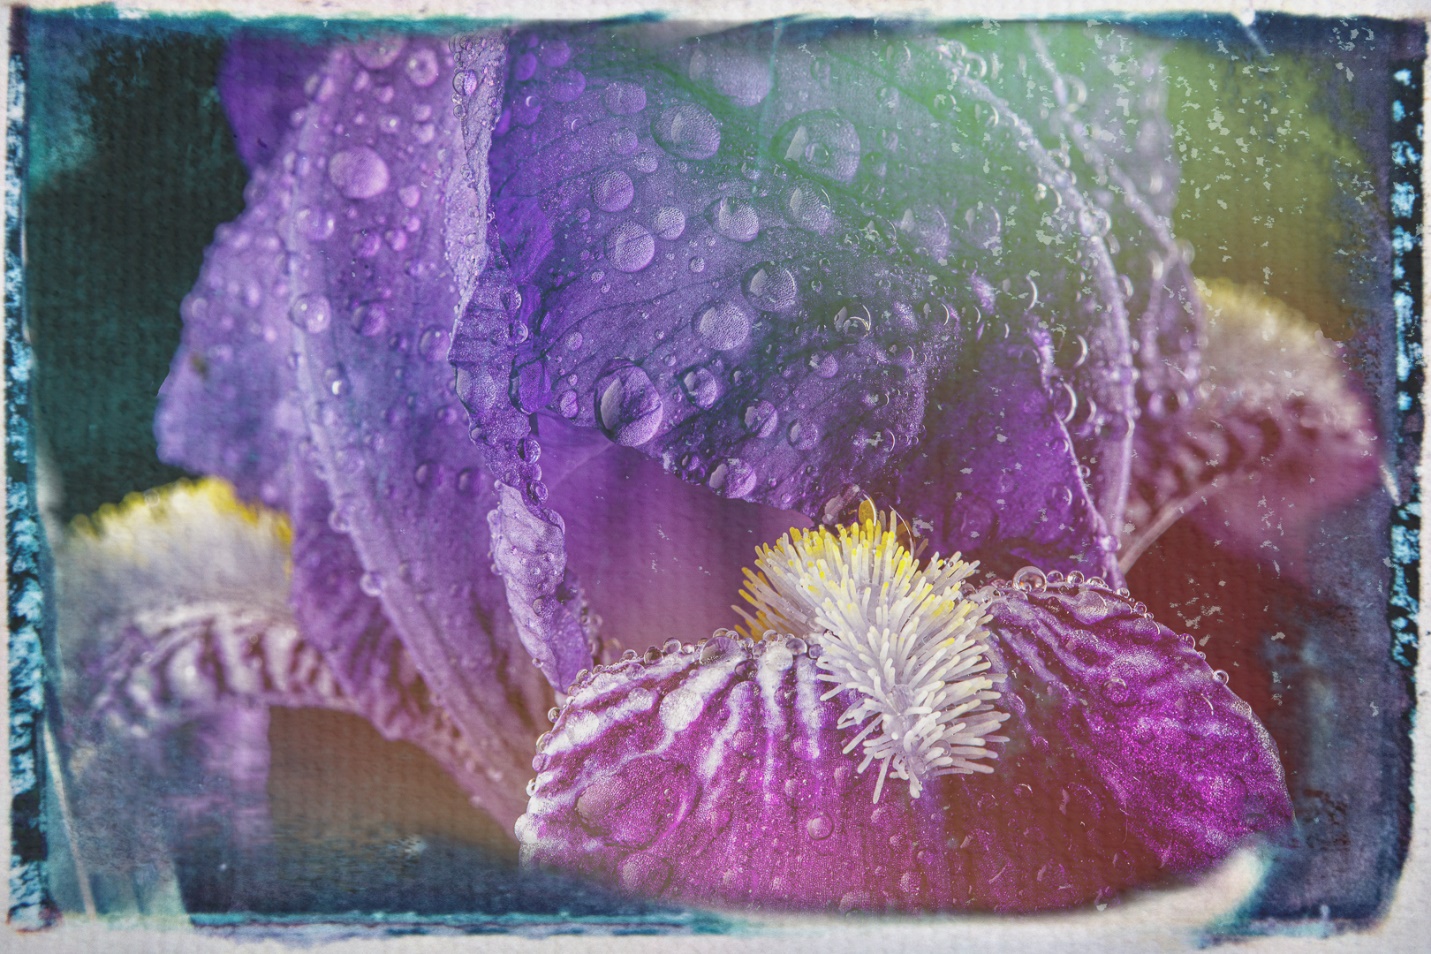
Lately I’ve been experimenting more and more with textures, color grading, and other filters to produce a less realistic and perhaps more artistic look. It’s still a learning process and I’m not fully comfortable with it yet, but I’m getting there.
This last image required focus stacking four images because of the very shallow depth of field produced by extreme magnification. Even f/22 couldn’t provide enough depth of field for the look I wanted. And if I’m being honest, I had to go back and reread my older article on focus stacking because I haven’t had to use it in over a year.
BONUS
I knew I wasn’t going to sleep tonight unless and until I got out some speedlites to see if they really would change the look of the rain. I had a very small (about 5X7 in) and inexpensive softbox that goes directly on a speedlite. I placed this about 4 inches from the iris for two reasons. First by placing it so close it was still relatively large in relation to the flower and produced a fairly soft light. Second by placing it so close, I was able to shoot at f/22 at ISO 400 at only 1/16 power, which makes for much shorter flash duration. I used a second speedlite with a grid, also at 1/16 power behind the flower and camera right to backlight the flower and “rain”.
So, did we learn anything? First, I already knew it, but now you know it too; I’d rather do photography than sleep. Second was a bit of a surprise to me; I was able to get my f/22 exposure by only going to ISO 400, and still only used 1/16 power on the flashes. That was important because of the short flash duration. Third, the speedlites really did produce less of a “tail” on the raindrops, and even where it did the drops don’t feel like they are rising up instead of falling down. Fourth, it matters how I sprayed. If I sprayed down on the flower with a slow squeeze, the drops were larger, and fell faster due to direction and weight. If I made a fast squeeze aimed more above the flower, the drops were smaller, lighter and didn’t fall as fast or blur as much.
I have been working with speedlites more and more, and other than the lack of modeling lights they can handle small jobs almost as well as studio strobes, if not better, as in this case.
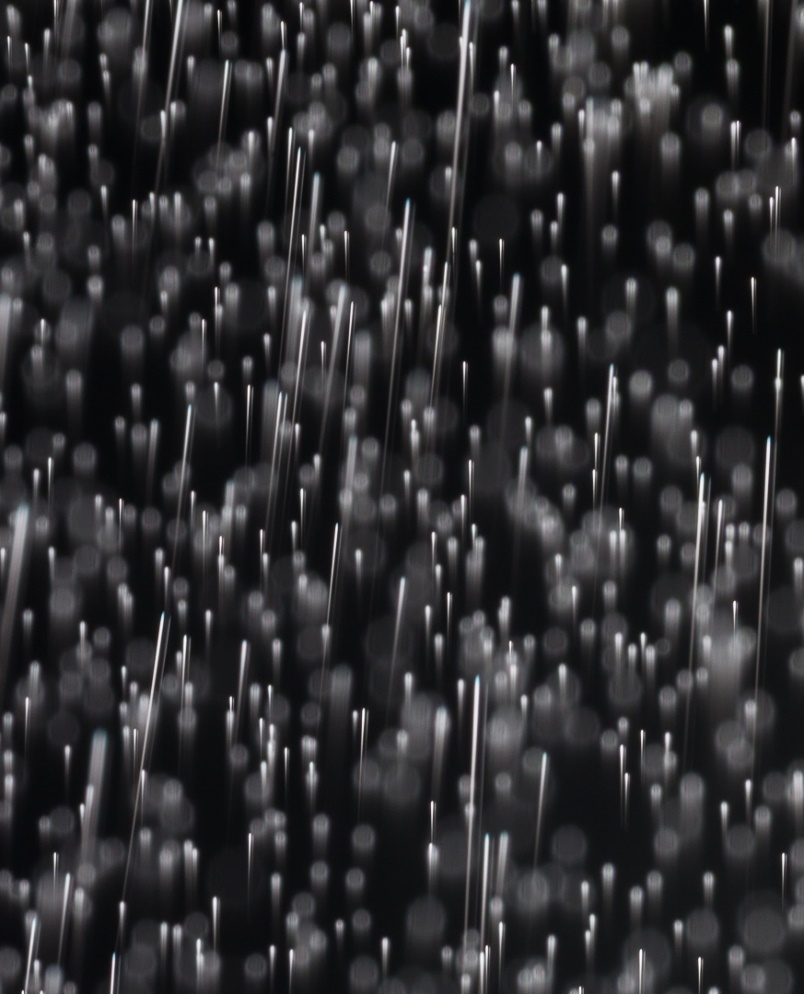
Here’s a detail of the rain shot by a speedlite. Notice the tails are almost nonexistent or very short due to the short flash duration. And the tails don’t taper and look like they’re rising.
Here a slow squeeze aimed downward produced larger drops and slightly longer tails.
Here a quicker spray aimed above the flower produced small drops with almost no tails.
With the Fourth of July coming up, here are some basic tips for shooting fireworks. At the end of the article I’ll tell you how I’m actually doing my fireworks shots for the last few years.
You can do a google search for “your city”, the “year”, and “fireworks” and find upcoming events with fireworks. I feel it’s important to include the year in your search or you’ll be seeing events from several years past. Remember fireworks are not just at the major holidays, but often follow sporting events and concerts.
Once you’ve picked your event, arrive early and decide where you want to shoot from and what you want to include in your image. Don’t forget there will be others (lots of others) arriving later so try to pick a location or shooting angle where they won’t be in the way. Also try not to be in anyone else’s way. I have found that many displays start too early, before the sky is really dark enough. There’s not much you can do about that except change the sky in post processing.
Basic Equipment You need a camera that allows you to set long exposure times, or preferably bulb mode. Almost any DSLR or mirrorless camera is adequate. Make sure your battery is freshly charged, and have backups with you. Long exposures, and especially using live view will drain batteries quickly. You can use almost any focal length depending what you want to include in your image. Do shoot loose (wider focal length) because where the bursts occur varies a lot, especially the height.
You will be using longer shutter speeds so you definitely need a sturdy tripod. A cable release is a most for sharp shots. Be careful where you put your tripod when there are others around. At best they may bump your tripod and blur your image. At worst they may trip on the legs and be injured. One very good tip that I read and can’t take credit for is to tape or rubber band glow sticks to each tripod leg.
A small flashlight or headlamp is useful for setting your camera controls. If you use a headlamp, be courteous and don’t shine it the face of the people you look at.
Don’t forget bug spray and water.
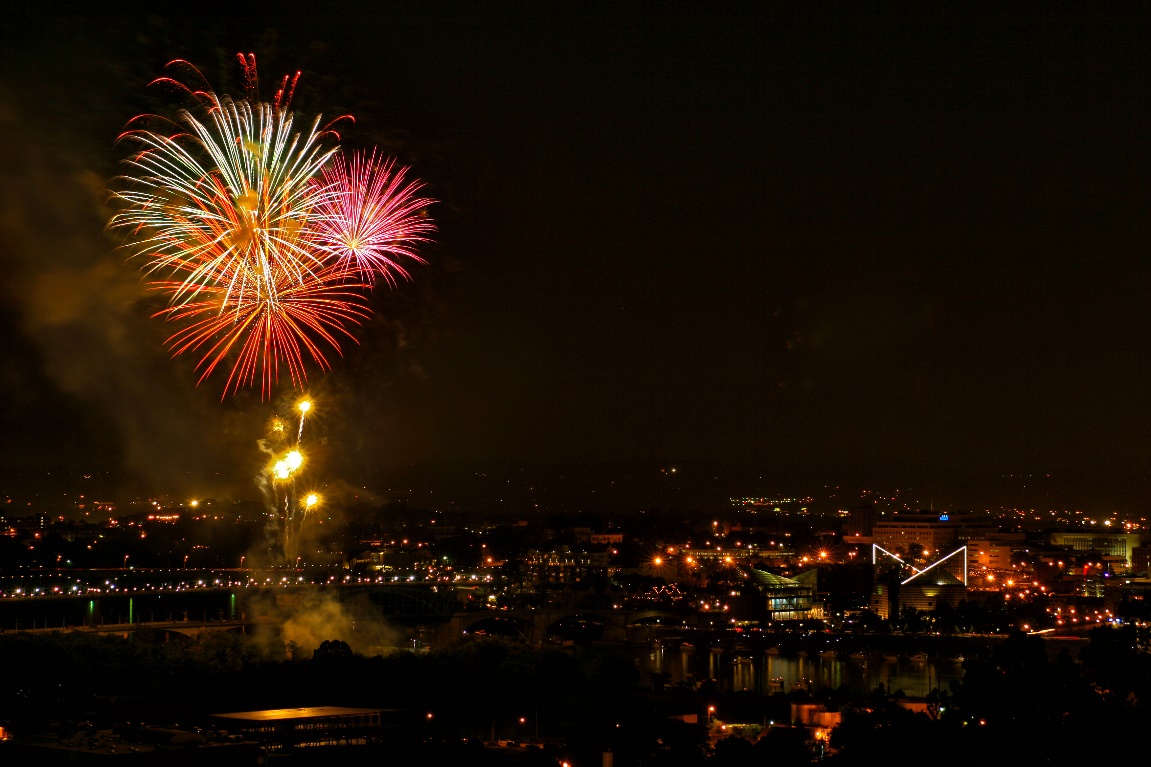
The image below was one of the first fireworks images I shot in digital back in 2008. It was shot with a Canon 20D (A whopping 8 MP, max 1600 ISO) and a 15-55 kit lens. You can buy the camera and lens used now for under $75. If I could shoot fireworks with this relic, whatever camera you have now is more than adequate.
Basic Settings Use a low ISO, 100 or 200 depending on your camera. Turn off long exposure noise reduction, which causes long delays (equal to your exposure time) between shots. Set your aperture at f/8 or f/11 for ISO 100 or f/11 or f/16 for ISO 200. Check after the first shot or two and see if you need to adjust. I like to use bulb mode, where the shutter opens when you press the cable release and stays open until you release it. I know others who set 5 or 10 seconds, but I feel I have more control with bulb mode. Some photographers open the shutter while covering the lens with a black card, and remove it to capture the fireworks, so there will be even less vibration.
Since your camera is on a tripod, you may need to turn off image stabilization. I find it’s usually necessary to turn it off on DSLR’s but often not necessary on mirrorless cameras.
Turn off auto focus, and set your camera focus to infinity. Don’t use auto white balance. I usually set daylight white balance, and adjust later in Lightroom if I need to. I always shoot raw, so that I have the most latitude for editing my images later. You may prefer to shoot JPG’s, but be sure that the highlights don’t blow out.
Shooting I try to listen for the soft boom of a firework launching and then open my shutter (I use bulb) until the aerial burst has ended. For the first burst or two quickly check your LCD to see if your exposure for the fireworks is OK. All you want to adjust is the aperture, and within or not very far from the settings above.
Most shows start slowly with only one or two bursts at a time. I try to only capture one or two bursts per shot at the beginning of the show. At the finale is when lots of bursts are fired in a short period of time, so once the finale starts I may capture 5-10 bursts, close my shutter and quickly reopen and repeat until the show is over.
Unless you are at a really big show like New York City, or Washington DC, all of the fireworks are shot from the same small area, so all of your bursts will be in a small area of the sky, which is my reason for not trying to capture too many bursts in one frame. You can copy and paste bursts from one image to another to cover more of the sky.
Hopefully there will be a good breeze for two reasons. One, a breeze keeps bugs from landing and biting as often, and second the breeze blows away the smoke from the fireworks so your images don’t get successively hazier.
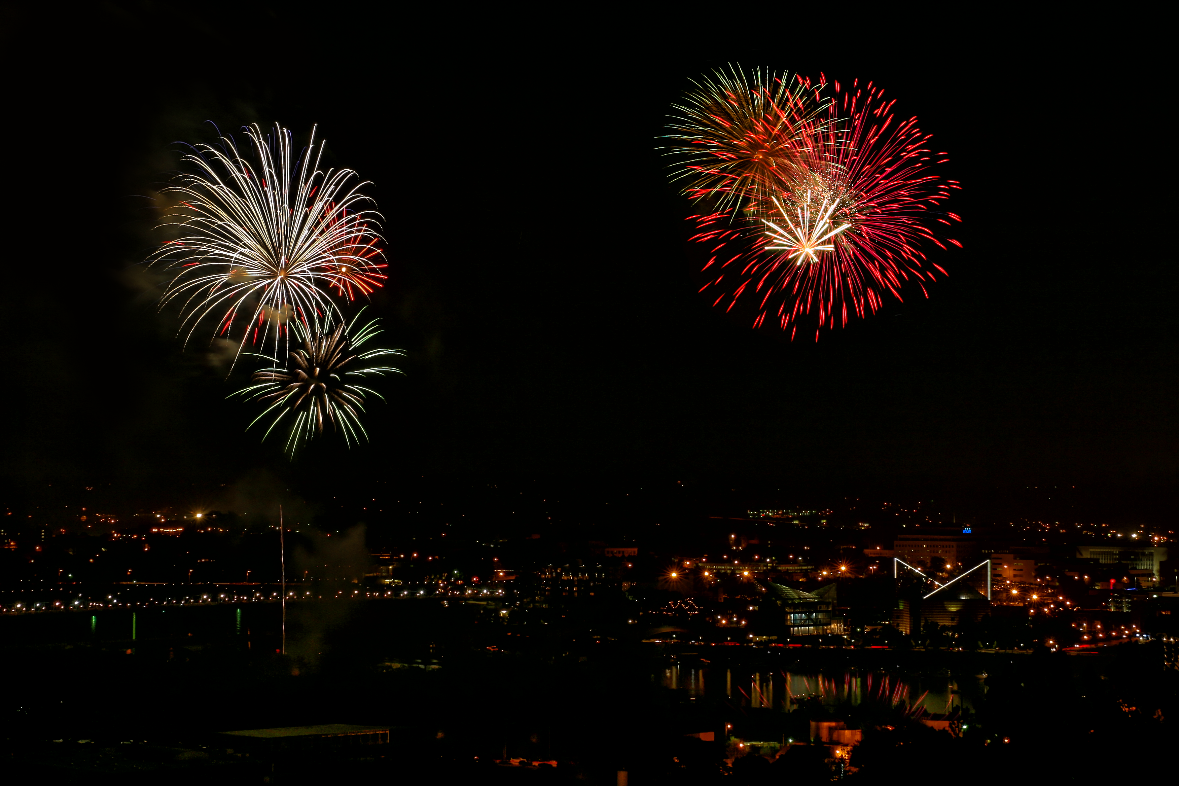
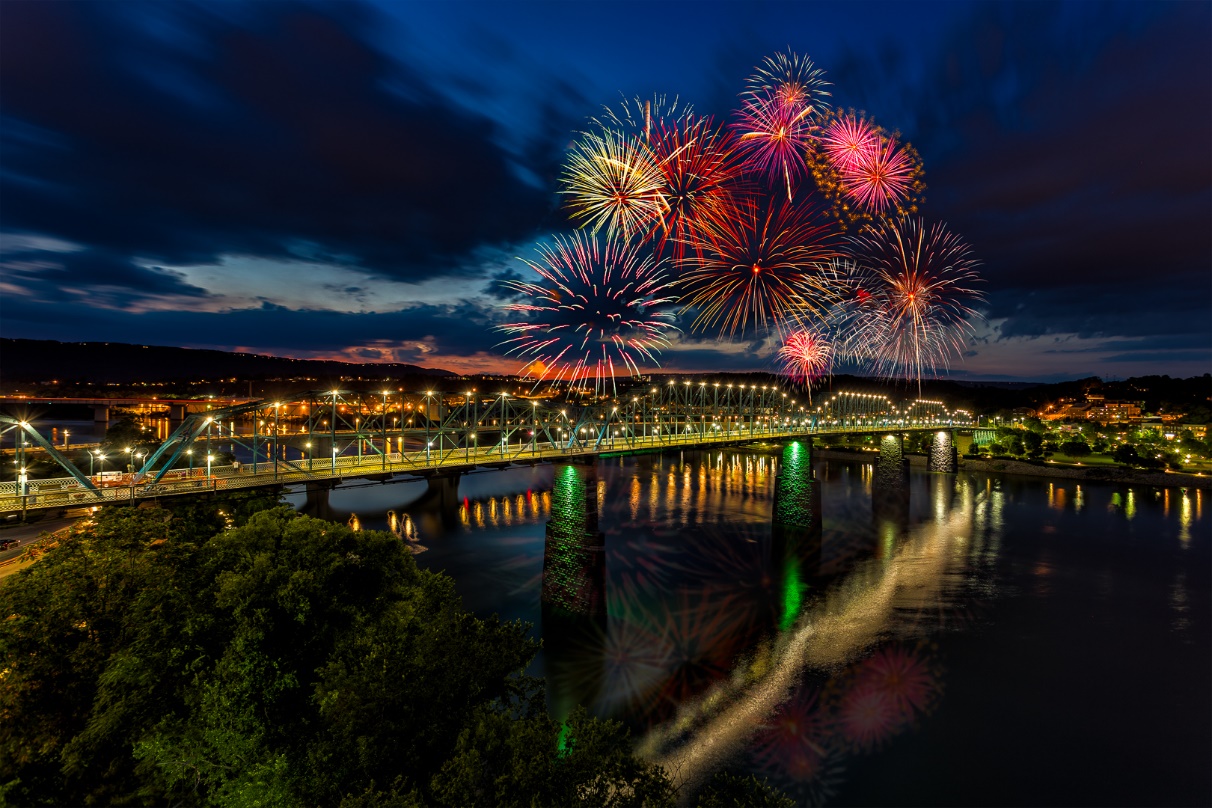
All of the fireworks in the image below were coming up from the left. I copied a burst from another image and pasted it into the right side sky to help the composition.
Processing I do most of my fireworks processing in Lightroom. I usually add a good bit of contrast and adjust the exposure for a good sky tone. Decreasing the black slider also helps make the bursts stand out better. Dehaze helps most shots, and may even minimize the haze from smoke on a night with no breeze. Vibrance and saturation can help bring out the color in your bursts and you may even want to go into Lightroom’s HSL/Color panel (Color Mixer in Camera Raw) and adjust individual colors to emphasize the fireworks. If the exposure for your sky with fireworks is very different from your foreground, you may use an adjustment mask like the brush or linear gradient to balance the scene.
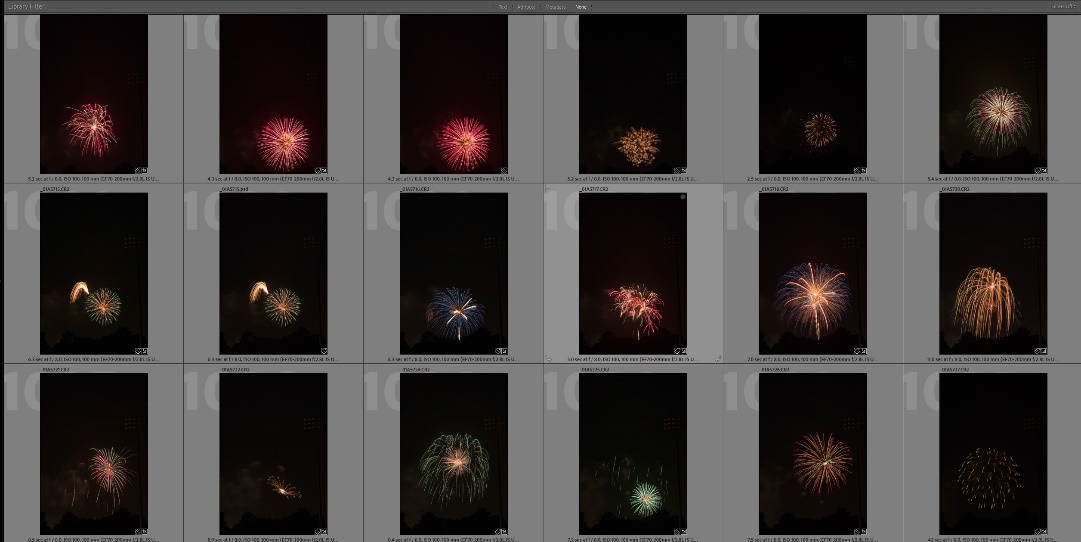
Build a library of fireworks bursts that you can add to scenes at a later time. See the article I refer to below. Here is just a small part of my library of fireworks bursts that I use to add to images.
How I create fireworks images now I have shot fireworks displays over a scene, but I’d be lying if I said I still do that. There are just too many variables, such as weather and being able to get a good location. Often it’s very hard to balance the fireworks exposure with the foreground, or keep people out of the image. Also the older I get, the more I hate crowds, and particularly photographing in crowds and the traffic as the crowd leaves. So what do I do? I cheat.
Over the years I have built up a library of isolated fireworks images, and if I go to photograph fireworks now, that’s all I’m after. Then I can shoot a night scene at my leisure, in good weather, and good light and add the fireworks in Photoshop. I’m able to put the fireworks where I want them and distribute them more widely than they appear at the actual show. And best of all I’m not fighting crowds or traffic. I wrote an article in the April 2018 PSC newsletter; you can find in the PSC newsletter archives, or on my website at:
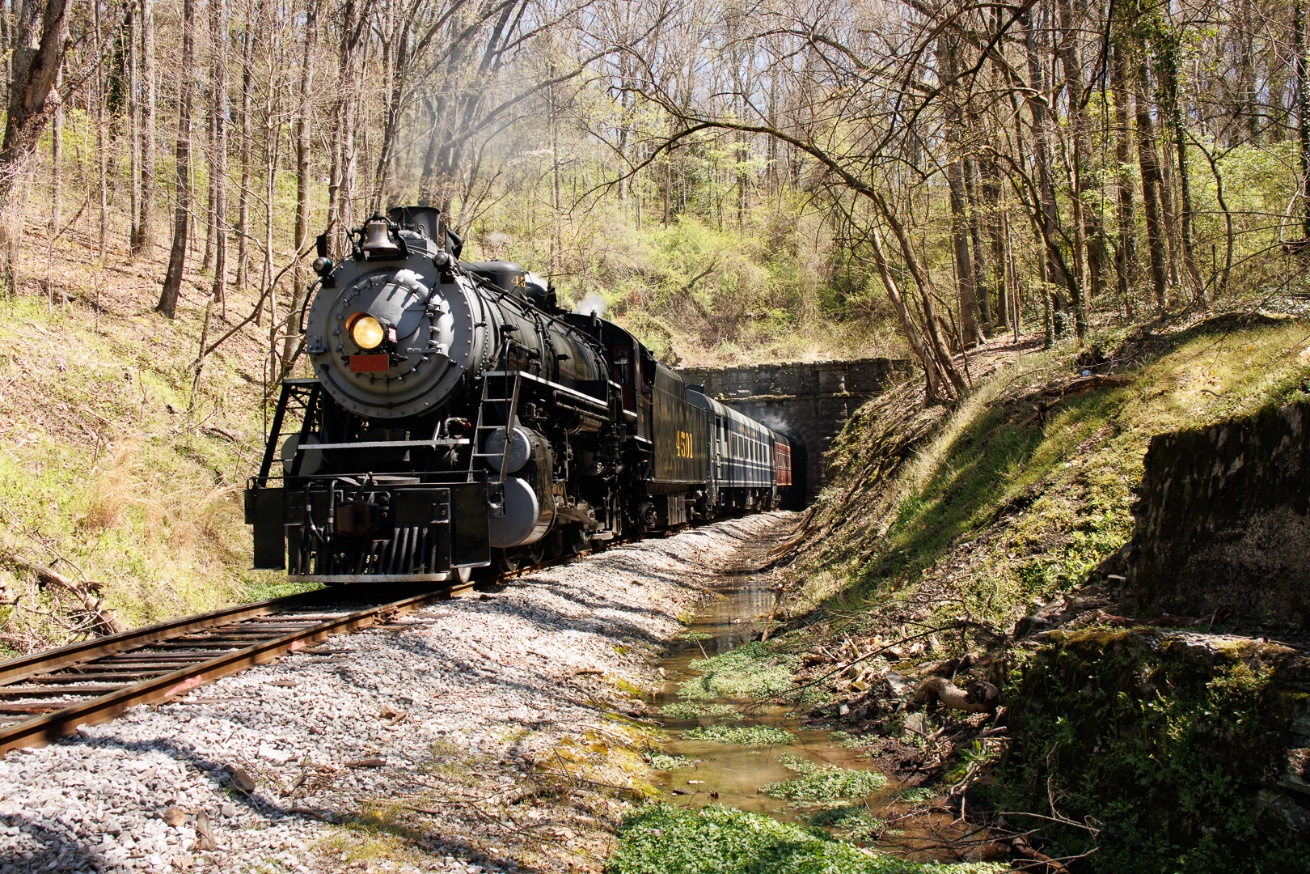
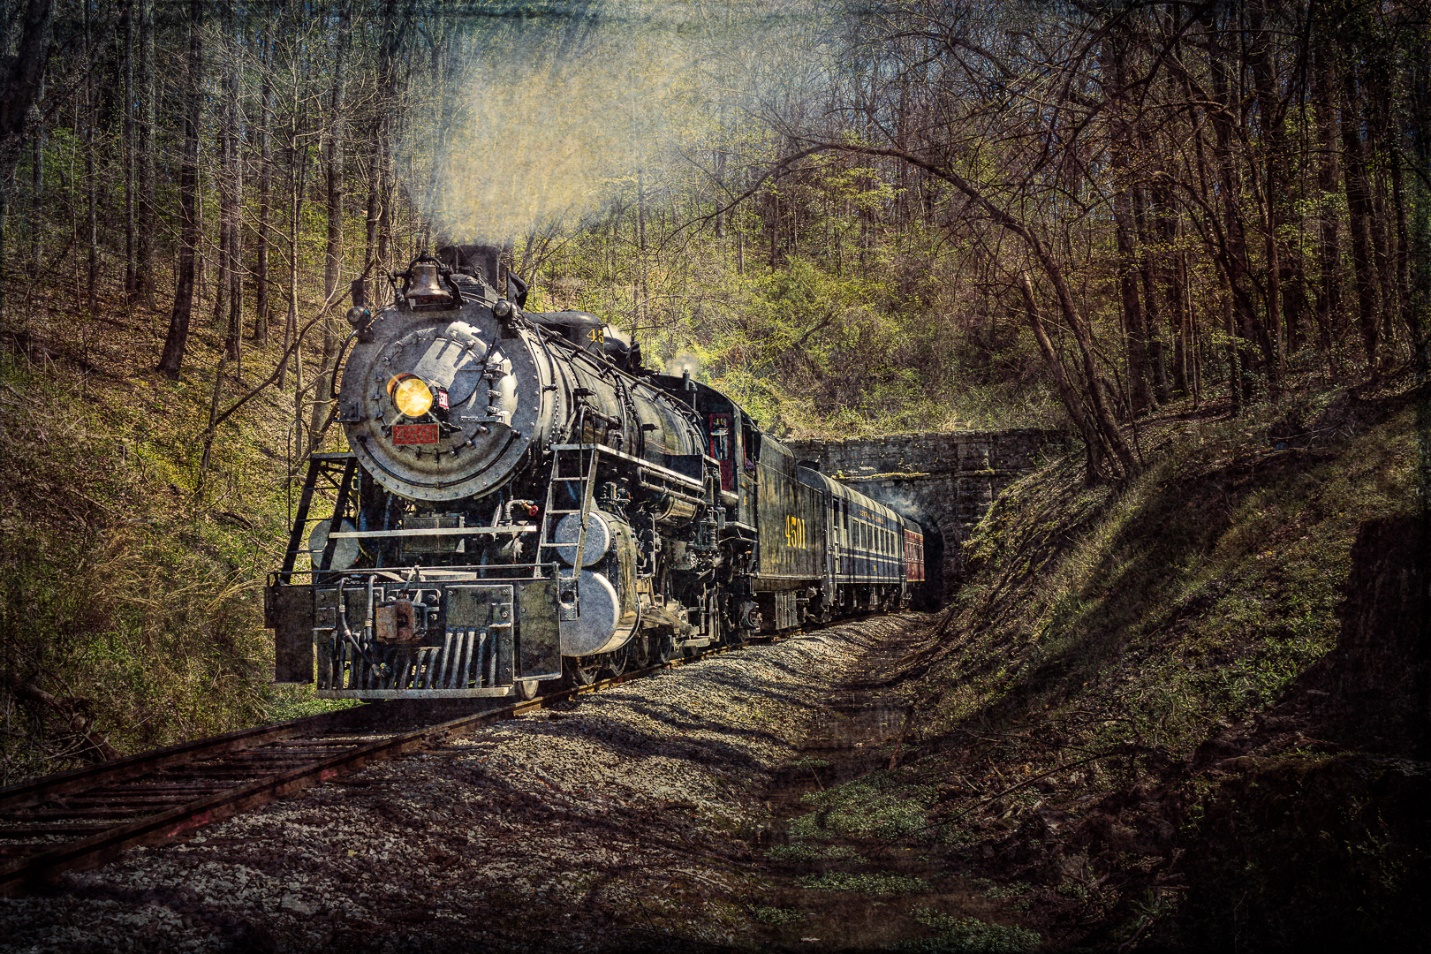
I went out yesterday and grabbed a couple of shots of a train coming out of a tunnel. I got into position with about 10 minutes to spare and had time to plan my composition, and check my camera settings.
If you look at the first image below and pay attention to the shadows, you’ll see that the sun was high overhead and slightly to the right. The tunnel and tracks are in a gully, so the hillside on the left was brightly lit, the train was mostly lit by overhead raw sunlight, and the hillside on the right was more shaded. I chose to use manual exposure at 1/250 and f/8 and ISO 400. I needed the fast shutter speed to freeze the motion of the train, and I wanted f/8 for depth of field. These settings dictated the ISO 400 which is well within the good range for my camera. Once the train left the tunnel I only had about 20 seconds to shoot about 15 images, while continuously zooming out to capture the train as it got closer, so it was fortunate that I had the time to get all of my settings locked in. I also shot in RAW which gave me the most latitude in processing.
Because of the high angle of the sun on the train, the lower parts were a bit underexposed, and the brighter sun on the left hill was overexposed, but not blown out. The exposure was the best compromise, and I knew I could bring down the highlights and open up the shadows in editing. If I had increased the exposure for the train, I would have blown out highlights on the hillside that I would not have been able to recover. If I had decreased exposure for more detail in the hillside, I would have had very dark shadows in the undercarriage of the train that would not lighten without lots of noise and loss of detail.
Here is the image straight out of camera. It’s not exactly pretty, but there is enough detail to work with in both the shadows and highlights.
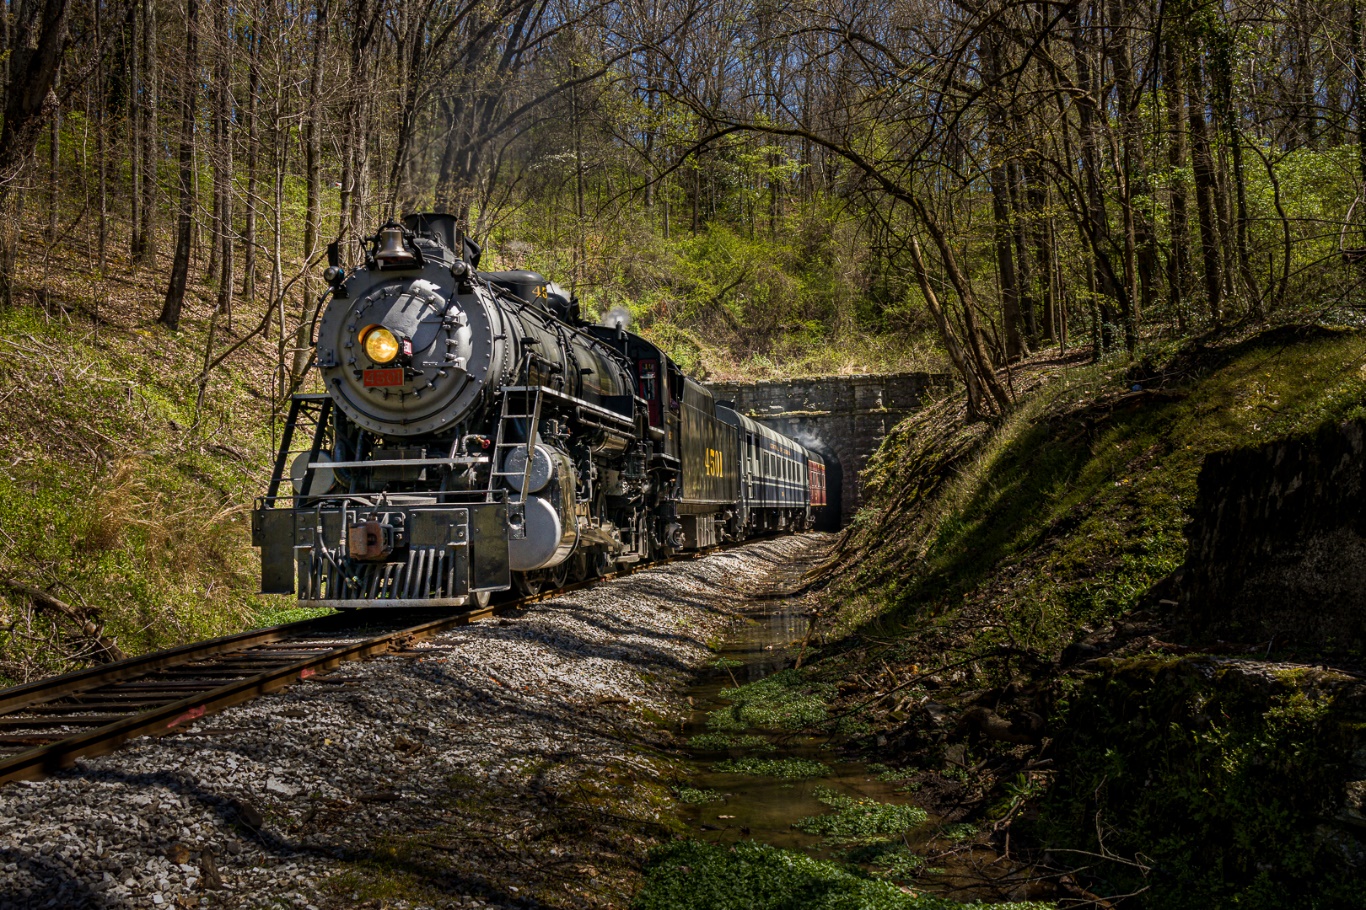
I was able to get the image looking much better in Lightroom, before moving on the Photoshop for final tweaks.
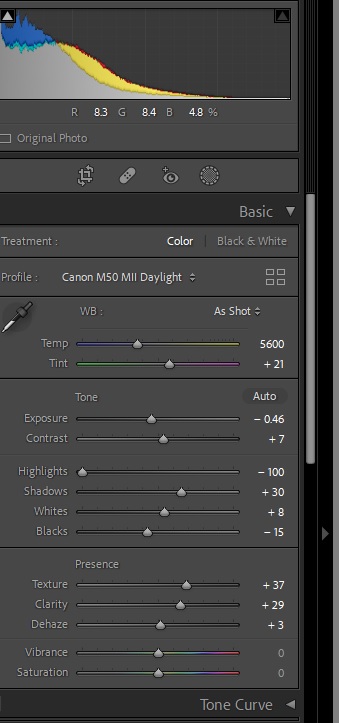
In Lightroom, I decreased exposure slightly, decreased highlights all the way, increased shadows a bit, and added texture, clarity and a bit of dehaze.
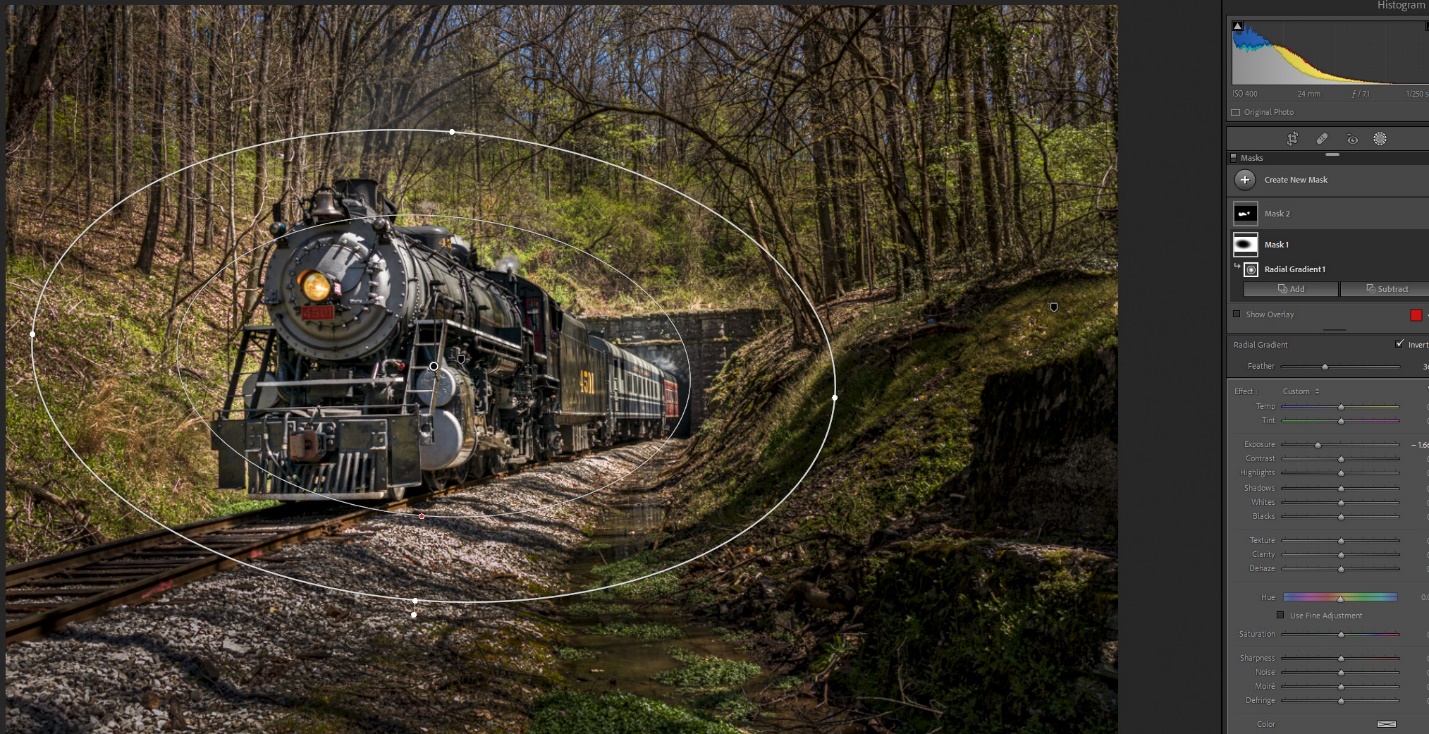
The Lightroom adjustments that really brought the image to life were the local adjustments using the new masking features. These have been available in the last several versions of Lightroom; they just weren’t referred to as masking. First and most important I used the radial filter inverted so changes affected what was outside of the gradient. I darkened everything but the train by 1.6 stops to pull interest toward the train. Generally, the eye goes toward the lighter parts of the image, so the extreme darkening made the train more obviously the center of interest. Certainly this was extreme and not anything like what my eye (or camera) saw, but now we’re moving toward artistic, and not just realistic.
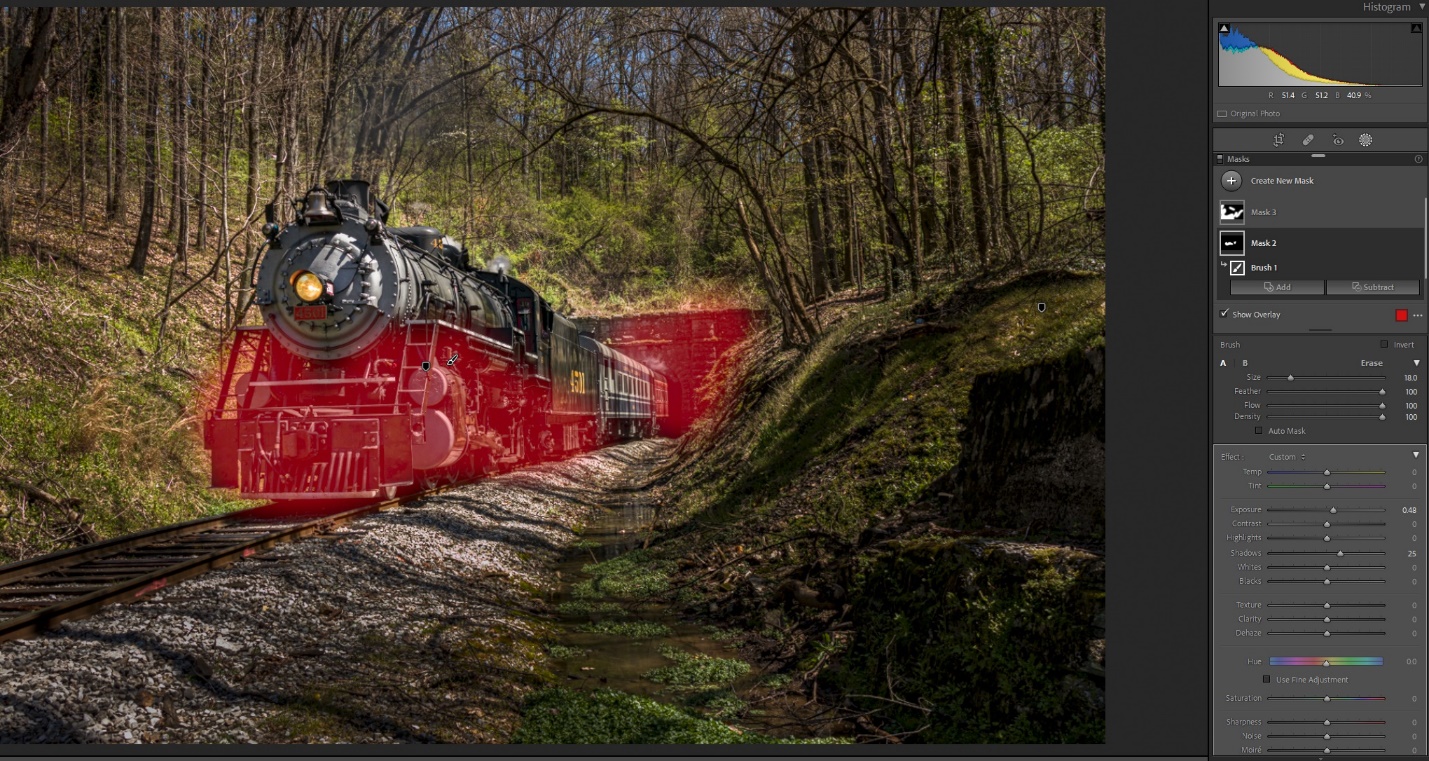
Next I used a brush to lighten the train’s undercarriage, the front of the engine and the tunnel wall. I increased exposure by about ½ stop and increased the shadows by about 25%. You can see the areas I painted highlighted in red.
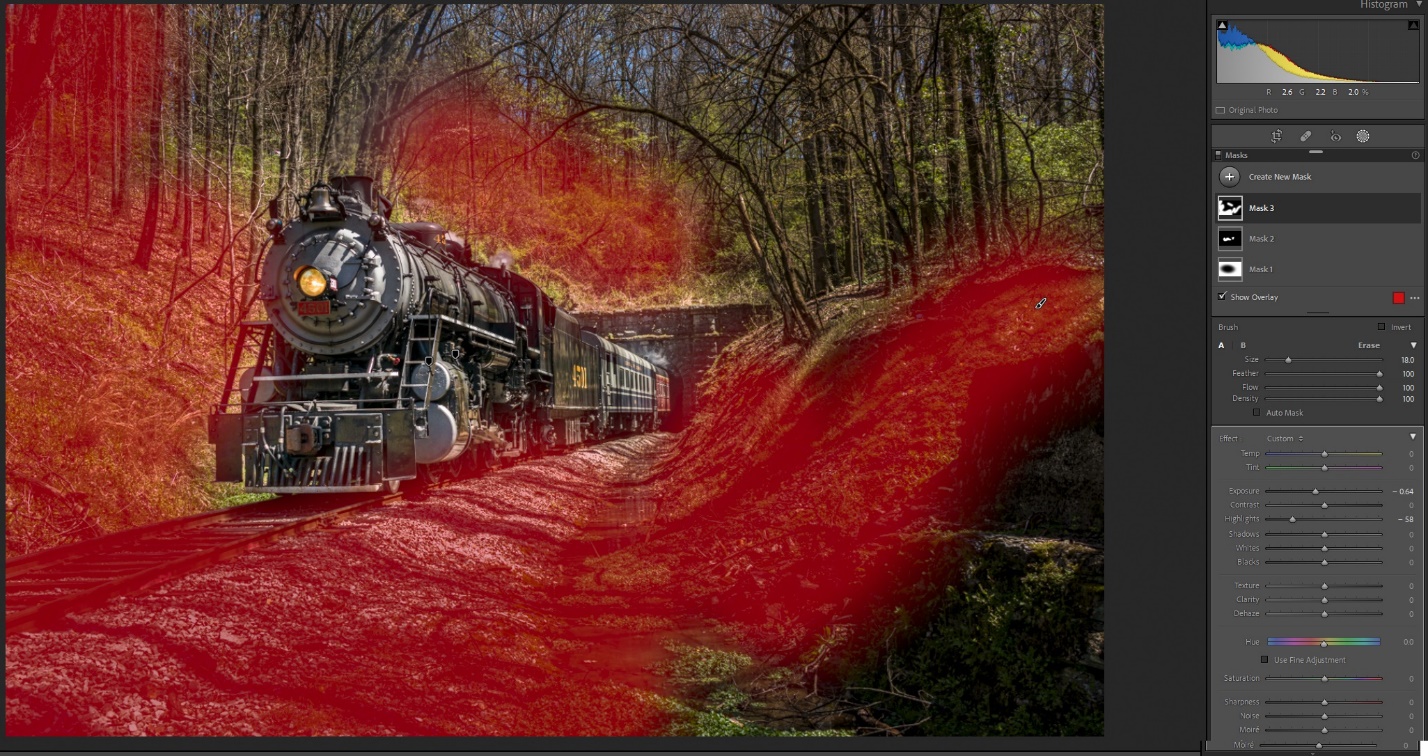
I used a second brush to do some additional darkening by decreasing exposure .64 stops, and also decreasing highlights. Again the idea is to use light and dark to bring the eye to the train.
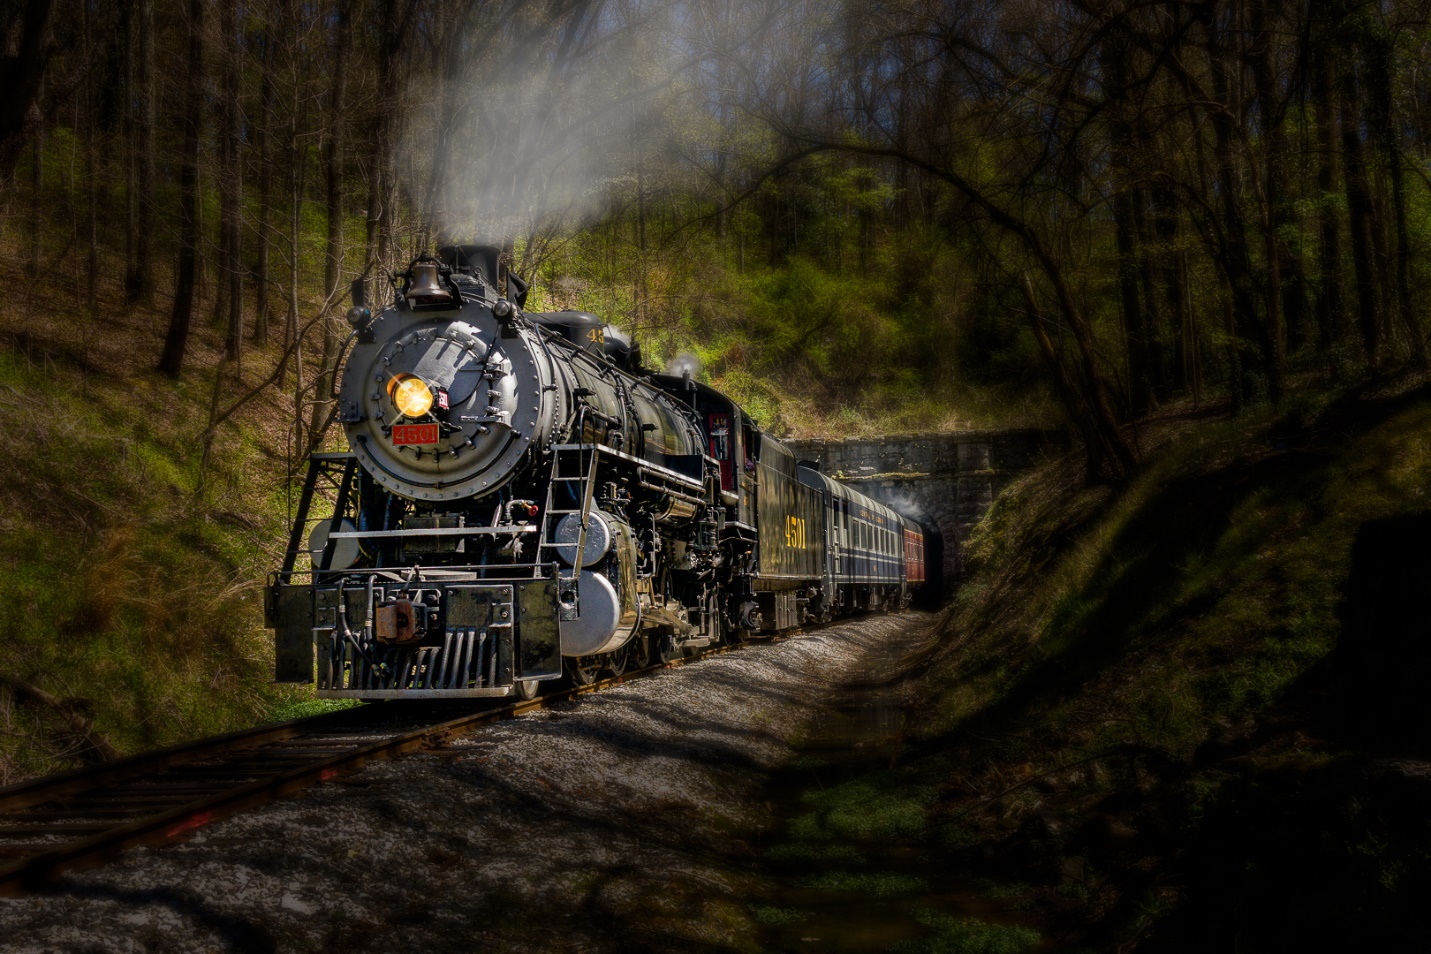
Photoshop is where I do my final detail tweaks. On this image I cropped in just a bit to improve the composition. My biggest Photoshop tweak was to add smoke to the engine. A well run engine doesn’t produce a lot of smoke, although the engineer can make more for the visual effects. Also where’s there’s smoke, there’s fire, or at least a few embers. We’re under a burn advisory, and I suspect that had a lot to do with the lack of smoke. There are lots of smoke brushes for Photoshop that you can download for free. I used a combination of several to create my smoke and varied the opacity of the layer until it looked right to me.
Just to take it a bit further in Photoshop I applied a Gaussian blur to everything but the train. I then created a copy, and changed the blend mode to multiply which drastically darkens the image. I masked out the train, and then decreased the opacity until I like the effect.
That pretty much finished the image, but lately I’ve been experimenting with textures for that extra artistic look. Here I used Topaz Lab’s Texture Effects to add a texture effect, and then added three other textures and varied the opacity and blend modes to get the desired effect. The textures decreased contrast and lightened the image, so I finished with a contrast layer.
Here is another before and after shot, but without all of the details. In short I darkened everything but the train, lightened the train’s undercarriage, and also added some blur to everything except the train.
I hope this has given you some ideas for visualizing the possibilities in an otherwise bland image. Some of this may seem a bit extreme to you, or totally doesn’t suit your tastes. You may like the Photoshop edits, but not the textures. We don’t all have to envision an image the same way, and I would be a bit disappointed if we did. That difference in expression is what makes us photographers and artists.
As photographers we all love getting new gear, and new cameras especially. The overwhelming temptation is to tear open the box and start shooting. But I think there are some important things to do as soon as you get your camera.
As you’re unpacking, double check that everything that should be there is there. The first thing to do is find the charger and battery and plug them in to charge. While the battery is charging, read the manual to acquaint yourself with the camera’s controls and operation. Lately the trend seems to be for the manufacturer to only include a very basic manual, and have you download the advanced user’s manual online. After you download it be sure to put a copy on your phone, so you always have ready reference with you. While you’re on the manufacturer’s site download any other software and check for camera firmware updates.
After you’ve read over at least the basics of the manual, insert the battery and a memory card, attach a lens and learn the camera’s modes and controls. Many of the new cameras allow you to set up custom menu screens where you can place the menu items you use most, and that is one of the first things I do. If you already have a similar camera, it’s very helpful to set the menus up the same so switching between cameras is seamless. Go through all of the menu items and set things to your liking. This is the point where I go into custom controls and set back button focus. Set up the information screens to show the info you like to see when shooting, and turn off info you don’t need so your screen is less cluttered. Pay particular attention to autofocus settings and modes.
Now you’re ready to go and actually shoot. Try to shoot a variety of still and moving subjects in different lighting conditions. Get them into the computer and check for exposure and image sharpness. If there are issues try to figure out if it’s a settings issue, user error or an actual problem with the camera. By now you should be ready to go out and shoot with your new camera with confidence.
Here are some non-photographic items that you might not consider, or overlook in your excitement.
As I described in another article, I like to make color profiles and import presets for all of my cameras. So I shoot my color checker target in clear daylight, overcast skies, studio strobe and with my fluorescent ringlight. After shooting these color checker shots, I create camera color profiles in Lightroom, and then create import profiles that include my favorite sharpening settings and some clarity. Now every time I import images from that camera I can apply my color profiles and sharpening during the import process.
Hopefully you keep an inventory of your photography gear, so remember to add it and include the serial number, date of purchase, where you purchased it, and the price. If you have your gear insured be sure to add it to the list that you provide your insurer.
Register your new gear, either with the warranty card, or online at the manufacturer’s website. Also if you belong to something like Canon Professional Services, make sure to add it to your equipment list.
Put a small label or two with your name and phone number in an inconspicuous place. I usually place one on the base of the camera where it is covered by the L Plate and one behind the foldout screen. It may not help with a theft, but if you lose your camera it could help someone return it to you.
One of the best ways to learn a new camera (or lens) is to shoot with it exclusively for a while. That way the operation becomes second nature and you know it’s capabilities and limitations.
I also have one major “DON’T” with a new camera. Never go on a major photo trip or workshop, or shoot a commercial job or wedding until you have tested your camera and are thoroughly familiar with its operation. There are probably photographers who have violated this rule and gotten away with it, but I’ve also seen and heard of a lot of horror stories. So why risk it?
In my last article I talked about how to research a photography trip. Sometimes you may decide it’s better to go on a workshop rather than a do it yourself trip. Maybe the workshop leader is teaching a new technique that you’d like to learn or has detailed knowledge of an area that will probably guarantee a more productive outing.
Try to research the workshop and instructor, and if they will help you learn. See if the instructor posts work by students or has a group where participants share work. If you see good work being done by the students, it’s likely due to a good workshop leader. Some workshops are heavy on instruction, while others are more photo tours or photo ops and concentrate on getting you to good locations in good light, or providing subjects you want to photograph, while assuming you know basic photography. Also pay attention to any physical requirements mentioned in the workshop. At best you won’t enjoy a workshop beyond your abilities; at worst you may get overly fatigued or even injured.
Even though a good workshop has already done a lot of the research for you, you should still do some basic research. What will the weather be like and what clothing do you need to bring to cover the possibilities? What equipment do you need to bring? Some workshops provide a list of suggested clothing and equipment, or you can probably contact the leader.
Some workshops include lodging and/or meals; others require you to make your own reservations. Make your reservations as soon as possible, so you don’t wind up staying far from the group.
Trip insurance should be something you consider. The last two years have forced a lot of cancelled travel plans and even workshops. Also be sure your travel plan includes medical care and medical evacuation if you are out of the country.
When I can, I like to get to the workshop location at least a day in advance to get acclimated and recover from jet lag. Going early also helps eliminate anxiety if there are travel delays.
Once the workshop begins, meet the instructor and the other participants. Be on your best behavior and hope everyone else will be also (more on this later). Besides making new friends, you may find that you will learn from other participants as well as the instructor.
Often there is work to be done setting up, hauling gear, packing up afterwards and generally organizing. Whenever you can jump in and share the work; don’t be the one who sits back, doesn’t help and expects to be waited on.
When you are out shooting, watch where others are shooting, and don’t get in someone else’s photo. You may think you’re ok, but if the other photographer is shooting with a very wide angle lens you may intrude without knowing it. It’s always safe to ask “Am I in your shot?” Conversely, you know what your reputation will be if you are constantly charging in front of others. Often the workshop leader will start with group shooting from a distance, and move the group forward in stages; follow his directions.
If there is something you don’t understand, then ask for help, but try not to be the one talking and asking questions constantly and not allowing anyone else to learn. Also you may find that you will learn from your fellow photographers. Usually you will figure pretty quickly who the good photographers are. Glance at what the instructor and other photographers are shooting. Even though there may image reviews in the evening, it’s better to see what’s working while you are still in the field and can be sure you get a good shot, rather than find out what you missed that evening.
There may be one best viewpoint or several good shooting locations. If there is one best location, don’t monopolize it; share and later they will return the favor. Sometimes a location is so cramped that it’s difficult to even get a tripod in position. I’ve been in a couple of situations where once someone got their tripod in position, we left it in place and just swapped photographers and cameras. Of course this works best if everyone is using a common attachment like Arca Swiss plates.
Don’t forget to stop and just enjoy the location, without even taking a photo. Also with a good group, meals and breaks can be a very enjoyable part of the event.
Be flexible! Even the best workshop leader can’t control the weather, crowds, government shutdowns and road closings. The he best leaders do adapt quickly, or already have plan B or C ready. Go with the flow and you may still have a great workshop.
I’ll finish off with some stories of good and bad workshop behavior I’ve seen on some of my trips. Names will be omitted to protect the innocent (or guilty) photographers.
The Bad
I went to one workshop that was supposed to have a couple of hours of class in the morning before an afternoon of shooting. “Class” turned out to be a half hour of the photographer telling us how great he was, followed by an hour of him bashing a line of equipment that no longer sponsored him. When it came time to shoot, he was pretty much absent and we were on our own. Not surprisingly I don’t see him doing workshops any more.
I was on one workshop where there was a leader and about 30 photographers. This many photographers requires clear and firm direction to keep us out of each other’s way. What we got was an instructor who was wrapped up in working on his off camera flash technique, rather than paying attention to the group. To make things worse, he had his assistant out in front of us with the flash, and I lost a lot of good shots because the assistant was in my shot.
At a similar shoot, we had about 30 photographers and a very organized, attentive instructor who lined us up in a line so we didn’t block each other. Then one totally oblivious photographer proceeded to walk out in front of everybody and up and down the line. Our instructor tried unsuccessfully to reign her in (she really did her best short of tackling her), and she pulled this a few more times. We all took to yelling and screaming at her, but she remained totally oblivious or just didn’t care. Don’t be that photographer!
On another workshop we ran into one of those situations where there really was one best viewpoint. Most of us in the group were used to shooting together and sharing a location. But not one photographer. He ran in front of everyone to stake out the location and despite subtle and not so subtle hints to move for a minute and share the location, he didn’t budge. Years later we still gripe about him, and certainly we’d never willingly shoot in a group with him again.
The Good
I went out to Colorado for the Durango Silverton Fall photographers weekend. Each day we had about forty photographers on board and the train would stop at scenic locations, put the photographers out, and back up out of sight and then make a photo run or two. The group was about fifty percent hardcore photographers who also like trains, and about fifty percent hardcore train fanatics who did some photography or video. Our group leader did a phenomenal job of lining us up and making sure everyone had a clear shot and no one was blocking anyone else before he radioed the engineer to bring the train in. For two days, ten locations a day he kept us perfectly organized. Talking to him later I found out that among other things, he was a roller derby announcer, so I guess he was used to much rougher crowds.
On a winter wildlife workshop our leader did a lot helpful instruction, and managed us well in the field. Even though he was shooting, he made sure everyone else was getting good shots. When another photographer’s camera died (probably due to the subzero cold), he didn’t hesitate. He pulled the card out of his camera and handed his camera over and had them put their card in his camera and keep shooting. That’s a leader who really cares about his students more than about getting his own shots.
As I write this (Feb 2022) Covid finally seems to be waning and hopefully travel and photography workshops will begin to return to normal. Start looking for workshops that interest you, and hopefully you’ll come back with good photos, good stories, and new friends.
Some advance research and preparation can make any photography trip more pleasant and productive. Even if you’re going on a workshop, where hopefully the leader has done much of the research for you, there are still things that you should check for yourself. Here are some of the basics that I look for. With all of the information available to us on the internet, it has never been easier to prepare.
Where to Shoot
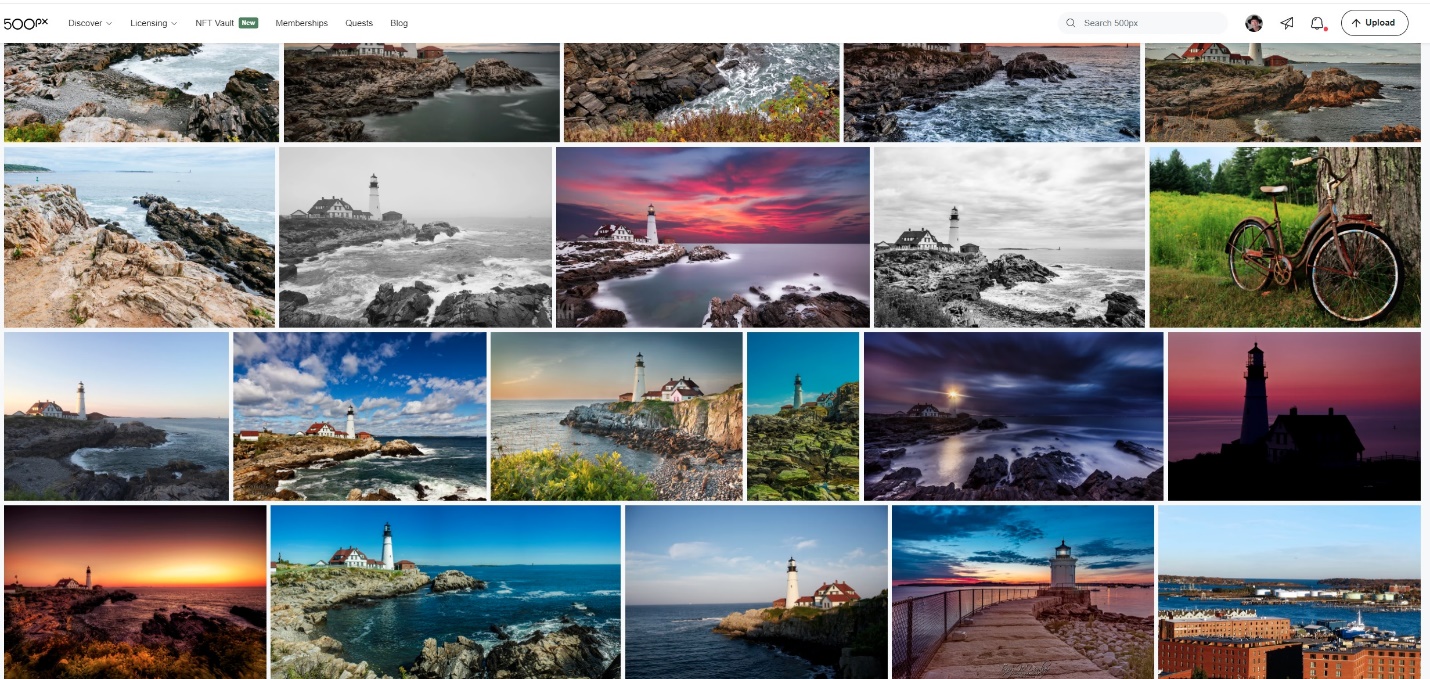
Often I get ideas for where to go from seeing an image or talking to other photographers. Once I have a general area in mind, I find it useful to see what other photographers have done in that location. Go to https://500px.com/ and search for the name of a location. You will see dozens if not hundreds of images. Pay attention to the time of year and time of day. Clicking on a picture will show you details like the photographer’s name, camera and lens, date and time. I have even used this to contact photographers and have gotten good suggestions.
When I see images I like, I try to keep them in mind as starting points, not something to try to duplicate. Often the best shots aren’t the “post card shots” but if they present themselves, take them because family and friends will expect to see those shots. I try very hard not to go on a shoot with certain exact images in mind. If you don’t get that image for whatever reason, you have set yourself up for disappointment. And while you are trying so hard to find that exact shot, you may be blind to other great shots around you. Try to be flexible and work with what’s in front of you.
Locationscout (https://www.locationscout.net/) is more about the location and how to get there; sometimes right down to where to park and where to walk. As of right now it’s not very comprehensive, but it is expanding constantly.
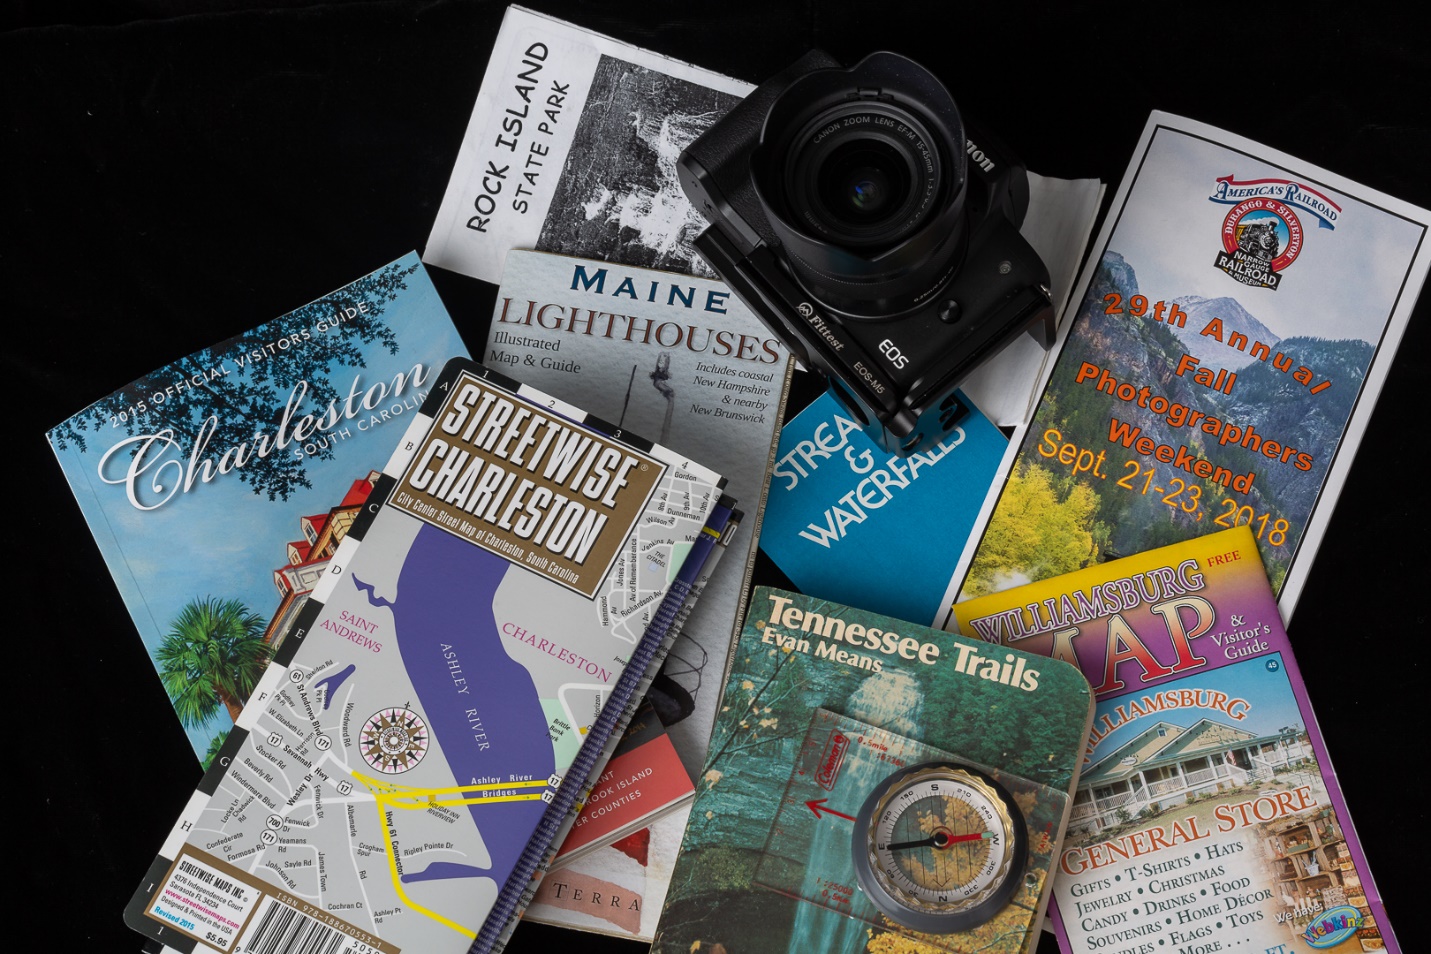
Use google to search for “Best places to photograph in _____________”. Sometimes you’ll find a lot, sometimes nothing. And you’ll definitely see a wide range of photography skills. I also usually search for “photographers in _________________”, and visit their web pages. You’ll have to wade through a lot of wedding and portrait photographer’s sites, but you may also find someone shooting the types of subjects you like. Again, you might make contact and get suggestions, or even arrange to meet and shoot together. Wikipedia may be useful for general information about an area. Also search Amazon for guide books of the area, and don’t forget AAA guidebooks, and information available at welcome and tourist information centers.
I always find it handy to have paper maps (phones fail or lose signal), and I carry a GPS and enter all of my hotels, restaurants, airports, rental cars and photo destinations in advance so I spend less time lost.
This is just a part of what I found by typing “Portland Maine” into the search field of 500PX.
Getting There
Will you be flying or driving? Are rental cars available? Is the location you want easily accessible by car or will you need an off-road vehicle? Will the location require a long hike or climb, and can you handle the physical challenge? Don’t forget that smaller regional jets, or even smaller prop planes may limit how much gear you can carry and how to pack it. In these days, don’t forget to check on Covid related requirements, especially travelling overseas. Check the CDC website for information and requirements for all countries. You might also check the State Department website for risks associated with traveling to various countries. Ukrainian vacation anyone? While you’re doing all of this research, create a document with the addresses and phone numbers of your hotels, restaurants, rental car location and airport. Also include each flight number, times and any shuttle times. Save it as a pdf and put a copy on your phone, and it’s available to you quickly anytime.
Weather
Research weather history using your favorite weather site. I like weather underground, and I’ll look at the monthly history of the area going back several years. Also I’m watching weather right up to my departure date so I can either change the clothing I carry or even cancel or postpone if necessary. Having the right clothes for the weather can definitely be the difference between a miserable, unpleasant experience, or staying comfortable so you can concentrate on photography. Don’t forget rain gear for both you and your camera. Don’t forget to research sunrise and sunset times. An app like Photo Pills on your phone will show you the location of the sun, moon or even the Milky Way on any date and time. If you’re shooting around coastal areas, you can find high and low tide times. I have a tide app on my phone. Nothing you can do to reschedule them, but you may be able to pick a day when the tides and lighting you want will coincide.
Gear
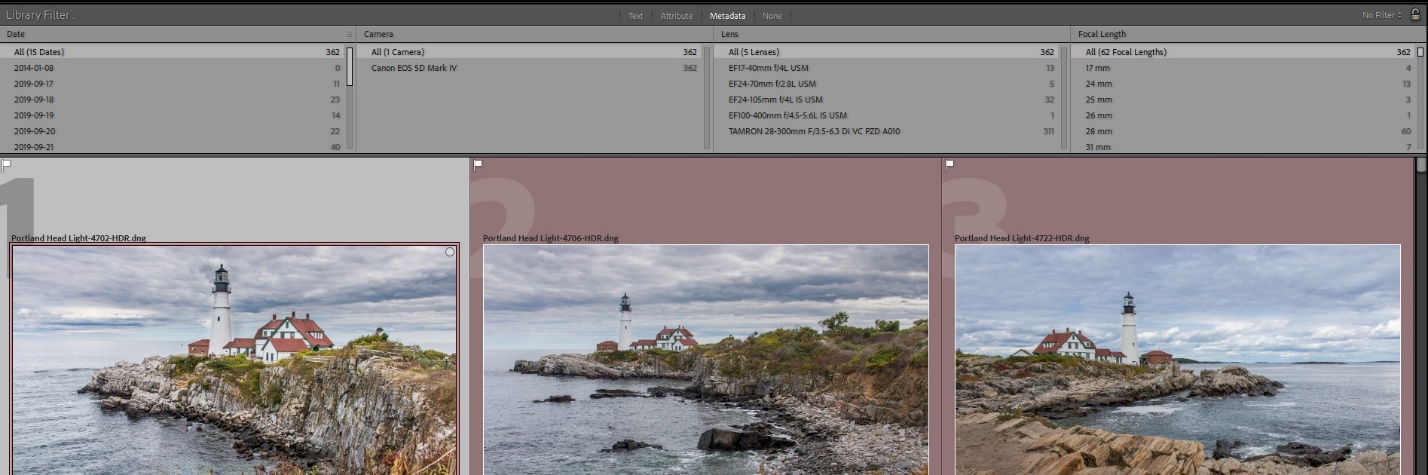
As you are looking at images, see what lenses and focal lengths others are using. If you have visited there before use the Metadata search features in Lightroom to see which lenses and focal lengths you used in thepast. That can help you minimize the number of lenses you carry. Also I’m a big fan of all-in-one travel lenses, with maybe a very wide angle zoom as a second lens. Will you need to shoot flash? And if so, is power available or will you be using batteries and are extras available in the area? If this is a once in a lifetime trip, you should consider a backup camera, especially if you are not near a city with a camera store. For me, a tripod is a given, but it will be a large sturdy one for landscapes, or a smaller one for travel photography. Plan how to carry your gear to your destination and once you’re there.
Here’s a clip of my Lightroom metadata of all of my Maine photos. Only 5 were taken with my 24-70 lens, so I won’t bother carrying that heavy lens again. Only 1 shot was taken with a 100-400, but I borrowed that one. On the right hand panel, you can even see how many shots were taken at any focal length.
Lodging and Restaurants
I have found that it’s best to book rooms in advance. There is nothing worse than travelling and photographing all day only to find that all of the area hotels are full. It also pays to search for area restaurants to make sure they will be open at that time of year and what hours. This is a major consideration in areas with extreme weather and well defined tourist seasons.
Special Events
Some areas may have special events at various times of the year. You may enjoy the events and associated crowds, but hotels may be harder and more expensive to book. Parking may be difficult or nonexistent. If there are admission fees, will you need to arrange them in advance? Personally I avoid the special events, since I don’t enjoy crowds, and photography is usually more difficult. And again, since as of this writing, Covid is still rampart, what are the mask and/or vaccine requirements? You have to make the decision on whether it is worth the risk.
Once You’re There
Even after all of your careful research, stuff happens. I’ve shown up at a hotel that looked OK on the website, only to find something that would make the Addams Family nervous. I’ve had to sit in the hotel and watch downpours and thunderstorms for days straight. I’ve blocked out a whole day to go train chasing a steam locomotive, only find that it broke down the night before. I’ve shot for a week in “severe clear” weather which means bald, and uninteresting skies. I’m sure most of you have your own horror stories. Be flexible, and try to have a plan B. If it’s nasty outside, are there some interior shots to do? Or take the time to do laundry, shop and prepare for the next day.
One of my friends says his goal at every location is to take the best picture that’s ever been taken there. But when the weather and other elements are against you, my more achievable goal is to take the best picture that anyone could possibly take under the existing circumstances. It may take ten or twenty tries to get that really perfect picture, but that’s what keeps us challenged.
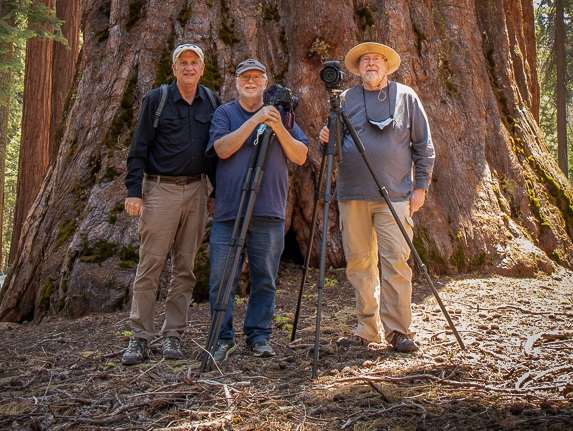
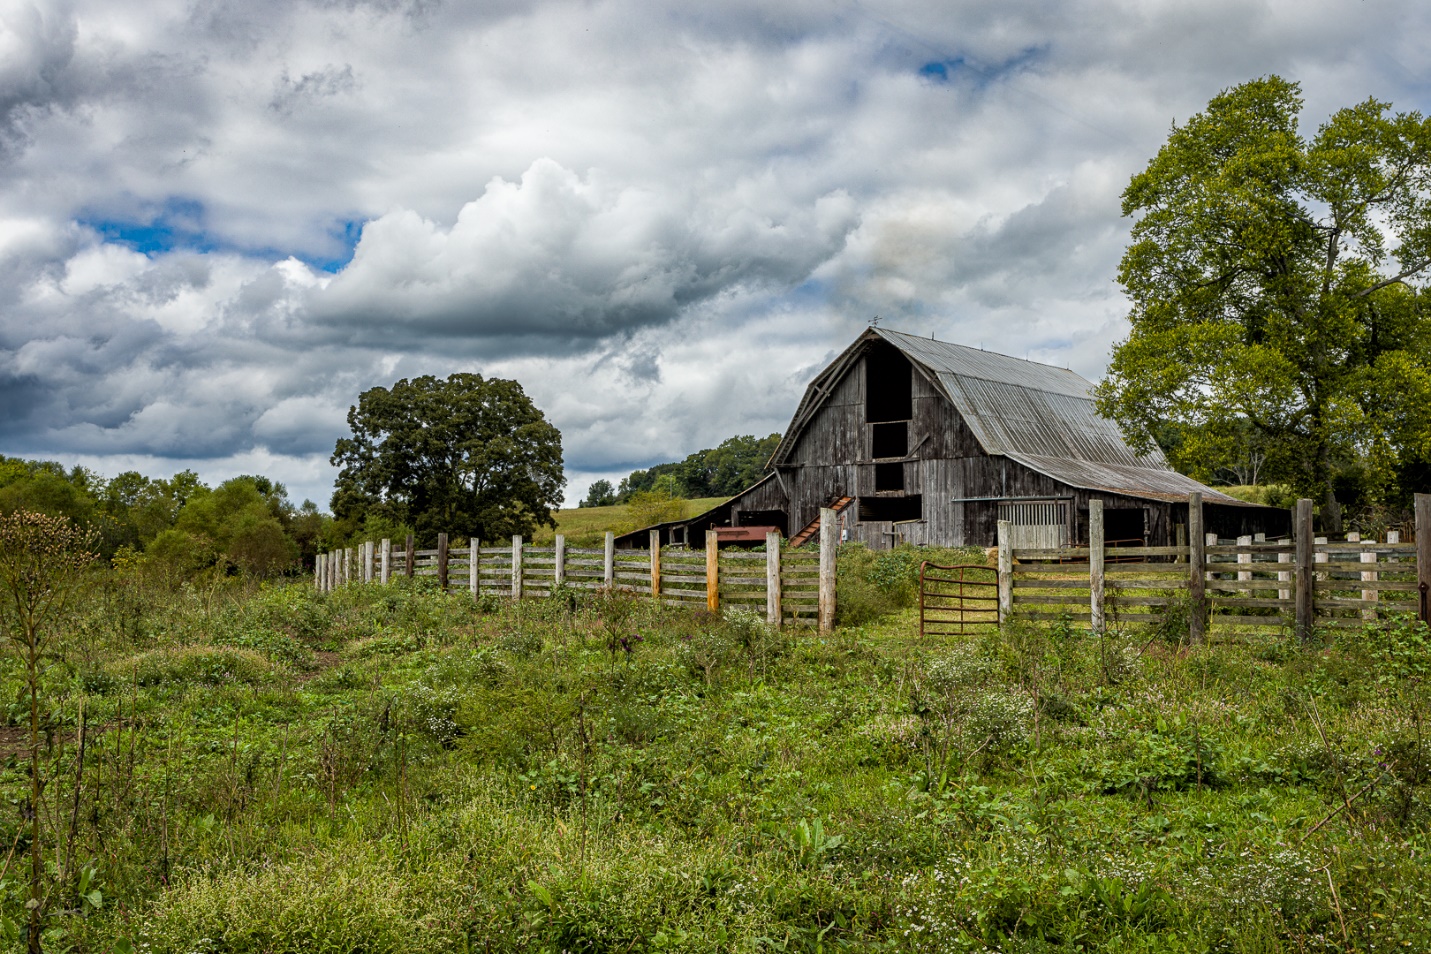
One of the things that will help you grow as a photographer and increase your enjoyment is to photograph with a friend or a small group of friends. I’ll do an article in the future on how to get the most from a photo workshop or tour, but this is like a small and informal workshop. Over the years I’ve shot with varying groups of friends, and I know it has helped me improve my photography just as I hope it has helped them. During 2020 (the year of Covid) I went on numerous trips photographing barns and rural Tennessee with groups of 1, 2, or 3 fellow photographers. In addition to helping our photography I think it helped keep us all sane and active.
One of my favorite barn shots of 2020 came from a group trip. We had a goal in mind, and a general area to explore. Most of our good shots came from just exploring backroads and keeping an eye out for good images.
While you can certainly photograph alone, and many do, there are lots of advantages to photographing with a group. It’s important to have a group of compatible photographers who enjoy working together. I also feel that a small group of four or less works best. Once that number increases beyond four, you get into having multiple vehicles, more logistical problems and it becomes more like a workshop (nothing wrong with workshops), but this is meant to be more fun and informal.
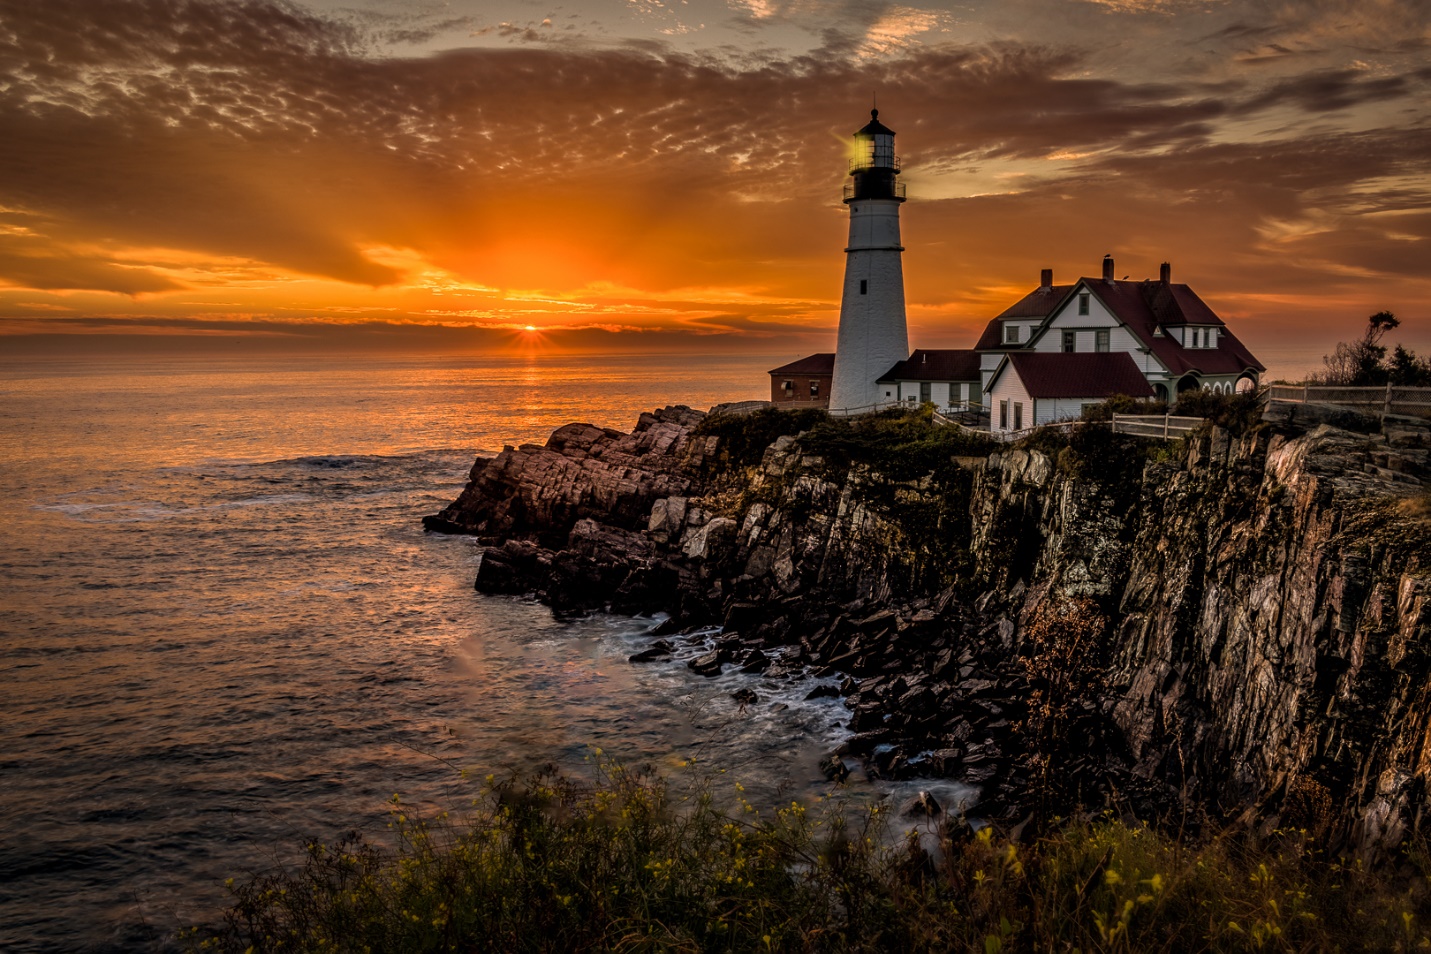
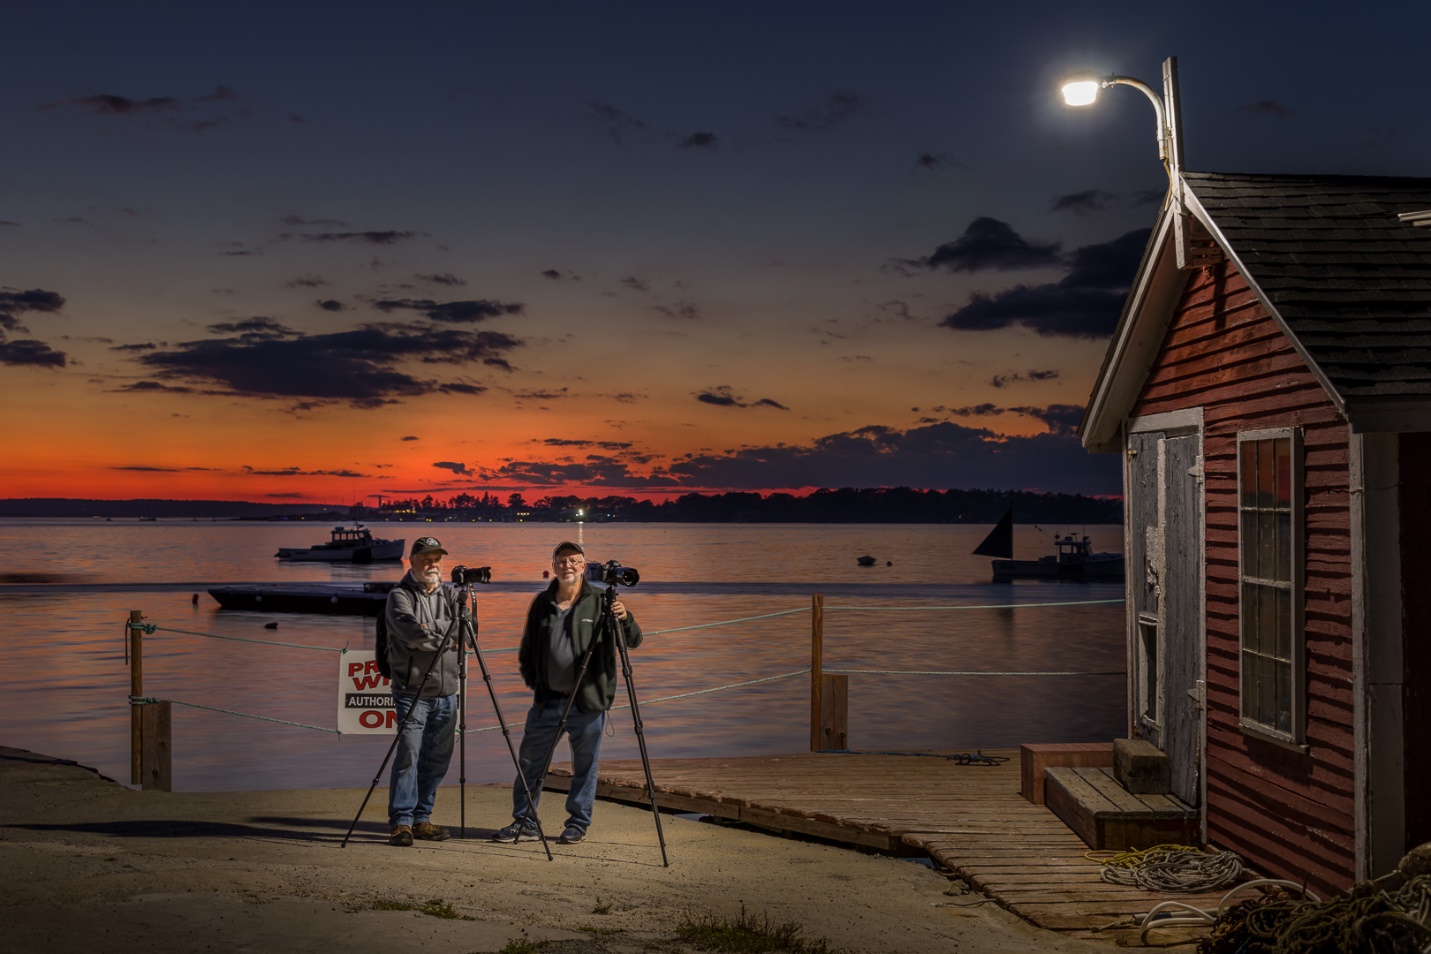
One of the biggest reasons to shoot with a group is that it forces you to get out and shoot, when you might not feel like it otherwise. Getting out of bed at 4 AM to go shoot a sunrise is hard; it’s easy (too easy) to roll over and go back to sleep. But if you have committed to meeting the group, you don’t want to feel like you’re letting them down. I can almost guarantee that some of the rest feel the same way, but for the sake of the group, they all make themselves get going too. Now think of how many times you planned a shoot by yourself, and decided it was too early, too far, too late or too boring and talked yourself out of the shoot. Now think of how many times shooting with other photographers forced you to get moving and go.
It’s not easy to force yourself out of bed at 4AM to be in position waiting for sunrise. Group motivation makes it easier; images like this make it worthwhile.
Some considerations in selecting the members of the group
Not everybody has to be at the same skill level. Within the group, everybody can learn and get ideas from all of the other photographers. Not everyone has to like all of the same subjects, but it is good if you share a core of basic interests. With that in mind, go with the group even if the shoot isn’t something that really interests you. You still may learn some new skills, or get some shots that surprise you. Pay attention to what the others are shooting. You may see subjects and viewpoints that you might have overlooked.
If others in the group shoot the same brand of equipment, it can be a great opportunity to borrow and test new equipment before investing. And someone who uses the same camera can be a great resource for learning the features and operations that you may not already know. Also on a more extended trip, shooters with the same equipment can do some preplanning to make sure there are backups for key equipment without everyone having to carry everything.
Making the outings fun and productive
Ideally everyone in the group is constantly on the lookout for good, subjects, location and weather that would make for an interesting image. Everyone does basic research, and more in depth research when the group chooses their location. I’ll say more about how to research a location in a later article. It’s important that this is a shared responsibility, so everyone shares the workload. If one person is constantly having to arrange the trips, they will feel more like an unpaid workshop leader.
I’ve mentioned several times that our photo trips almost always include food. And if I’m really honest, some of our trips are more about eating and photography is almost just an excuse to go somewhere good to eat. So finding a good place to eat is always an important part of our research for new locations.
It’s good to share and rotate driving duties, so no one is over used and abused. In our group, the unwritten rule is that on longer out of town trips, passengers kick in for gas or buy lunch. It’s also great if one person helps with navigation, so the driver can concentrate on driving. Also passengers should be looking for unplanned shots along the way. Many of my best shots came before or after reaching our main destination. Good pictures are wherever and whenever you find them. Also keep an eye out for things that might be good shots with better light or skies or at a different time of day. You may not get the shot this time, but keep it in mind for later.
After a shoot share and compare images. This can be by email, websites, or prints. It’s always interesting to see how others shot an edited the same or similar subjects.
Your group doesn’t have to be the same all of the time. The number and individual members will frequently vary. Just as variety in photography is beneficial, the different ideas and viewpoints of different group members can help spark creativity.
While there are workshops, and club fieldtrips (and they each have their strengths and advantages), I think you will really enjoy the more informal and frequent small group outings. They are more likely to get you out moving, and there is much more collective knowledge and creativity in multiple minds. In our own photography club, (PSC) I’ve seen several groups form based on interests and even where the members live. I feel this is one of the ways to get the most out of belonging to a camera club. Start small with maybe just one friend, and then gradual expand as you find like-minded photographers.
One of the most useful features in Lightroom is Virtual Copies. As a quick reminder, when you edit an image in Lightroom (LR), you are not making changes to the original image. Rather, you are creating a set of instructions that tells LR how to display this image. These instructions are stored in the LR catalog. As a result, if you use a file manager to copy an image that has been edited in LR, or open the image in another program, you won’t see the edits, only the original image. To use the image with LR edits, you must export the image from LR.
Virtual copies are simply copies of the image with new and different editing instructions. The master image is not altered or duplicated. And because a virtual copy is nothing more than a new set of instructions it takes up almost no disk space. The virtual copies exist only within LR’s catalog, and if you go looking for these virtual copies with a file manager, you won’t find them because they exist only as sets of instructions in the LR Catalog.
So, what are some reasons to use virtual copies? Let’s say you want to look at several different ways of editing or cropping your image, and still have the original for comparison. Or maybe you have an image that you need to use in several places, but one needs to be cropped vertical, one square, and one horizontal. Virtual copies are the perfect solution.
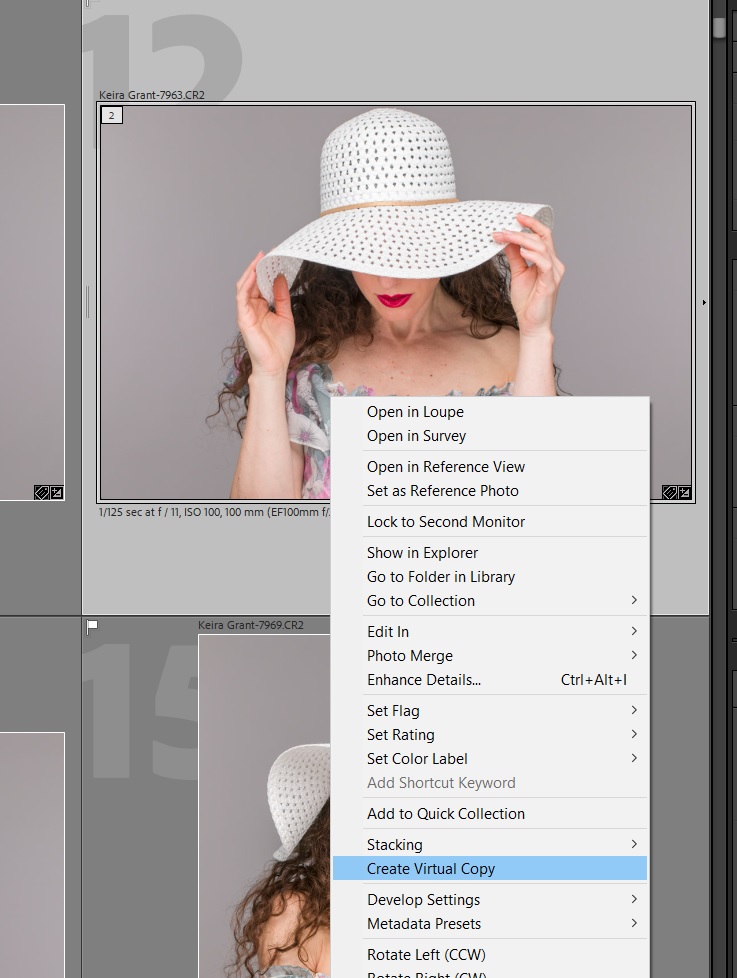
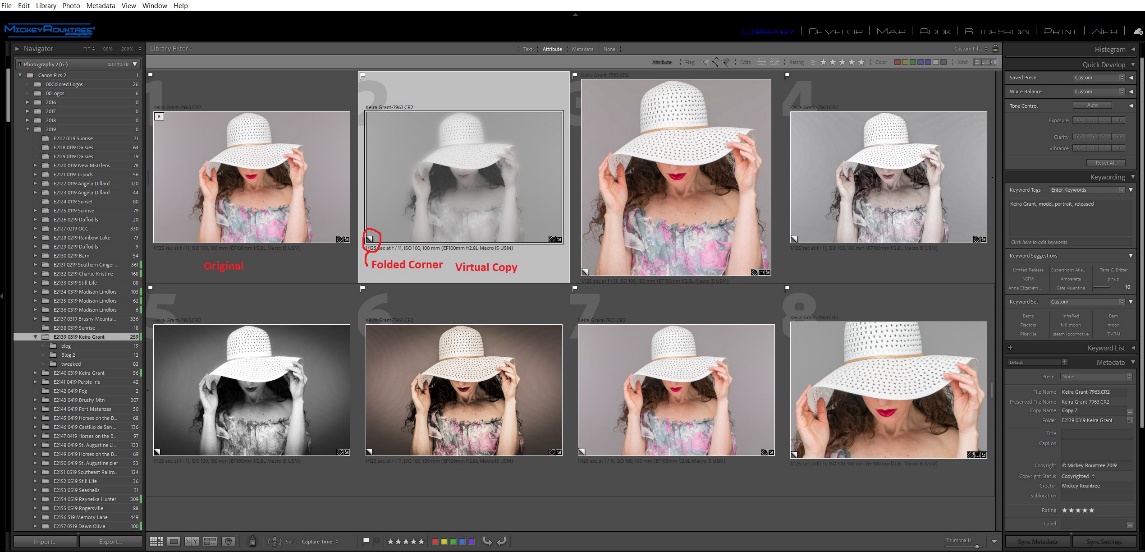
To create a virtual copy, right click on an image and choose create virtual copy, or use the keyboard shortcut Ctrl (Cmd) + ‘. You can make as many virtual copies of an image as you like. Virtual copies can be recognized by the folded up lower left corner.
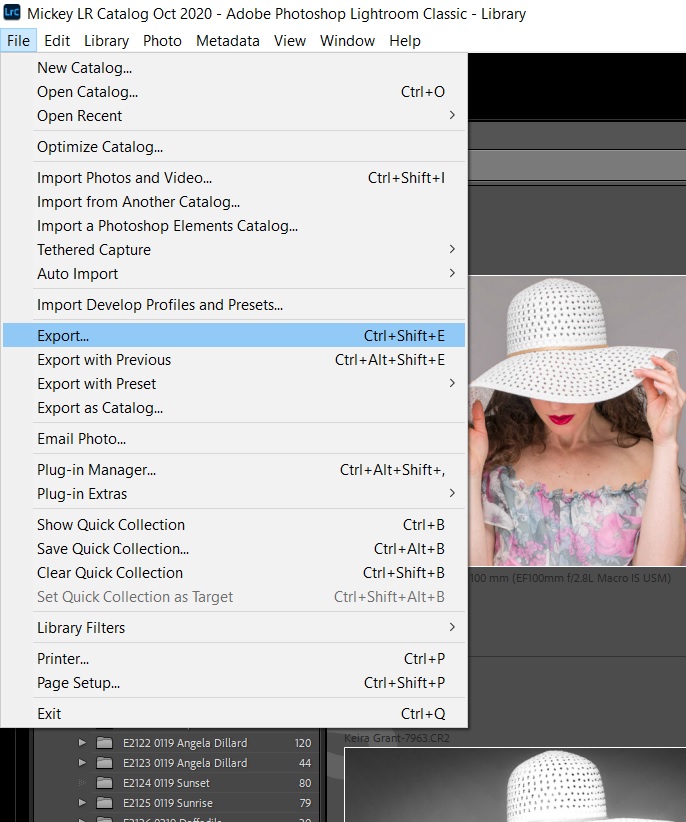
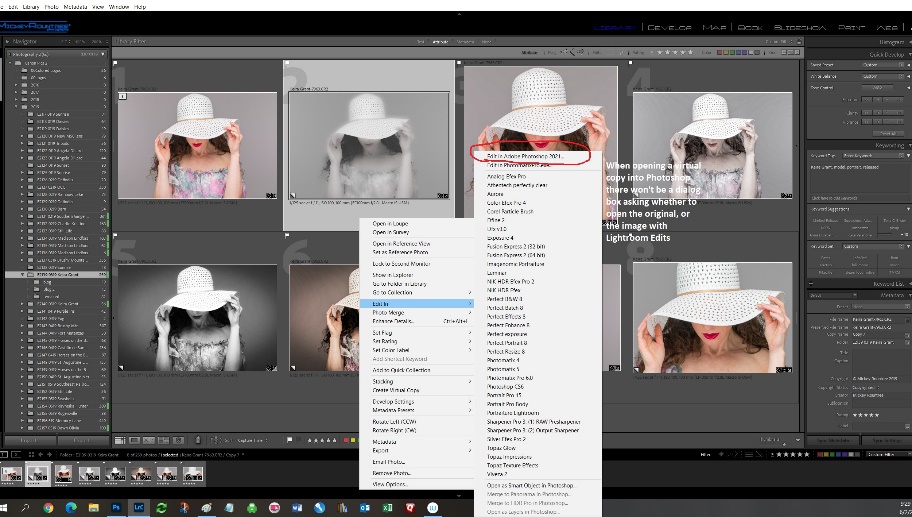
You can export virtual copies, or send them to Photoshop for further editing. To delete a virtual copy, select and hit delete, or right click and choose remove photo. In either case you’ll be asked if you want to remove the copy from LR. This will not delete the original image from LR or from the disk.
I use virtual copies regularly to try different looks or frequently to have different cropping versions readily available. If you have never tried using virtual copies, I think you will quickly realize how handy they are, and you’ll find ways to incorporate them into your workflow.